Easy Guacamole Recipe

Easy Guacamole Recipe: The Best 5-Minute Guac

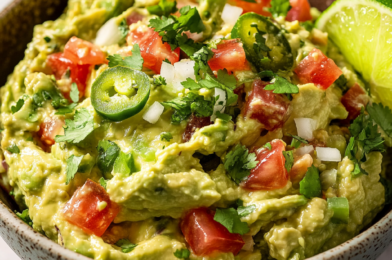
The vibrant green of perfectly ripe avocados, the zing of fresh lime, and a subtle kick of jalapeño – that’s the dream of truly amazing guacamole. Looking for an easy guacamole recipe that delivers on flavor and speed? You’ve found it!

We’ll show you how to whip up a fresh, creamy, and irresistibly tangy dip in just five minutes. Discover the secrets to perfect texture, vibrant color, and balanced flavor. It’s sure to become your new go-to.

This isn’t just another avocado dip; it’s a game-changer for busy weeknights and spontaneous gatherings. It’s packed with fresh ingredients, simple to prepare, and always a crowd-pleaser. Whether you’re fueling up for game day, hosting happy hour, or simply making taco night extra special, this homemade guacamole is your ticket to deliciousness. You’ll love how quickly it comes together!

Why You’ll Love This Recipe

You’ll adore this recipe because it truly lives up to its “easy” name. It comes together in mere minutes. It’s a fantastic solution for busy parents who want to serve healthy, flavorful snacks without spending hours in the kitchen.

The creamy texture, bright acidity from the lime, and subtle warmth from the spices create a truly addictive experience. What surprised me in testing was how quickly these simple ingredients transform into something so incredibly satisfying.

This guacamole is also incredibly versatile. It’s perfect for kid-friendly meals or more sophisticated adult palates. The fresh cilantro and finely minced red onion add a delightful crunch and aromatic depth. Plus, its vibrant green hue is always a welcome sight on any table, signaling freshness and deliciousness.

Ingredients You’ll Need

Making the best easy guacamole recipe starts with a few high-quality ingredients. You don’t need a long list, just fresh components that shine. Here are the essential guacamole ingredients:

  • Avocados: Choose three medium ripe avocados. Their creamy flesh forms the luxurious base of your dip. Ripe avocados are essential for a smooth, rich texture.
  • Lime Juice: One to two tablespoons of fresh lime juice adds essential tanginess. It also helps keep the avocado bright green. Freshly squeezed lime is always superior to bottled.
  • Sea Salt: About half a teaspoon of sea salt enhances all the other flavors, making them pop. You can always adjust this to your personal taste.
  • Red Onion: A quarter cup of finely chopped red onion provides a crisp texture and a pungent, savory bite. Its vibrant color also adds visual appeal.
  • Jalapeño: One deseeded and finely minced jalapeño offers a gentle kick without overwhelming heat. Removing the seeds is key for a milder flavor profile.
  • Fresh Cilantro: Two to three tablespoons of chopped fresh cilantro brings a bright, herbaceous note. This is classic in Mexican cuisine. It truly ties all the flavors together.
  • Tomatoes: Two small, deseeded, and diced tomatoes add a touch of juicy sweetness and a lovely pop of color. Make sure to deseed them to prevent a watery dip.
  • Garlic: One finely minced clove of garlic deepens the savory profile with its pungent aroma. A little garlic goes a long way in this avocado dip.
  • Ground Cumin: Half a teaspoon of ground cumin introduces an earthy, warm spice that complements the other ingredients beautifully. It adds an authentic touch.
  • Chipotle Powder or Chili Powder: An eighth of a teaspoon of chipotle powder offers a smoky depth. Chili powder provides a mild, earthy warmth. This optional addition adds another layer of flavor.
  • Freshly Ground Black Pepper: A quarter teaspoon of black pepper adds a subtle, sharp finish to the overall taste. Freshly ground is always best for flavor.

How to Make Easy Guacamole Recipe

Making this easy guacamole recipe is incredibly straightforward. It’s perfect for when you need a quick and delicious appetizer. Follow these simple steps to create a creamy, flavorful dip that everyone will love.

1. Preparing the Avocados

  1. Cut open the three ripe avocados lengthwise, carefully working around the pit. Remove the pit from each half by gently twisting it out or using a spoon.
  2. Use a spoon to scoop the vibrant green avocado flesh directly into a medium-sized mixing bowl. You’ll want a bowl large enough to mash and mix comfortably.
  3. Grab a potato masher or a sturdy fork and gently mash the avocado flesh. Aim for a slightly chunky consistency at this stage; we don’t want it perfectly smooth just yet.

2. Mixing in the Flavors

  1. To the mashed avocado, add the lime juice, finely minced garlic, finely chopped red onion, and deseeded and minced jalapeño. This is where the magic starts to happen!
  2. Next, stir in the chopped fresh cilantro, ground cumin, and the chipotle powder or chili powder if you’re using it. Add the sea salt and freshly ground black pepper.
  3. Stir all these wonderful ingredients together until they’re evenly combined. This ensures every bite will be bursting with flavor. I’ve always found that mixing thoroughly here makes a big difference.

3. Adding the Final Touch

  1. Gently fold in the deseeded and diced tomatoes. Stir just enough to incorporate them without over-mashing the guacamole further.
  2. Taste your freshly made guacamole and adjust the seasonings as needed. You might want to add a little extra salt for more savory depth or a splash more lime juice for added brightness.

4. Resting and Storing

  1. For the best flavor, let the guacamole sit for at least 30 minutes at room temperature before serving. This resting period allows the flavors to meld beautifully.
  2. If you’re making it more than 30 minutes ahead of time, or have leftovers, refrigerate it immediately. To prevent browning, press plastic wrap directly onto the surface of the guacamole, eliminating any air pockets. Then, store it in an airtight container.

Expert Tips and Tricks

Mastering homemade guacamole is simple with a few key insights. These tips will your avocado dip is always fresh, flavorful, and perfectly green.

  • Choose Perfectly Ripe Avocados: The foundation of great guacamole is ripe avocados. Look for Hass avocados that are dark green to almost black and yield slightly to gentle pressure. If the stem cap pulls off easily to reveal green underneath, it’s ready. Brown means it’s overripe.
  • Don’t Over-Mash: For the best texture, mash most of the avocado until creamy but leave some small chunks. This provides a satisfying mouthfeel and prevents the guacamole from becoming too uniform or paste-like.
  • Finely Dice Ingredients: your red onion, jalapeño, and garlic are all very finely minced. This distributes their flavors evenly throughout the guacamole, so you don’t get a harsh bite of one ingredient.
  • The Power of Lime Juice: Fresh lime juice is crucial not only for its bright, tangy flavor but also for its acidity. This helps slow down the oxidation process that causes browning. Don’t skimp on it!
  • Let Flavors Mingle: While you can serve it immediately, allowing your guacamole to rest for 30 minutes at room temperature lets the various flavors meld and deepen. This simple step makes a noticeable difference.
  • Adjust Spice to Your Liking: If you prefer less heat, remove all seeds and white membranes from the jalapeño. For more spice, leave some seeds in or even add a second, smaller jalapeño.

Recipe Variations and Substitutions

This easy guacamole recipe is wonderfully flexible. It allows you to customize it to your taste or dietary needs. You can easily adapt it for different occasions or to use up ingredients you have on hand.

For those who prefer a milder flavor, simply omit the jalapeño entirely. If you’re sensitive to spice, you might also consider rinsing the finely diced red onion under cold water for a minute or two. This helps mellow its sharpness. Conversely, if you crave more heat, try adding a pinch of cayenne pepper or a dash of hot sauce along with the chipotle powder.

To add more texture and make it a heartier avocado dip, consider stirring in some grilled corn kernels or a quarter cup of drained black beans. These additions are fantastic for making the guacamole more substantial for a party spread. For an unique sweet and savory twist, especially in summer, I’ve found that diced mango or pineapple works beautifully. Just remember to add these juicy mix-ins right before serving to prevent excess moisture. If you don’t have fresh cilantro, a small amount of finely chopped parsley can offer a similar fresh, green note, though the flavor profile will be slightly different.

Serving and Pairing Suggestions

This easy guacamole recipe is incredibly versatile. It pairs well with a wide array of dishes. Of course, the classic pairing with crispy tortilla chips is always a winner for any gathering. It’s the ultimate appetizer for happy hour, game day, or a casual get-together with friends.

Beyond chips, it makes a fantastic topping for your favorite Mexican-inspired meals. Spoon generous dollops onto fish tacos, chicken fajitas, or a hearty breakfast burrito. For a lighter, healthier option, serve it alongside crunchy vegetable sticks like carrots, bell peppers, or cucumber slices. You can also use it as a creamy spread in sandwiches or wraps instead of mayonnaise.

To plate it beautifully, garnish your bowl of guacamole with a sprinkle of extra chopped cilantro. A lime wedge or a tiny dusting of chipotle powder can add a vibrant finish.

Frequently Asked Questions

How do you keep easy guacamole recipe from turning brown?

To keep your easy guacamole recipe from turning brown, press plastic wrap directly onto its surface, ensuring no air pockets remain. The acidity from the lime juice also helps slow down oxidation. Storing it in an airtight container in the refrigerator further extends its freshness.

What are some popular mix-ins for guacamole?

Popular mix-ins for guacamole include diced tomatoes, roasted corn, black beans, diced mango or pineapple, and crumbled cotija cheese. You can also add extra garlic, a different type of chili pepper, or even a dash of your favorite hot sauce for a personalized touch.

Can you make guacamole ahead of time?

Yes, you can make guacamole ahead of time, but it’s best enjoyed within 1-2 days for optimal freshness and color. Make sure to follow the browning prevention tips, like pressing plastic wrap directly onto the surface, to maintain its vibrant green hue.

What’s the best way to ripen avocados for guacamole?

The best way to ripen avocados is to place them in a brown paper bag with a ripe banana or apple. These fruits release ethylene gas, which accelerates the ripening process. Store the bag at room temperature and check daily until the avocados yield slightly to gentle pressure.

What can I substitute for lime juice in guacamole?

If you don’t have lime juice, fresh lemon juice is the best substitute, offering a similar bright acidity. In a pinch, a very small amount of white vinegar or apple cider vinegar can work, but it will alter the flavor profile more significantly.

Conclusion

This easy guacamole recipe proves that incredible flavor doesn’t require endless effort. In just five minutes, you can create a creamy, tangy, and fresh avocado dip. It’ll impress everyone at your table.

It’s a testament to the power of fresh ingredients and simple techniques. It’s perfect for the busy home cook. I encourage you to try this recipe tonight and experience the difference yourself! Share your results on social media – I love seeing your culinary creations. If you enjoyed this, you might also like my recipes for Fresh Mango Salsa, Quick Pico de Gallo, or even a zesty Black Bean and Corn Salad.

Easy Guacamole Recipe

This quick and easy guacamole recipe is made with fresh, high-quality ingredients like ripe avocados, lime juice, red onion, jalapeno, cilantro, and salt. It’s a creamy, tangy, and flavorful dip perfect for taco nights, happy hour, or game day snacking.
Prep Time 5 minutes
Total Time 5 minutes
Servings: 6 servings
Cuisine: Mexican

Ingredients
  

  • 3 medium ripe avocados
  • 1-2 Tablespoons lime juice
  • 1/2 teaspoon sea salt
  • 1/4 cup finely chopped red onion
  • 1 jalapeno deseeded and finely minced
  • 2-3 Tablespoons chopped fresh cilantro
  • 2 small tomatoes deseeded and diced
  • 1 clove garlic finely minced
  • 1/2 teaspoon ground cumin
  • 1/8 teaspoon chipotle powder or chili powder
  • 1/4 teaspoon freshly ground black pepper

Method
 

Instructions
  1. Cut open avocados lengthwise, remove the pit, and use a spoon to scoop out the flesh into a medium-sized mixing bowl.
  2. Use a potato masher or fork and gently mash the avocado, leaving it a little bit chunky at this point.
  3. Add lime juice, garlic, red onion, jalapeno, cilantro, cumin, chipotle powder (if using), sea salt, and black pepper. Stir until evenly combined.
  4. Add tomatoes and stir until combined.
  5. Taste and add extra salt or lime juice if needed.
  6. Let sit for at least 30 minutes at room temperature before serving, or refrigerate if making more than 30 minutes ahead of time. To prevent browning, press plastic wrap directly onto the surface of the guacamole and store in an airtight container.


Cheesy Sausage Balls

Best Cheesy Sausage Balls Recipe – Easy Appetizer

The aroma of warm, savory bites wafting from the kitchen instantly signals comfort and good times. Few appetizers capture that feeling quite like classic cheesy sausage balls. These aren’t just any party bites; they’re a Southern tradition, beloved for their irresistible flavor and tender texture. This easy recipe delivers savory, bite-sized appetizers perfect for parties, holidays, or game day, and you’ll learn exactly how to make them perfectly every time.

This recipe is incredibly straightforward, using just three core ingredients to create a truly delicious make-ahead appetizer. It’s perfect for busy families needing quick, kid-friendly meals or impressive party food without the fuss.

Why You’ll Love This Recipe

First, the sheer simplicity is a game-changer for busy professionals. You won’t spend hours in the kitchen, yet you’ll produce a dish that tastes like you did. This recipe delivers big flavor with minimal effort, which is exactly what a busy family needs.

Then there’s the taste: a perfect balance of savory pork, sharp cheddar, and a tender, biscuit-like crumb. Each bite of these cheesy sausage balls is meaty, tender, and bursting with cheesy goodness. They’re also incredibly versatile, equally at home on a breakfast platter, a game-day spread, or a festive holiday buffet.

And for parents, these are a guaranteed kid-friendly recipe, making mealtime or snack time a breeze. They’re easy for little hands to pick up and enjoy, often becoming a fast favorite. Plus, they’re a fantastic make-ahead appetizer, giving you more time to enjoy your guests.

Ingredients You’ll Need

Here are the simple ingredients that come together to create these delightful cheesy sausage balls. You’ll be surprised at how much flavor you can get from so few items.

  • Ground Pork Sausage: The foundation of these savory bites, providing rich flavor and essential fat for moisture. You can opt for mild breakfast sausage or a hot variety for an extra kick.
  • Biscuit Baking Mix: This acts as both flour and leavening, creating that signature tender texture. Think of it as the secret to easy bisquick sausage balls, ensuring a soft interior.
  • Sharp Cheddar Cheese, shredded: Adds a tangy, creamy element that melts beautifully into the sausage. Freshly shredded is always best for superior melt and flavor in your sausage cheese balls.

How to Make Cheesy Sausage Balls

Making these delicious cheesy sausage balls is a breeze, even for novice cooks. Just follow these clear, step-by-step instructions. You’ll have a batch of savory bites ready in no time.

1. Prep Your Ingredients

  1. Remove ground sausage from the refrigerator and let it sit at room temperature for 30 minutes. This ensures even mixing and cooking, preventing a tough texture.
  2. Preheat your oven to 350 degrees F (175 degrees C). Line your baking sheets with parchment paper for easy cleanup and to prevent sticking.

2. Mix and Roll

  1. In a large bowl, combine the room temperature sausage and biscuit mix. Use your hands to thoroughly mix these two ingredients until they are well combined. It might feel a bit crumbly at first, but keep working it.
  2. Add the shredded Cheddar cheese to the mixture. Continue mixing with your hands until the cheese is fully incorporated, ensuring every bite is cheesy. What surprised me was how quickly the mixture comes together once the cheese is added.
  3. Roll the mixture into about 30 walnut-sized balls, approximately 1-inch in diameter. Uniform size helps them cook evenly. Transfer these cheesy sausage balls to your prepared baking sheets, spaced evenly apart.

3. Bake to Golden Perfection

  1. Bake in the preheated oven for 20 to 25 minutes. They should be golden brown on the outside and the sausage cooked through to a safe internal temperature.

Expert Tips and Tricks

Getting perfect cheesy sausage balls is simple with a few insider tips. These pointers will help you achieve that ideal tender texture and rich flavor every time.

  • Room Temperature Sausage is Key: Letting your ground sausage come to room temperature makes it much easier to mix with the other ingredients. This prevents overworking the mixture, which can lead to tough sausage balls.
  • Don’t Overmix: Once ingredients are just combined, stop mixing. Overworking the dough can develop the gluten in the biscuit mix, resulting in a less tender texture. In my kitchen, I’ve found a gentle touch makes all the difference.
  • Shred Your Own Cheese: While pre-shredded cheese is convenient, it often contains anti-caking agents that can affect how well the cheese melts and combines. Freshly shredded sharp cheddar will give you the best flavor and texture for your cheesy sausage balls.
  • Uniform Balls for Even Baking: Use a small cookie scoop or a tablespoon to portion out your mixture. Then, quickly roll them between your palms to create consistent 1-inch balls. This ensures all your cheesy sausage balls cook at the same rate.
  • Parchment Paper is Your Friend: Lining your baking sheets with parchment paper not only prevents sticking but also makes cleanup a breeze. No more scrubbing stubborn baked-on bits!

Recipe Variations and Substitutions

This classic recipe for cheesy sausage balls is fantastic as is, but it also serves as a wonderful base for creative variations. Feel free to experiment with these ideas to suit your taste or dietary needs.

Spice It Up: For those who love a kick, swap out the mild ground pork sausage for a hot variety. You could also add a pinch of red pepper flakes or a dash of cayenne pepper to the mixture for extra heat. This simple change can transform the flavor profile significantly.

Cheesy Alternatives: While sharp cheddar is classic, feel free to experiment with other cheeses. Pepper Jack adds a spicy twist, while Colby Jack offers a milder, creamier flavor to your sausage cheese balls. A blend of cheeses can also create a more complex taste.

Add a Touch of Creaminess: For an extra moist and tender bite, consider making cream cheese sausage balls. Simply add 4 ounces of softened cream cheese to the mixture along with the shredded cheddar. This will make them incredibly rich and melt-in-your-mouth delicious!

Herbal Infusion: A tablespoon of finely chopped fresh chives or parsley can add a lovely subtle flavor and a pop of color. Mix it in with the cheese for an aromatic boost. You might even try a sprinkle of dried sage for a more traditional holiday flavor.

Serving and Pairing Suggestions

These cheesy sausage balls are incredibly versatile, making them perfect for any occasion. They are designed to fit seamlessly into a busy lifestyle.

Serve them warm as a delightful breakfast alongside scrambled eggs and fresh fruit, or as a savory snack for hungry kids after school. They’re a fantastic way to start the day or bridge the gap until dinner. They shine as a make ahead appetizer for holiday gatherings, game days, or casual get-togethers. Arrange them on a platter with your favorite dipping sauces like honey mustard, ranch, or a tangy BBQ sauce.

For a fun party food spread, pair them with mini quiches, fruit skewers, and a colorful veggie tray. They disappear fast, so be sure to make a double batch! I’ve found that they are always the first thing to go at any event.

Frequently Asked Questions

What are the best variations for cheesy sausage balls? You can easily vary cheesy sausage balls by changing the type of sausage, like using hot Italian or sage sausage for different flavor profiles. Experiment with cheeses like Pepper Jack or Colby Jack, or add softened cream cheese for extra moisture. Fresh herbs like chives or parsley also make a great addition.

Can you freeze cheesy sausage balls? Yes, you can absolutely freeze cheesy sausage balls! You can freeze them raw or baked. For raw, roll them into balls, flash freeze on a baking sheet until solid, then transfer to a freezer-safe bag for up to 3 months. Bake from frozen, adding a few extra minutes to the cooking time. Baked balls can be frozen similarly and reheated.

What kind of sausage and cheese should I use for sausage balls? For classic sausage cheese balls, ground pork breakfast sausage (mild or hot) is traditional and provides good fat content for moisture. Sharp cheddar cheese is highly recommended for its flavor that stands up well to the sausage. You can also use other cheeses like Colby, Monterey Jack, or Pepper Jack for variety.

Why are my sausage balls dry and how can I fix them? Dry sausage balls often result from too much baking mix or not enough fat in the sausage. you’re using ground pork sausage with a good fat content, as this recipe relies on it for moisture. If your mixture feels too dry before baking, you can try adding a tablespoon or two of milk or an extra ounce of shredded cheese to help bind it.

How long do sausage balls last in the refrigerator? Cooked cheesy sausage balls will last in an airtight container in the refrigerator for 3-4 days. Uncooked sausage balls can be stored in the refrigerator for up to 2 days before baking. Always they are properly cooled before storing to maintain freshness and prevent spoilage.

Conclusion

These cheesy sausage balls prove that some of the best recipes are also the simplest. With just three ingredients, you get a tender, savory bite that’s perfect for any time of day or occasion. I’ve learned that getting the right consistency makes all the difference for that perfect texture.

Give this easy recipe a try for your next family breakfast or game day gathering, and let me know what you think in the comments below! For more quick and delicious appetizers, our recipes for savory dips, easy puff pastry bites, or quick cheese spreads.

Cheesy Sausage Balls

Cheesy, meaty, and tender sausage balls are a staple passed hors d’oeuvres at holiday parties throughout the South. These savory bites are perfect for breakfast, appetizers, or game-day nibbles.
Prep Time 10 minutes
Cook Time 20 minutes
Total Time 30 minutes
Servings: 15 servings
Cuisine: American

Ingredients
  

  • 1 pound ground pork sausage
  • 2 cups biscuit baking mix
  • 1 pound sharp cheddar cheese shredded

Method
 

Instructions
  1. Remove ground sausage from refrigerator and let sit at room temperature for 30 minutes before preparing.
  2. Preheat oven to 350 degrees F (175 degrees C). Line baking sheets with parchment paper.
  3. In a large bowl, combine room temperature sausage and biscuit mix. Mix with your hands until well combined.
  4. Add shredded Cheddar cheese and mix until fully incorporated.
  5. Roll mixture into about 30 walnut-sized balls (approximately 1-inch balls). Transfer to prepared baking sheets, spaced evenly apart.
  6. Bake in the preheated oven for 20 to 25 minutes, until golden brown and sausage is cooked through.


Brown Sugar Pecan Cookies

Brown Sugar Pecan Cookies: Easy & Delicious Recipe

That first bite of a perfectly baked cookie, warm from the oven, is pure bliss. It’s a moment of comfort, a sweet escape that reminds us of home. These brown sugar pecan cookies deliver exactly that feeling, offering a delightful combination of nutty warmth and sweet, tender chewiness. You’ll find this recipe surprisingly straightforward, resulting in a batch of irresistible treats.

This recipe is designed for ease, making it perfect for busy families looking for a homemade touch without the fuss. We’ll walk through each step, ensuring you achieve soft, chewy cookies with that signature crispy edge every time.

Why You’ll Love This Recipe

You’re going to adore these cookies for their incredibly satisfying texture. They boast a tender, soft center that melts in your mouth, perfectly contrasted by slightly crispy edges. It’s a truly delightful experience with every single bite.

The flavor profile is equally captivating, with rich brown sugar notes perfectly complemented by the earthy, buttery crunch of toasted pecans. Baking these cookies will fill your kitchen with a heartwarming aroma, making your home feel cozy and inviting. Plus, they’re a fantastic kid-friendly recipe that everyone will enjoy, whether for an afternoon snack or a special dessert.

Ingredients You’ll Need

Here’s what you’ll gather to create these delightful brown sugar pecan cookies:

  • Unsalted Butter: Softened to room temperature, this provides the rich, creamy base for our cookies.
  • Brown Sugar (packed): Essential for that deep, caramel-like flavor and contributes significantly to the cookies’ soft, chewy texture.
  • Granulated Sugar: Adds a touch of sweetness and helps create those coveted crispy edges.
  • Large Egg: Acts as a binder, bringing all the ingredients together while adding moisture.
  • Pure Vanilla Extract: A must-have for depth of flavor, it truly brightens the entire cookie.
  • All-Purpose Flour: The structural foundation of our cookie dough.
  • Baking Powder & Baking Soda: These leavening agents your cookies rise beautifully and achieve a light texture.
  • Salt: Balances the sweetness and brings out all the other flavors.
  • Pecan Halves: Toasted and chopped, these provide a wonderful nutty flavor and satisfying crunch.

How to Make Brown Sugar Pecan Cookies

Making these brown sugar pecan cookies is a rewarding process, and following these steps will perfect results.

1. Prepare the Pecans

  1. Preheat your oven to a gentle 300°F (150°C). This low temperature is ideal for toasting nuts without burning them.
  2. Spread the pecan halves evenly on a lined baking sheet. Bake them for 8–10 minutes until fragrant and lightly golden.
  3. Let the toasted pecans cool for a few minutes on the baking sheet. Once cool enough to handle, chop them coarsely. You’ll use 3/4 cup in the dough, reserving the rest for garnish. Turn off the oven for now.

2. Mix the Dough

  1. In a medium bowl, whisk together the all-purpose flour, baking powder, baking soda, and salt. Set these dry ingredients aside.
  2. In a large bowl, using a handheld or stand mixer with a paddle attachment, beat the softened butter and both brown sugar and granulated sugar together on high speed. Continue beating for about 2 minutes until the mixture is completely smooth and creamy.
  3. Add the large egg and pure vanilla extract to the creamed butter mixture. Beat on high speed for about 1 minute until everything is well combined. Don’t forget to scrape down the sides and bottom of the bowl to an even mix.
  4. Gradually add the dry ingredients to the wet ingredients, mixing on low speed until just combined. Be careful not to overmix the dough. Stir in 3/4 cup (90g) of the toasted chopped pecans. The dough will be a bit soft; if it seems too sticky, add 1 more tablespoon of flour.

3. Chill and Cut

  1. Divide the soft dough into two equal portions. Place each portion onto a piece of lightly floured parchment paper or a silicone baking mat.
  2. With a lightly floured rolling pin, roll each dough portion out to an even 1/4-inch thickness. Add more flour if the dough becomes too sticky during rolling. The shape doesn’t matter much at this stage, just the consistent thickness.
  3. Lightly dust one rolled-out dough with flour, then place a piece of parchment paper on top. Stack the second rolled-out dough on top of this. Cover the entire stack tightly with plastic wrap or aluminum foil, then refrigerate for at least 1–2 hours, or up to 2 days. This cookie dough chilling step is crucial for preventing spread and achieving crisp edges.

4. Bake the Cookies

  1. Once the dough is chilled, preheat your oven to 350°F (177°C). Line 2–3 large baking sheets with parchment paper or silicone baking mats.
  2. Carefully remove the top dough piece from the refrigerator. Using your favorite cookie cutter, cut the dough into shapes. Re-roll any dough scraps and continue cutting until all the dough is used. Repeat this process with the second piece of dough.
  3. Arrange the cut-out cookies on the prepared baking sheets, leaving about 3 inches between each cookie. This spacing allows for proper air circulation.
  4. Bake for 12–13 minutes, or until the edges are lightly browned. If your oven has hot spots, rotate the baking sheets halfway through the bake time for even cooking.
  5. Allow the brown sugar pecan cookies to cool on the baking sheet for 5 minutes. Then, carefully transfer them to a wire rack to cool completely before adding any delicious brown sugar frosting or other decorations.

Expert Tips and Tricks

  • Don’t skip toasting the pecans: This simple step makes a huge difference. Toasting truly brings out their deep, nutty flavor, making the cookies much more aromatic and delicious. In testing, I found raw pecans resulted in a flatter, less flavorful cookie.
  • Proper butter temperature is key: your butter is softened to room temperature but not melted. It should be pliable enough to indent with your finger without being greasy. This helps achieve a smooth, creamy dough.
  • Roll before you chill: This is a game-changer for cut-out cookies. Rolling the dough while it’s soft makes it much easier to work with than trying to roll stiff, cold dough. What surprised me was how much easier it made the entire process.
  • Don’t overmix the flour: Once you add the dry ingredients, mix only until just combined. Overmixing develops the gluten, which can lead to tough cookies.
  • Chill time matters: The 1-2 hours of cookie dough chilling is essential for preventing the cookies from spreading too much in the oven. It helps them hold their shape and contributes to that desired soft-chewy texture.
  • Slightly underbake for chewiness: Pull the cookies from the oven when the edges are lightly golden but the centers still look a bit soft. They will continue to set and firm up as they cool on the baking sheet, ensuring a perfectly chewy cookie.

Recipe Variations and Substitutions

These brown sugar pecan cookies are wonderful as is, but you can easily customize them to your taste or dietary needs.

For a different nutty flavor, you can substitute other nuts. Walnuts or even toasted almonds would be delicious in place of pecans, offering a similar crunch and earthy note. If you’re looking to make maple pecan cookies, add 1/2 teaspoon of maple extract along with the vanilla extract to the wet ingredients. This will give a lovely, warm maple undertone that pairs beautifully with the pecans.

To make them gluten-free, you can try a 1:1 gluten-free all-purpose flour blend. Be aware that the texture might vary slightly, but many blends work well in cookie recipes. If you want to skip the frosting, a sprinkle of flaky sea salt on top of the warm cookies after baking provides a lovely contrast to the sweetness. For a richer, more decadent cookie, consider adding 1/2 cup of mini chocolate chips along with the pecans.

Serving and Pairing Suggestions

These brown sugar pecan cookies are delightful on their own, but they truly shine when paired thoughtfully. For a classic pairing, serve them with a tall glass of cold milk or a warm mug of coffee or tea. The rich, nutty flavor of the cookies complements both perfectly.

For a more indulgent dessert, consider topping them with a scoop of vanilla bean ice cream or a dollop of freshly whipped cream. They also make a fantastic addition to any holiday cookie platter, especially with their festive cut-out shapes. During the fall, they’re wonderful with a spiced cider or a pumpkin latte. These cookies are also sturdy enough to be packaged as thoughtful homemade gifts for friends and family.

Frequently Asked Questions

Q1: How do you make brown sugar pecan cookies from scratch? Making brown sugar pecan cookies from scratch involves creaming butter and sugars, adding egg and vanilla, then mixing in dry ingredients and toasted pecans. The dough is then rolled, chilled, cut into shapes, and baked until lightly golden.

Q2: Can I substitute other nuts in brown sugar pecan cookies? Yes, you can absolutely substitute other nuts. Walnuts or almonds would work wonderfully, providing a similar texture and complementary nutty flavor. Just be sure to toast them first for the best results.

Q3: How long do brown sugar pecan cookies stay fresh? When stored in an airtight container at room temperature, these brown sugar pecan cookies will stay fresh for up to 5 days. For optimal softness, you can place a slice of bread in the container to help retain moisture.

Q4: What makes brown sugar pecan cookies soft and chewy? The combination of both brown and granulated sugars, along with proper chilling and slightly underbaking, contributes to their soft and chewy texture. Brown sugar adds moisture and a rich, tender crumb, while baking until just set ensures they don’t dry out.

Q5 Can you freeze brown sugar pecan cookie dough? Yes, you can freeze the cookie dough! After preparing the dough through step 6, wrap each portion tightly in plastic wrap and freeze for up to 3 months. Thaw in the refrigerator before rolling, cutting, and baking as directed.

Conclusion

These brown sugar pecan cookies offer a perfect blend of tender chewiness and rich, nutty flavor, making them an instant family favorite. The key to their success lies in toasting the pecans and allowing the dough sufficient time to chill. You’ll find that the effort is truly worth the reward.

I hope you try this recipe soon and discover the joy of these delicious chewy cookies for yourself. Share your baking adventures with me in the comments below! If you loved these, you might also enjoy my classic chocolate chip cookies, a comforting apple pie, or some festive gingerbread cut-outs.

Brown Sugar Pecan Cookies

These soft and chewy brown sugar pecan cookies are made with toasted pecans, brown sugar, and plenty of butter, often topped with a brown sugar frosting. They are a delightful treat for any occasion, offering a tender, soft center with crispy edges and a nutty flavor.
Prep Time 18 minutes
Cook Time 10 minutes
Total Time 28 minutes
Servings: 24 cookies
Cuisine: American

Ingredients
  

  • 1 cup 226g unsalted butter, softened to room temperature
  • 1 cup packed light or dark brown sugar
  • 1/2 cup granulated sugar
  • 1 large egg at room temperature
  • 2 teaspoons pure vanilla extract
  • 2 1/4 cups 281g all-purpose flour
  • 1/2 teaspoon baking powder
  • 1/2 teaspoon baking soda
  • 1/4 teaspoon salt
  • 1 1/4 cups 150g pecan halves, toasted and chopped

Method
 

Instructions
  1. Preheat oven to 300°F (150°C).
  2. Spread the pecans on a lined baking sheet and bake for 8–10 minutes. Let cool for a few minutes, then chop. You’ll use 3/4 cup (about 90g) in the dough, and save the rest for garnish. Turn off the oven for now.
  3. Whisk the flour, baking powder, baking soda, and salt together in a medium bowl. Set aside.
  4. In a large bowl using a handheld or stand mixer fitted with a paddle attachment, beat the butter and brown sugar together on high speed until completely smooth and creamy, about 2 minutes.
  5. Add the egg and vanilla, and beat on high speed until combined, about 1 minute. Scrape down the sides and up the bottom of the bowl and beat again as needed to combine.
  6. Add the dry ingredients to the wet ingredients and mix on low until combined. Stir in 3/4 cup (90g) toasted chopped pecans. Dough will be a bit soft. If the dough seems too soft and sticky for rolling, add 1 more Tablespoon of flour.
  7. Divide the dough into 2 equal parts. Place each portion onto a piece of lightly floured parchment paper or a lightly floured silicone baking mat. With a lightly floured rolling pin, roll the dough out to about 1/4-inch thickness. Use more flour if the dough seems too sticky. The rolled-out dough can be any shape, as long as it is evenly 1/4-inch thick.
  8. Lightly dust one of the rolled-out doughs with flour. Place a piece of parchment on top. Place the second rolled-out dough on top. Cover with plastic wrap or aluminum foil, then refrigerate for at least 1–2 hours and up to 2 days.
  9. Once chilled, preheat oven to 350°F (177°C). Line 2–3 large baking sheets with parchment paper or silicone baking mats.
  10. Carefully remove the top dough piece from the refrigerator. Using a cookie cutter, cut the dough into shapes. Re-roll the remaining dough and continue cutting until all is used. Repeat with second piece of dough.
  11. Arrange cookies on baking sheets about 3 inches apart. Bake for 12–13 minutes or until lightly browned around the edges. If your oven has hot spots, rotate the baking sheet halfway through bake time.
  12. Allow cookies to cool on the baking sheet for 5 minutes, then transfer to a wire rack to cool completely before decorating.


King Ranch Chicken Casserole

King Ranch Chicken Casserole: Ultimate Easy Recipe

Imagine a dish so comforting, so rich with flavor, it transports you straight to a Tex-Mex kitchen. That’s exactly what you get with a classic King Ranch Chicken Casserole. This beloved dish layers tender chicken, cheesy goodness, and a creamy, zesty sauce between crisp tortilla strips. It’s a hearty meal that truly satisfies, perfect for any family dinner or a lively potluck.

We’re diving into an easy-to-follow recipe that brings all that classic taste to your table without the fuss. You’ll learn how to craft this iconic casserole from scratch, ensuring a fresh, homemade taste every time. Get ready to impress your family with a meal they’ll ask for again and again.

Why You’ll Love This Recipe

This King Ranch Chicken Casserole isn’t just another dinner; it’s a culinary hug in a dish. Busy weeknights often call for quick solutions, and this recipe delivers big on convenience and flavor. It comes together with minimal fuss, making it a fantastic option when time is short but you still crave something homemade.

The creamy chicken sauce, infused with savory spices and bright Rotel, perfectly complements the juicy chicken. You’ll enjoy the delightful contrast of textures from the soft, cheesy layers and the slightly crisp tortilla strips. It’s a truly satisfying Tex-Mex casserole that appeals to both adults and kids, ensuring clean plates all around. Plus, making it from scratch means you control the ingredients, avoiding any canned soup for a fresher, more wholesome meal.

Ingredients You’ll Need

Creating this incredible casserole starts with a few simple ingredients. Each one plays a crucial role in building the layers of flavor and texture. Here’s what you’ll gather for your ultimate King Ranch Chicken Casserole:

  • Boneless, skinless chicken breast: Provides lean protein. You can also use pre-cooked rotisserie chicken for a shortcut.
  • Chili powder: Adds a warm, earthy spice to the chicken.
  • Cooking oil: For browning the chicken and sautéing vegetables.
  • Butter: Forms the rich base for our homemade sauce.
  • Yellow onion: Offers a sweet and savory aromatic foundation.
  • Green bell pepper: Adds a touch of freshness and vibrant color.
  • All-purpose flour: Thickens the creamy sauce to perfection.
  • Chicken broth: Provides liquid for the sauce and depth of flavor.
  • Diced tomatoes with green chiles (Rotel): This is the heart of the chicken Rotel flavor, bringing a zesty kick. Make sure to drain it well.
  • Sour cream: Contributes to the luxurious, creamy chicken sauce.
  • Cheddar cheese: Melts into gooey perfection, forming the signature cheesy layers.
  • Tortilla chip strips OR corn tortillas: You can choose between the crunch of chip strips or the traditional softness of corn tortillas.
  • Green onions: An optional, fresh garnish for a pop of color and mild onion flavor.

How to Make King Ranch Chicken Casserole

Let’s get cooking! This King Ranch Chicken Casserole comes together in a few straightforward steps. You’ll be amazed at how quickly this comforting dish is ready for the oven.

1. Prepare the Chicken

  1. Preheat your oven to 375°F. Lightly spray a 9×13-inch or 3-quart baking dish with cooking spray. This prepares your casserole for easy removal.
  2. Pound the chicken breasts to an even thickness, about 3/4 to 1-inch thick. Season them generously with chili powder on both sides. This ensures even cooking and infuses flavor.
  3. Heat the cooking oil in a large skillet over medium heat. Cook the seasoned chicken until it’s beautifully browned on each side and cooked through, which takes about 5 minutes per side. Remove the chicken to a clean cutting board to cool, then dice it into bite-sized pieces.

2. Build the Creamy Sauce

  1. In the same skillet, add the butter, diced onion, and bell pepper. Sauté these over medium heat until the onions become soft and translucent, about 5 minutes. The aroma will start to fill your kitchen.
  2. Add the flour to the skillet, stirring constantly. Continue to sauté for about 1 minute, or until the flour coats the bottom of the skillet and turns a light golden brown. This creates a roux, the base of our delicious sauce.
  3. Pour the chicken broth into the skillet, stirring vigorously to dissolve the flour and scrape up any browned bits from the bottom. Allow the broth to come to a simmer, and you’ll see it thicken into a rich gravy. Remove the skillet from the heat once it’s thickened.

3. Combine and Layer

  1. Drain the can of diced tomatoes with green chiles very well. Stir the diced cooked chicken and the drained tomatoes into the gravy in the skillet. This brings all the core flavors together.
  2. Add the sour cream and 1/2 cup of the shredded cheddar cheese to the skillet. Stir until everything is well combined and creamy. Here’s what I found: combining the cheese directly into the warm mixture helps it melt beautifully into the sauce.
  3. Layer a few handfuls of tortilla chip strips, or half of your quartered corn tortillas, into the bottom of your prepared casserole dish. This forms the first sturdy layer.
  4. Spoon half of the chicken mixture evenly on top of the chips or tortillas.
  5. Add another layer of tortilla chip strips, using about half as much as the first layer, or the remaining quartered corn tortillas.
  6. Spoon the remaining chicken mixture over this second layer of tortillas.
  7. Sprinkle the remaining 1.5 cups of shredded cheddar cheese generously over the very top. This will create a golden, bubbly crust.

4. Bake and Serve

  1. Bake the casserole in the preheated 375°F oven for 15 minutes, or until the cheese is melted and the casserole is bubbling invitingly around the edges.
  2. For an extra golden and slightly crispy top, broil the casserole for 1-2 minutes, watching very closely to prevent any burning. Cheese can brown quickly under the broiler.
  3. Sprinkle with sliced green onions immediately after baking, if desired. Serve your hot, bubbly King Ranch Chicken Casserole right away!

Expert Tips and Tricks

  • Even Chicken Thickness: Pounding your chicken breasts to an even thickness ensures they cook uniformly and remain juicy. Uneven chicken can lead to dry spots.
  • Don’t Skimp on Draining Rotel: Thoroughly draining your diced tomatoes with green chiles is crucial. Excess liquid can make your casserole watery, especially if using tortilla chips.
  • Freshly Shredded Cheese: While pre-shredded cheese is convenient, freshly shredded cheddar melts more smoothly and has a better flavor. In testing, I’ve noticed a significant difference in creaminess.
  • Prevent Mushy Tortillas: If using corn tortillas, consider lightly toasting them in a dry skillet for a minute or two before layering. This helps them hold up better against the creamy sauce and prevents them from becoming overly soft.
  • Rotisserie Chicken Shortcut: For busy nights, swap the raw chicken breast for 2-3 cups of shredded rotisserie chicken. Simply add the chili powder directly to the sauce mixture with the vegetables.
  • Watch the Broiler: Broiling gives a beautiful golden crust, but it can go from perfect to burnt in seconds. Stay by the oven and keep a close eye on it!

Recipe Variations and Substitutions

This King Ranch Chicken Casserole is wonderfully adaptable. You can easily tweak it to suit dietary needs, ingredient availability, or just your family’s preferences.

For a spicier kick, consider adding a finely chopped poblano pepper or a small, seeded jalapeño to the sautéed vegetables. This introduces a fresh heat that complements the chili powder. If you’re looking for a different texture, some people prefer using flour tortillas instead of corn. What surprised me is that while corn tortillas are traditional, flour tortillas can create a softer, more integrated layer, though they can sometimes get a bit gummy if the sauce is too thin.

If you want to make this a no canned soup recipe and prefer a different kind of creaminess, you can use a small amount of reduced-fat cream cheese in the sauce, as some variations suggest. This adds a tangy richness. For a Tex-Mex casserole with a twist, swap out half of the chicken for cooked ground beef or turkey. This creates a heartier, meatier dish. You can also experiment with different cheeses; Monterey Jack or a Mexican blend would work beautifully in place of cheddar.

Serving and Pairing Suggestions

This King Ranch Chicken Casserole is a complete meal on its own, packed with protein, vegetables, and carbs. However, pairing it with a few simple sides can round out the experience beautifully.

A crisp green salad with a light vinaigrette offers a refreshing contrast to the rich, creamy casserole. You might also serve it with a side of simple black beans or a fresh corn salsa for added texture and flavor. For a truly authentic Texan meal, a dollop of extra sour cream or a sprinkle of fresh cilantro on top is always a welcome addition. This dish is perfect for a casual family dinner, but it also shines as a crowd-plepleaser at potlucks or gatherings, especially during cooler months when comfort food is most desired.

Frequently Asked Questions

Q1: What are common variations for King Ranch Chicken Casserole? Common variations include using condensed cream of chicken and mushroom soups for the sauce, or substituting different cheeses like Monterey Jack or Pepper Jack. Some recipes also incorporate ground beef instead of chicken, or add extra peppers like poblano or jalapeño for more heat.

Q2: Can you freeze King Ranch Chicken Casserole for meal prep? Yes, King Ranch Chicken Casserole freezes well for meal prep. Assemble the casserole as directed but do not bake it. Cover it tightly with plastic wrap and then foil, and freeze for up to 3 months. Thaw overnight in the refrigerator before baking as instructed.

Q3: What can I substitute for Rotel tomatoes in this casserole? If you can’t find Rotel, you can substitute a 10-ounce can of diced tomatoes (drained) combined with a 4-ounce can of diced green chiles (drained). You can also use fresh diced tomatoes and finely chopped fresh green chiles like jalapeños or poblanos for a fresher flavor.

Q4: How long does it take to make King Ranch Chicken Casserole from scratch? This recipe takes about 10 minutes of prep time and 35 minutes of cook time, for a total of 45 minutes from start to finish. This makes it a relatively quick and easy weeknight meal, especially if you use pre-cooked chicken.

Q5: Why do my tortillas get mushy in King Ranch Chicken Casserole? Tortillas can get mushy if they absorb too much liquid from the sauce. To prevent this, your Rotel tomatoes are very well drained. You can also lightly toast corn tortillas in a dry skillet before layering, which helps them retain some texture. Using tortilla chip strips, as an alternative, can also help maintain a crunchier texture.

Conclusion

This King Ranch Chicken Casserole offers a taste of Tex-Mex comfort that’s both easy to prepare and incredibly satisfying. The homemade creamy chicken sauce and layers of cheese and tortillas create a truly memorable meal. It’s a fantastic option for busy families looking for a hearty, kid-friendly dinner that feels special.

I encourage you to try this recipe tonight and experience the magic for yourself! Share your delicious results with me on social media. If you loved this casserole, you might also enjoy other hearty chicken dishes, cheesy baked pasta, or spicy enchilada recipes.

King Ranch Chicken Casserole

King Ranch Chicken Casserole is a classic Tex-Mex comfort food with layers of chicken, tortillas, cheese, and a rich creamy sauce. It’s a hearty, cheesy, and satisfying dish perfect for family dinners or potlucks.
Prep Time 10 minutes
Cook Time 35 minutes
Total Time 45 minutes
Servings: 6 servings
Cuisine: Tex-Mex

Ingredients
  

  • 1 lb boneless skinless chicken breast
  • 1 Tbsp chili powder
  • 1 Tbsp cooking oil
  • 2 Tbsp butter
  • 1 medium yellow onion diced
  • 1 medium green bell pepper diced
  • 2 Tbsp all-purpose flour
  • 1 cup chicken broth
  • 1 can 10 oz diced tomatoes with green chiles (Rotel), drained
  • 1/2 cup sour cream
  • 8 oz cheddar cheese shredded
  • 5 cups tortilla chip strips OR 12 corn tortillas quartered
  • 2 green onions sliced (for garnish, optional)
  • 1/2 cup bell pepper chopped (for sauce, if using condensed soup method)
  • 10.75 ounces condensed cream of chicken soup if using condensed soup method
  • 10.75 ounces condensed cream of mushroom soup if using condensed soup method
  • 1/2 cup onion chopped (for sauce, if using condensed soup method)
  • 2 cloves garlic minced (for scratch sauce method)
  • 6 tablespoons flour for scratch sauce method
  • 2 cups milk for scratch sauce method
  • 2 cups chicken broth divided (for scratch sauce method)
  • 1 teaspoon cumin for scratch sauce method
  • 1 teaspoon garlic powder for scratch sauce method
  • 1 teaspoon chili powder for scratch sauce method
  • Salt & freshly ground pepper for scratch sauce method
  • 1 poblano pepper chopped (optional)
  • 1 small jalapeño seeded and finely chopped (optional)
  • 2 ounces reduced-fat cream cheese at room temperature (for WellPlated method)
  • 1/2 teaspoon ground cumin for WellPlated method
  • 3/4 teaspoon kosher salt for WellPlated method
  • 1 teaspoon ancho chile powder for Allrecipes method
  • 1/2 teaspoon dried oregano for Allrecipes method
  • 1/4 teaspoon chipotle chile powder for Allrecipes method

Method
 

Instructions
  1. Preheat oven to 375°F. Lightly spray a 9×13-inch or 3-quart baking dish with cooking spray.
  2. Pound chicken breasts to an even thickness (3/4 to 1-inch thick) and season with chili powder. Heat cooking oil in a large skillet over medium heat. Cook chicken until browned on each side and cooked through, about 5 minutes per side. Remove chicken to a clean cutting board to cool. Dice cooked chicken.
  3. In the same skillet, add butter, diced onion, and bell pepper. Sauté over medium heat until onions are soft and translucent, about 5 minutes.
  4. Add flour to the skillet and continue to sauté for about 1 minute, or until the flour coats the bottom of the skillet and turns golden brown.
  5. Add chicken broth to the skillet and stir to dissolve the flour and any browned bits. Allow the broth to come to a simmer and thicken into a gravy. Remove from heat.
  6. Drain the can of diced tomatoes with green chiles well. Stir the diced chicken and drained tomatoes into the gravy.
  7. Add sour cream and 1/2 cup of the shredded cheddar cheese to the skillet and stir until combined.
  8. Layer a few handfuls of tortilla chip strips (or half of the quartered corn tortillas) into the bottom of the prepared casserole dish.
  9. Spoon half of the chicken mixture on top of the chips/tortillas.
  10. Layer more tortilla chip strips (about half as much as before, or the remaining quartered corn tortillas) on top.
  11. Spoon the remaining chicken mixture on top.
  12. Sprinkle the remaining 1.5 cups of shredded cheddar cheese over the top.
  13. Bake in the preheated 375°F oven for 15 minutes, or until the cheese is melted and the casserole bubbles around the edges.
  14. For a golden top, broil for 1-2 minutes, watching closely to prevent burning.
  15. Sprinkle sliced green onions on top after baking, then serve hot.


Shrimp Roll (Shrimp Salad Recipe for Sandwiches)

Shrimp Roll Recipe: Easy Shrimp Salad Sandwiches

The scent of a warm, buttery bun, perfectly toasted, cradling a mound of fresh, creamy seafood salad — that’s the essence of summer. Today, we’re diving into the best easy shrimp roll recipe for those moments when you crave something light, satisfying, and utterly delicious without the fuss. This New England-style favorite brings the seaside right to your kitchen, making it a perfect meal for busy families.

You’ll learn how to transform plump shrimp into a vibrant salad, complete with a zesty, herby dressing, all nestled into a perfectly toasted bun. This recipe is a fantastic way to enjoy a gourmet-style meal in under 30 minutes, proving that quick and healthy can also be incredibly flavorful.

Why You’ll Love This Recipe

This shrimp roll recipe is a true crowd-pleaser, especially when the weather warms up. It offers a delightful balance of textures, from the tender shrimp to the crisp celery and the soft, toasted bun. The bright lemon and fresh dill create an irresistible aroma that hints at sunny days and relaxed dining.

It’s also incredibly versatile, making it a wonderful lobster roll alternative for those who want a taste of the coast without the premium price tag. The creamy dressing coats every piece of shrimp, ensuring each bite is bursting with flavor. My family loves how quickly this comes together, leaving more time for evening activities.

Ingredients You’ll Need

Here’s a look at the key ingredients that make this creamy shrimp salad so special:

  • Raw Shrimp: The star of our show, providing a sweet, tender bite. Cooking them yourself ensures maximum flavor and perfect texture.
  • Lemon: Adds essential brightness to both the cooking liquid and the salad dressing. Its zest and juice cut through the richness.
  • Fresh Dill: A quintessential herb for seafood, offering a delicate, anise-like freshness. Don’t skip it!
  • Celery Rib: Provides a crucial crunch and subtle earthy note, contrasting beautifully with the soft shrimp.
  • Green Onions & Chives: These mild alliums add a gentle oniony flavor without overpowering the delicate shrimp.
  • Mayonnaise: Forms the creamy base of our dressing, binding all the flavors together. Use your favorite high-quality brand.
  • Worcestershire Sauce & Dijon Mustard: These two secret weapons add depth, tang, and a savory complexity to the dressing.
  • Red Pepper Flakes: An optional addition for a hint of warmth and subtle spice, waking up the palate.
  • Rolls or Hot Dog Buns: The perfect vehicle for our shrimp salad. I prefer soft, split-top hot dog buns for an authentic New England feel.
  • Butter: For toasting the buns, creating that irresistible golden crust and rich flavor.

How to Make Shrimp Roll

Making this delightful shrimp salad sandwich is simpler than you might think. Follow these steps for a perfect meal every time.

1. Preparing the Shrimp

  1. First, cut a lemon in half. Squeeze the juice from one half into a small bowl and set it aside for the salad dressing.
  2. Bring a medium pot of water to a rolling boil. Add the remaining lemon halves, a dill sprig, a teaspoon of salt, and a teaspoon of pepper to the boiling water.
  3. Carefully add the peeled and deveined raw shrimp to the seasoned boiling water. Cook them just until they turn pink and opaque, which usually takes about 2-3 minutes.
  4. Once the shrimp are perfectly cooked, remove them from the water immediately. Set them aside in a bowl to cool completely before dicing.

2. Assembling the Shrimp Salad

  1. While the shrimp cool, dice your celery rib, mince the green onions, chop the chives, and finely chop the fresh dill.
  2. In a separate mixing bowl, combine the diced celery, minced green onions, chopped chives, and chopped dill.
  3. Add the mayonnaise, the reserved lemon juice, Worcestershire sauce, Dijon mustard, a quarter teaspoon of salt, a quarter teaspoon of pepper, and the optional red pepper flakes to the bowl. Stir all these ingredients together until they are well combined and creamy.
  4. Once the shrimp are cool, dice them into bite-sized pieces. Add the diced shrimp to the dressing mixture and gently mix to coat every piece. At this point, you can cover the bowl and refrigerate the shrimp salad for an hour to allow the flavors to meld, or you can serve it right away.

3. Toasting the Buns and Serving

  1. Brush your rolls or hot dog buns with butter, making sure to coat both the inside and outside surfaces.
  2. Place the buttered buns on a baking sheet. Broil them on low for a few minutes, watching closely to they turn golden brown without burning. This step is key for that classic texture.
  3. Finally, load the warm, toasted buns generously with your delicious shrimp salad. Serve immediately and enjoy your homemade seafood sandwich!

Expert Tips and Tricks

  • Don’t Overcook the Shrimp: This is perhaps the most important tip. Overcooked shrimp become rubbery. Watch for them to just turn pink and opaque, then remove them promptly.
  • Season the Cooking Water: Adding lemon, dill, salt, and pepper to the boiling water infuses the shrimp with flavor from the start, making a huge difference in the final taste of your shrimp roll recipe.
  • Chill for Flavor: While you can serve it immediately, letting the creamy shrimp salad chill for at least an hour allows the flavors to deepen and meld beautifully. This is a step I often take if I have the time.
  • Butter Both Sides of the Bun: Brushing butter on both the inside and outside of the bun before toasting creates an incredibly rich flavor and satisfying texture throughout the sandwich.
  • Watch the Broiler Closely: Buns can go from perfectly toasted to burnt in seconds under a broiler. Stay vigilant and pull them out as soon as they reach a golden brown.
  • Dice Shrimp Evenly: Dicing the shrimp into similar-sized pieces ensures that each bite of your shrimp salad sandwich has a consistent texture and flavor distribution.

Recipe Variations and Substitutions

This shrimp roll recipe is wonderfully adaptable, allowing you to tailor it to your taste or what you have on hand. Don’t be afraid to experiment!

For dietary alternatives, if you’re avoiding dairy, you can use a plant-based mayonnaise. If gluten is a concern, serve the creamy shrimp salad in lettuce cups or on your favorite gluten-free buns. This makes it accessible for everyone.

When it comes to seasonal swaps, feel free to play with the herbs. While dill is classic, you could try fresh parsley, tarragon, or a mix of chives and cilantro for a different flavor profile. In testing, I’ve found that a touch of fresh tarragon adds a lovely, slightly anise-like note that pairs wonderfully with shrimp.

If you’re looking to adjust the difficulty, using pre-cooked shrimp (see FAQ below) can save a few minutes, though cooking raw shrimp yourself yields the best flavor. You can also vary the heat; add more red pepper flakes for a spicier kick or a dash of hot sauce to the dressing. For a richer flavor, consider using brioche buns instead of standard hot dog buns.

Serving and Pairing Suggestions

A delicious shrimp roll recipe is often best served simply, allowing the fresh flavors to shine. For an authentic New England experience, pair your shrimp rolls with classic sides like crispy potato chips, a simple green salad, or a creamy coleslaw. I’ve found that a light, vinegar-based coleslaw offers a nice contrast to the richness of the shrimp salad.

For a family-friendly meal, offer a side of crunchy carrot sticks or cucumber slices. You could also serve them alongside a bowl of tomato soup for a comforting lunch. These rolls are perfect for summer picnics, backyard barbecues, or a light weeknight dinner. They also make a fantastic appetizer when served on smaller slider buns.

Frequently Asked Questions

Q1: Can you make shrimp roll recipe ahead of time?

Yes, you can absolutely prepare the shrimp salad ahead of time. I’ve found that making it an hour or two in advance, or even the day before, allows the flavors to meld and deepen beautifully. Just be sure to store it in an airtight container in the refrigerator.

Q3: What are common variations for a shrimp salad sandwich?

Common variations include adding finely diced red onion, a touch of Old Bay seasoning, or other fresh herbs like parsley or tarragon. Some people also like to add a bit of finely chopped hard-boiled egg or a squeeze of fresh lime juice for a different citrus note.

Q4: How long does shrimp salad last in the refrigerator?

Shrimp salad, when stored properly in an airtight container, will last for 2-3 days in the refrigerator. For the best quality and flavor, I recommend consuming it within 48 hours of preparation.

Q5: Can I use pre-cooked shrimp for shrimp rolls?

You can use pre-cooked shrimp to save time, but the flavor won’t be as vibrant. Pre-cooked shrimp often lack the seasoning and fresh taste that comes from boiling raw shrimp in a flavorful liquid. If you do use pre-cooked, give them a quick rinse and pat them very dry before dicing.

Q6: What should I serve with shrimp rolls?

Shrimp rolls pair wonderfully with light, fresh sides. Consider serving them with a simple green salad, potato chips, coleslaw, or even some fresh fruit like watermelon or berries for a refreshing summer meal. A chilled glass of lemonade or iced tea is also a perfect accompaniment.

Conclusion

There you have it—a simple yet spectacular shrimp roll recipe that brings a taste of coastal charm right to your table. The combination of plump, seasoned shrimp, a creamy, zesty dressing, and a buttery toasted bun is truly irresistible. This recipe is a testament to how quick, healthy, and kid-friendly meals can also be incredibly satisfying for busy families.

I encourage you to try this recipe for your next summer gathering or a quick weeknight dinner. Don’t forget to share your creations and tell me what you think! If you loved this, you might also enjoy exploring other easy seafood recipes, like a classic tuna melt or a fresh crab salad.

Shrimp Roll (Shrimp Salad Recipe for Sandwiches)

This easy New England-style shrimp roll features plump shrimp tossed in a creamy, lemony, and herby dressing, served on a deliciously toasted bun. It’s a light yet satisfying sandwich, perfect for summer dinners or picnics.
Prep Time 10 minutes
Cook Time 5 minutes
Total Time 15 minutes
Servings: 4 servings
Cuisine: American

Ingredients
  

  • 1 lb raw shrimp peeled and deveined
  • 1 lemon
  • 1 tbsp fresh dill
  • 1 tsp salt
  • 1 tsp pepper
  • 1 celery rib diced
  • 2 green onions minced
  • 2 tsp chopped chives
  • 5 tbsp mayonnaise
  • 1 tbsp lemon juice
  • 2 tsp Worcestershire sauce
  • 1 tbsp Dijon mustard
  • 1/4 tsp salt
  • 1/4 tsp pepper
  • 1/2 tsp red pepper flakes optional
  • 4 rolls or hot dog buns
  • 1 tbsp butter

Method
 

Instructions
  1. Cut lemon in half and squeeze the juice out of a half in a small bowl and set aside for the filling.
  2. In a medium pot bring water to boil. Once boiling add the lemon halves, dill sprig, salt, and pepper.
  3. Add shrimp and boil until cooked. The shrimp will just be turning pink and opaque. This will take about 2-3 minutes.
  4. Once cooked remove shrimp from water and set aside to cool.
  5. Dice celery, green onions, chives, and dill.
  6. In a bowl add diced celery, green onions, chives, dill, mayo, reserved lemon juice, Worcestershire sauce, Dijon mustard, salt, pepper, and red pepper flakes. Stir until combined.
  7. Add shrimp and mix to coat. At this point you can cover and refrigerate for an hour to let the flavors meld or serve right away on toasted buns.
  8. Brush the buns with butter- both in the inside and outside. Place buns on a baking sheet and toast by broiling on low for a few minutes. Watch the buns closely so they don’t burn.
  9. Load toasted buns with shrimp salad and enjoy!


French Vanilla Ice Cream

Classic French Vanilla Ice Cream Recipe

Vanilla ice cream is often underestimated, but a truly great one is a revelation. It’s the ultimate blank canvas, a creamy, sweet comfort that stands perfectly on its own. This classic french vanilla ice cream recipe takes simple ingredients and transforms them into a rich, decadent dessert. You’ll learn to craft a luscious, smooth ice cream with a distinct golden hue and deep vanilla flavor, perfect for any occasion.

This isn’t just any vanilla ice cream; it’s a celebration of texture and taste. The traditional egg yolk custard base makes all the difference, creating an unparalleled richness that store-bought versions simply can’t match. You’ll be amazed at how easy it is to achieve such a luxurious treat right in your own kitchen.

Why You’ll Love This Recipe

Making homemade ice cream offers a level of freshness and flavor you won’t find anywhere else. This recipe delivers an incredibly creamy texture that melts slowly on your tongue, releasing waves of pure vanilla. The distinct golden color signals the richness of the egg yolks, promising a truly indulgent experience.

There’s a special satisfaction in creating something so delicious from scratch. You control the quality of every ingredient, ensuring a wholesome dessert for your family. This french vanilla ice cream is versatile enough to be served plain or as the perfect accompaniment to almost any other sweet treat. It’s a simple pleasure that truly shines.

Ingredients You’ll Need

Here’s a look at the essential ingredients that make this ice cream so special:

  • Whole Milk & Heavy Cream: These dairy powerhouses provide the essential fat content for a rich, smooth, and utterly creamy ice cream texture. Don’t skimp on the fat here!
  • Vanilla Bean or Vanilla Extract: A vanilla bean offers those beautiful flecks and an intense, complex vanilla flavor. If using extract, opt for a good quality one to a pure taste. You can also use vanilla bean paste for a similar visual and flavor impact.
  • Salt: Just a pinch balances the sweetness and brings out the full depth of the vanilla.
  • Large Egg Yolks: These are the heart of french vanilla ice cream, creating the classic custard base that gives it its signature richness, pale yellow color, and silky mouthfeel.
  • Granulated Sugar: Provides sweetness and contributes to the smooth texture of the finished ice cream, preventing it from becoming too icy.

How to Make French Vanilla Ice Cream

Creating this french vanilla ice cream is a rewarding process. Follow these steps carefully for the best results.

1. Prepare Your Equipment

  1. Freeze the ice cream maker bowl for at least 24 hours, or until it is completely solid. This crucial step ensures your ice cream churns properly.

2. Infuse the Vanilla

  1. Pour the whole milk and heavy cream into a medium saucepan. Carefully cut a vanilla bean lengthwise down the middle and use the back of your knife to scrape out the tiny, fragrant seeds. Add both the seeds and the scraped bean pod to the milk mixture, along with a small pinch of salt.
  2. Bring this mixture to a gentle simmer over medium heat, watching for small bubbles around the edges (this usually takes about 10 minutes). Remove the pan from the heat, cover it tightly, and let it stand for 20 to 30 minutes. This allows the vanilla to infuse deeply into the cream.

3. Create the Custard Base

  1. In a separate mixing bowl, whisk together the egg yolks and granulated sugar. Continue whisking until the mixture becomes smooth, light pale yellow in color, and noticeably airy. This aeration is key for a light custard.

4. Temper the Eggs

  1. Reheat the vanilla-infused milk and cream mixture until it’s just steamy again. Using a ladle, slowly and gradually pour about 1/2 cup of the hot milk mixture into the whisked egg and sugar mixture. Whisk constantly as you pour; this process, called tempering eggs, gently raises the temperature of the yolks without scrambling them. After adding a couple of ladles and feeling the egg mixture warm up, add the remaining hot milk mixture to the bowl and mix everything very well.

5. Cook the Custard

  1. Pour the tempered mixture back into the saucepan. Cook over low heat, stirring constantly with a rubber spatula, until the mixture begins to thicken. It should coat the back of a spoon, and an instant-read thermometer should read 170-175°F. Do not let it boil, or the eggs will curdle.

6. Strain and Chill

  1. Pour the thickened custard through a fine-mesh strainer into a clean mixing bowl. This step removes any tiny cooked egg pieces and the vanilla bean pod, ensuring a perfectly smooth base.
  2. Let the mixture cool on the counter for 30-40 minutes. Then, cover the bowl with plastic wrap, pressing it directly onto the surface of the custard to prevent a skin from forming. Refrigerate the mixture for at least 2 hours, or until it is completely cold. I’ve found chilling it overnight yields the best results.

7. Churn and Freeze

  1. Once the base is thoroughly chilled, churn the ice cream according to your ice cream maker’s manufacturer’s instructions. Churn until it’s thick and has the consistency of soft-serve ice cream.
  2. Transfer the freshly churned ice cream to an airtight container. Freeze it overnight before serving to allow it to firm up to a scoopable consistency.

Expert Tips and Tricks

Making homemade ice cream is a joy, and these tips will help you achieve perfection every time.

  • Chill Thoroughly: The colder your ice cream base is before churning, the smoother and creamier your final product will be. Don’t rush the refrigeration step; overnight is ideal.
  • Use a Thermometer: A good instant-read thermometer is your best friend when cooking the custard. Hitting that 170-175°F sweet spot ensures safety and proper thickening without overcooking the eggs.
  • Strain for Smoothness: Don’t skip straining the custard. It removes any potential cooked bits of egg or vanilla bean debris, guaranteeing a silky-smooth texture.
  • Plastic Wrap Contact: Pressing plastic wrap directly onto the surface of the custard while it chills prevents a “skin” from forming, keeping your base perfectly smooth.
  • Quality Vanilla Matters: Since vanilla is the star here, invest in a good quality vanilla bean or extract. It truly makes a difference in the depth of flavor. If you’re using vanilla bean paste, it’s a reputable brand.
  • Airtight Storage: Store your finished french vanilla ice cream in an airtight container with a piece of parchment or wax paper pressed against the surface. This minimizes ice crystal formation and freezer burn.

Recipe Variations and Substitutions

This french vanilla ice cream recipe is wonderful as is, but it’s also a fantastic base for creativity. You can easily adapt it to suit different tastes or dietary needs (within reason for a custard base).

If you don’t have a vanilla bean, you can substitute 1 teaspoon of good quality vanilla extract or 2 teaspoons of vanilla bean paste in step 2. Add the extract or paste after cooking the custard in step 6, before chilling, to preserve its delicate flavor. For a dairy-free alternative, unfortunately, this recipe relies heavily on dairy and egg yolks for its classic texture, so substitutions here are not recommended. However, you can find many excellent no-churn dairy-free ice cream recipes online if that’s what you need.

For a fun twist, consider adding mix-ins during the last few minutes of churning. Think mini chocolate chips, chopped cookies, or a swirl of caramel sauce. These additions can make the ice cream even more appealing to kids. You could also infuse other flavors into the milk mixture, like a cinnamon stick or a few cardamom pods, for an aromatic variation.

Serving and Pairing Suggestions

This french vanilla ice cream is incredibly versatile and pairs beautifully with a wide array of desserts. Its rich, creamy texture and sweet vanilla flavor complement almost anything.

Serve a scoop alongside a warm apple pie, a fudgy brownie, or a fresh berry crumble. It’s also fantastic in a classic root beer float or as the base for a thick milkshake. For a simple yet elegant presentation, I often top a scoop with fresh berries and a drizzle of homemade chocolate sauce. In testing, I found that the pure vanilla flavor truly shines when paired with something tart, like raspberries, or something rich, like a dark chocolate ganache.

Frequently Asked Questions

Frequently Asked Questions

Q1: What makes French Vanilla Ice Cream different from regular vanilla?

French vanilla ice cream is distinguished by its use of an egg yolk custard base. This gives it a richer, creamier texture and a pale yellow color, compared to regular vanilla ice cream, which typically uses a simpler milk and cream base without egg yolks. The custard base provides a more decadent mouthfeel.

Q2: Can I make French Vanilla Ice Cream without an ice cream maker?

Unfortunately, this specific french vanilla ice cream recipe, with its custard base, is designed for an ice cream maker. The churning process is essential for incorporating air and preventing large ice crystals, resulting in a smooth, creamy texture. Without an ice cream maker, the result would likely be icy.

Q3: How long does homemade French Vanilla Ice Cream last in the freezer?

When stored properly in an airtight container with plastic wrap pressed directly onto the surface, homemade ice cream will last for about 1-2 weeks in the freezer for optimal quality. Beyond that, it might start to develop ice crystals and lose some of its creamy texture.

Q4: What are common substitutions for vanilla bean in French Vanilla Ice Cream?

If you don’t have a vanilla bean, the most common substitutions are vanilla extract or vanilla bean paste. For this recipe, you can use 1 teaspoon of high-quality vanilla extract or 2 teaspoons of vanilla bean paste instead of one vanilla bean. Add these after cooking the custard to preserve their flavor.

Q5: Why is tempering eggs important when making French Vanilla Ice Cream?

Tempering eggs is crucial to prevent the egg yolks from scrambling when hot liquid is added. By slowly whisking a small amount of hot milk mixture into the egg yolks first, you gradually raise their temperature. This allows the eggs to be safely incorporated into the hot custard base without cooking into lumps.

Conclusion

Crafting your own french vanilla ice cream is a culinary experience that truly pays off. The rich egg yolk custard base and deep vanilla flavor create a dessert that’s far superior to anything you can buy. Follow these steps, and you’ll be rewarded with a creamy, dreamy treat your whole family will adore.

I encourage you to give this recipe a try and share your results! There’s nothing quite like the taste of homemade ice cream. If you enjoyed this, you might also like exploring other custard-based desserts, creamy fruit ice creams, or even a simple chocolate ice cream recipe.

French Vanilla Ice Cream

A rich, creamy, and decadent homemade French Vanilla Ice Cream made with a classic egg yolk custard base, perfect as a stand-alone dessert or served with other treats.
Prep Time 10 minutes
Cook Time 30 minutes
Total Time 40 minutes
Servings: 10 servings
Cuisine: American

Ingredients
  

  • 1 1/2 cups whole milk
  • 1 1/2 cups heavy cream
  • 1 vanilla bean or 1 tsp vanilla extract
  • 1/8 teaspoon salt
  • 4 large egg yolks
  • 2/3 cup granulated sugar

Method
 

Instructions
  1. Freeze the ice cream bowl for at least 24 hours or until solid.
  2. Pour the milk and heavy cream into a saucepan. Cut a vanilla bean lengthwise and scrape the seeds. Put the seeds and the bean to the milk mixture, together with a pinch of salt.
  3. Bring the mixture to a simmer over medium heat (about 10 minutes). Remove from heat, cover, and let stand for 20 to 30 minutes to infuse the vanilla.
  4. In a mixing bowl, whisk together the egg yolks and sugar until smooth, pale yellow in color, and airy.
  5. Reheat the milk/cream mixture until just steamy. Using a ladle, slowly and gradually pour about 1/2 cup of the hot milk mixture into the egg/sugar mixture, while constantly whisking the egg yolks. After adding a couple of ladles and the eggs are warmed up, add the rest of the milk mixture to the bowl and mix very well.
  6. Pour the tempered mixture back into the saucepan and cook over low heat, stirring constantly, until the mixture starts to thicken and the internal temperature reaches 170-175°F, or until it coats the back of a spoon.
  7. Pour the mixture through a fine-mesh strainer into a clean mixing bowl to remove any cooked egg pieces and the vanilla bean.
  8. Let the mixture cool on the counter for 30-40 minutes. Then cover with plastic wrap, pressing it directly onto the surface, and refrigerate for at least 2 hours or until completely cold.
  9. Churn the ice cream according to the manufacturer’s instructions until it is thick and the consistency of soft-serve ice cream.
  10. Transfer the ice cream to an airtight container and freeze overnight before serving.


Apple Pie Waffles

Apple Pie Waffles: Easy Fall Recipe

The crisp air and vibrant colors of autumn awaken a craving for warm, comforting flavors. There’s nothing quite like waking up to the aroma of cinnamon and apples, and these apple pie waffles deliver exactly that cozy feeling. This recipe will guide you through creating perfect waffles that are crisp on the outside and wonderfully fluffy inside, infused with all the deliciousness of your favorite fall pie. You’ll learn how to make a batch that’s ideal for a special breakfast or a delightful dessert.

This recipe is a game-changer for busy families seeking delicious, kid-friendly meals without spending hours in the kitchen. It brings together the beloved taste of apple pie with the fun of waffles, creating a dish everyone will adore. Get ready to transform your morning routine or evening treat with this easy and flavorful creation.

Why You’ll Love This Recipe

You’ll quickly fall in love with these apple pie waffles for their incredible texture and comforting taste. Each bite offers a delightful contrast: a golden-brown, slightly crispy exterior gives way to a soft, airy interior. The warm apple pieces and fragrant spices create an inviting aroma that fills your home, making any meal feel special.

This recipe is surprisingly simple, perfect for a relaxed weekend breakfast or a quick weeknight dessert. It’s also a fantastic way to enjoy the bounty of fall apples, turning fresh fruit into a memorable family favorite. The combination of sweet apples and warm spices is simply irresistible, promising smiles all around the table.

Ingredients You’ll Need

Creating these delicious waffles starts with a thoughtful selection of pantry staples and fresh ingredients. Here’s a breakdown of what you’ll gather:

  • All-purpose flour: The base for our fluffy waffles, providing structure.
  • Sugar: Adds a touch of sweetness to complement the apples and spices.
  • Whole milk: Contributes to a rich, tender crumb. You can use 2% or almond milk if preferred.
  • Large eggs: Separating the yolks and whites is key for maximum fluffiness.
  • Vegetable oil: Ensures a moist texture and helps with crisping. Any neutral oil works well.
  • Sour cream: Adds richness and a subtle tang, making the waffles incredibly tender.
  • Buttermilk: Reacts with baking soda for lift and provides a lovely, slightly tangy flavor.
  • Vanilla extract: Enhances all the sweet notes in the batter.
  • Large apple: Shredded or finely diced, it brings fresh fruit flavor and moisture. Granny Smith or Honeycrisp are great choices.
  • Baking powder & baking soda: These leavening agents work together to create a light and airy texture.
  • Salt: Balances the sweetness and brightens all the flavors.
  • Apple pie spice: A blend of cinnamon, allspice, and nutmeg, delivering that classic fall taste. You can also use individual spices.
  • Vanilla ice cream: A classic topping that melts into the warm waffles.
  • Additional diced apples: For a fresh garnish and extra apple flavor.
  • Whipped cream: Adds a creamy, indulgent touch.
  • Caramel sauce: Drizzled on top for an extra layer of sweetness and decadence.

How to Make Apple Pie Waffles

Making homemade waffles from scratch is a rewarding experience, and this recipe ensures a fantastic outcome. Follow these steps for perfect apple pie waffles every time.

1. Preparing the Batter

  1. Using a large bowl, whisk together the flour, sugar, salt, baking powder, baking soda, and apple pie spice until they are thoroughly combined. Set this bowl aside for a moment.
  2. In a separate, medium-sized bowl, whisk together the buttermilk, vegetable oil, sour cream, egg yolks, and vanilla extract until they are smooth and well blended. This creates your wet ingredient mixture.
  3. Add the wet ingredients to the bowl containing the dry ingredients. Gently stir them together until they are just combined, being careful not to overmix the batter. Overmixing can lead to tough waffles.
  4. Fold the shredded apples into the batter. This distributes the apple pieces evenly, ensuring apple flavor in every bite.
  5. Using a hand mixer, whip the egg whites in a clean bowl until stiff peaks form. This means the whites will hold their shape when the beaters are lifted. Gently fold these whipped egg whites into the batter, again taking care not to overmix, which would deflate them. This step is crucial for light, fluffy waffles.

2. Cooking the Waffles

  1. Spray your waffle iron with non-stick spray and preheat it according to the manufacturer’s instructions. A properly preheated iron is essential for crispy edges and even cooking.
  2. Spoon the prepared batter into the hot waffle maker, being careful not to overfill the grids. The batter will expand as it cooks.
  3. Cook for 2-3 minutes, or until the waffles are golden brown and cooked through. Most waffle irons have an indicator light when they are ready.
  4. Serve the waffles immediately for the best texture and warmth. If you’re cooking a large batch, you can place the finished waffles in a 300°F (150°C) oven for up to 15 minutes to keep them warm while the remaining waffles bake.
  5. Serve your delicious apple pie waffles with a scoop of vanilla ice cream and additional diced apples. For a final flourish, sprinkle with a pinch of cinnamon before serving.

Expert Tips and Tricks

Achieving the perfect apple pie waffle is all about a few key details. Here are some of my top tips:

  • Don’t skip whipping the egg whites: In my testing, this step is absolutely essential for creating that incredibly light and airy interior. It truly makes a difference in the final texture.
  • Avoid overmixing the batter: Once you combine the wet and dry ingredients, stir just until no streaks of flour remain. Overmixing develops gluten, leading to tougher waffles.
  • Preheat your waffle iron thoroughly: A hot waffle iron ensures a crispy exterior and prevents sticking. Wait for the indicator light to signal it’s ready.
  • Keep waffles warm in the oven: If you’re making several batches, place cooked waffles directly on an oven rack in a 300°F (150°C) oven. This keeps them warm and slightly crisp.
  • Use the right apple: While many apples work, a slightly tart apple like Granny Smith or a firm-sweet apple like Honeycrisp holds its shape well and offers a nice contrast to the sweet batter.
  • Check for doneness: Waffles are done when they are golden brown and easily release from the iron. If they stick, they might need another minute or two.

Recipe Variations and Substitutions

These apple pie waffles are wonderfully versatile, allowing for creative twists and dietary adjustments. Don’t hesitate to experiment!

For a different flavor profile, consider swapping the apple pie spice for just cinnamon and a pinch of cardamom for apple cinnamon waffles. If you don’t have buttermilk, you can make a quick substitute by adding 1 tablespoon of white vinegar or lemon juice to a liquid measuring cup, then filling it to the 1¼ cup mark with whole milk. Let it sit for 5 minutes before using.

If you prefer a richer flavor, you can substitute melted butter for the vegetable oil. For a dairy-free option, use a non-dairy milk and a plant-based sour cream or yogurt alternative. You can also experiment with different fruits; shredded pears or peaches would be lovely in place of apples for a seasonal variation. For an extra crunch, fold in a handful of chopped pecans or walnuts with the apples. What surprised me in developing this recipe was how easily it adapted to different flours; a mix of half all-purpose and half whole wheat flour works well for a slightly heartier waffle.

Serving and Pairing Suggestions

These apple pie waffles are a showstopper, whether for a cozy fall breakfast ideas or an indulgent dessert. For a truly decadent experience, serve them warm with a generous scoop of vanilla ice cream that slowly melts into the nooks and crannies. A drizzle of warm caramel sauce and a dollop of freshly whipped cream are classic waffle toppings that the dish.

Beyond the sweet accompaniments, consider pairing these waffles with a side of crispy bacon or sausage for a balanced breakfast spread. For a lighter touch, a side of Greek yogurt and a sprinkle of granola would also be delicious. These waffles are also fantastic with a simple dusting of powdered sugar and a side of pure maple syrup. For an evening treat, pair them with a warm mug of apple cider or a cup of coffee.

Frequently Asked Questions

What kind of apples are best for Apple Pie Waffles?

For apple pie waffles, I recommend using a firm, crisp apple that holds its shape well when cooked. Granny Smith apples offer a nice tartness that balances the sweetness of the waffle, while Honeycrisp or Fuji apples provide a sweet-tart flavor and excellent texture.

Can I make Apple Pie Waffles ahead of time?

Yes, you can absolutely make these waffles ahead of time! Cook the waffles completely, let them cool, then store them in an airtight container in the refrigerator for up to 2 days or freeze them for up to 1-2 months. Reheat them in a toaster, toaster oven, or conventional oven until crisp and warm.

How do you make Apple Pie Waffles crispy?

To crispy apple pie waffles, make sure your waffle iron is fully preheated before adding the batter. Don’t overfill the iron, and allow the waffles to cook until they are golden brown and easily release. For extra crispiness, you can pop cooked waffles into a toaster or a 300°F oven for a few minutes before serving.

Can I use applesauce instead of fresh apples in this recipe?

While fresh shredded apples provide texture and a bright flavor, you can use unsweetened applesauce as a substitute. If you opt for applesauce, use about ½ cup and reduce the amount of milk slightly to maintain the correct batter consistency. The waffles will be moist but won’t have the distinct apple pieces.

What are some creative toppings for Apple Pie Waffles?

Beyond the traditional vanilla ice cream and caramel sauce, consider a dollop of cinnamon cream cheese frosting, a sprinkle of toasted pecans or walnuts, or a fresh berry compote. A drizzle of warm maple syrup, a dusting of powdered sugar, or even a spoonful of apple butter would also make delicious waffle toppings.

Conclusion

These apple pie waffles are truly a celebration of fall flavors, offering a perfect blend of crispness and fluffiness with every bite. The combination of warm apples and fragrant spices creates a comforting dish that’s both easy to make and incredibly satisfying. I’ve found that this homemade waffles recipe is a fantastic way to bring smiles to the breakfast table or end an evening on a sweet note.

Give this waffle iron recipe a try this season, and share your delicious creations! For more comforting ideas, check out our recipes for pumpkin spice muffins or cinnamon roll pancakes.

Apple Pie Waffles

These Apple Pie Waffles are loaded with Fall flavor, and they’re perfect for Saturday morning breakfast…or Saturday evening dessert! They are crisp on the outside and fluffy on the inside.
Prep Time 15 minutes
Cook Time 5 minutes
Total Time 20 minutes
Servings: 6 servings
Cuisine: American

Ingredients
  

  • 2 cups all-purpose flour
  • 2 Tbsp sugar
  • 1 3/4 cups whole milk
  • 2 large eggs separated
  • 1/2 cup vegetable oil
  • 1/2 cup sour cream
  • 1 1/4 cups buttermilk
  • 2 tsp vanilla extract
  • 1 large apple shredded or very finely diced (~1 cup when shredded)
  • 2 tsp baking powder
  • 1 tsp baking soda
  • 3/4 tsp salt
  • 1 Tbsp apple pie spice or 1 3/4 tsp cinnamon 1 tsp allspice and 1/4 tsp nutmeg
  • Vanilla ice cream for serving
  • Additional diced apples for serving
  • Whipped cream for serving
  • Caramel sauce for serving

Method
 

Instructions
  1. Using a large bowl, whisk together the flour, sugar, salt, baking powder, baking soda and apple pie spice until well combined. Set bowl aside.
  2. In a separate bowl, whisk together the buttermilk, vegetable oil, sour cream, egg yolks and vanilla extract until well combined.
  3. Add wet ingredients to the bowl with the dry ingredients; gently stir until well combined, but do not overmix.
  4. Fold the shredded apples into the batter.
  5. Using a hand mixer, whip the egg whites until stiff peaks form. Fold the egg whites into the batter. Do not overmix.
  6. Spray a waffle iron with non-stick spray and preheat iron.
  7. Spoon batter into waffle maker, taking care not to overfill.
  8. Cook for 2-3 minutes, or until done.
  9. Serve immediately or place waffles in a 300°F oven for up to 15 minutes while other waffles bake.
  10. Serve with vanilla ice cream and additional diced apples. Sprinkle with a pinch of cinnamon before serving.


Apple Cinnamon Oatmeal Cookies

Best Apple Cinnamon Oatmeal Cookies Recipe

The scent of warm cinnamon and baking apples can instantly transform any kitchen into a cozy haven. These delightful apple cinnamon oatmeal cookies deliver that comforting aroma and taste in every soft, chewy bite. You’re about to discover how to bake a batch of truly irresistible cookies, perfect for family snacks or a sweet treat. This recipe is designed for busy parents who want delicious, wholesome options that kids will adore, without spending hours in the kitchen.

Why You’ll Love This Recipe

These apple cinnamon oatmeal cookies are a true crowd-pleaser, offering a perfect blend of wholesome ingredients and comforting flavors. They strike a wonderful balance, being both satisfyingly hearty and delightfully sweet. You’ll appreciate how quickly they come together, making them an ideal choice for a spontaneous baking session or a last-minute dessert.

The texture is simply divine: soft and moist in the center, with a lovely chewiness from the oats, and just a hint of crispness at the edges. Fresh apple chunks burst with natural sweetness, perfectly complemented by the warm embrace of cinnamon spice. These are the kind of fall cookies that make everyone feel happy, but they’re wonderful any time of year.

Ingredients You’ll Need

Here’s a closer look at the key ingredients that make these cookies so special:

  • Unsalted butter: At room temperature, it creams beautifully with the sugars, creating a light and airy dough.
  • Granulated sugar & Light brown sugar: This combination provides the ideal balance of sweetness and moisture. Brown sugar adds a lovely depth of flavor with its molasses notes.
  • Large egg: Acts as a binder, helping to hold the cookies together and contributing to their tender texture.
  • Vanilla extract: A touch of vanilla enhances all the other flavors, adding warmth and sweetness.
  • All-purpose flour: Provides the necessary structure for the cookies.
  • Old-fashioned rolled oats: These are essential for that classic chewy oatmeal cookie texture.
  • Ground cinnamon, allspice, cloves, nutmeg: This blend of cinnamon spice brings incredible warmth and depth, making these truly aromatic apple cinnamon oatmeal cookies.
  • Baking soda: Helps the cookies spread and rise slightly, ensuring a soft interior.
  • Salt: Balances the sweetness and brings out the full flavor of the other ingredients.
  • Peeled and finely chopped apple: Fresh apples add natural sweetness and moisture, keeping the cookies incredibly soft.
  • Lemon juice: Tossed with the apples, it prevents browning and brightens their flavor.
  • Chopped white chocolate (optional): Adds pockets of creamy sweetness that pair wonderfully with the apples and spices.
  • Chopped walnuts (optional): For a delightful crunch and nutty flavor.
  • Maple Glaze (optional): Powdered sugar, milk, and maple syrup create a sweet, glossy finish that elevates the cookies.

How to Make Apple Cinnamon Oatmeal Cookies

Making these apple cinnamon oatmeal cookies is a straightforward process, perfect for bakers of all skill levels. Just follow these steps for a delicious result.

1. Prepare the Dough

  1. Preheat your oven to 350°F (175°C or 180°C). Line your baking sheets with parchment paper or silicone baking mats to prevent sticking.
  2. In a medium bowl, whisk together the flour, oats, cinnamon, baking soda, and salt. If you’re using optional allspice and nutmeg, whisk them in here too. Set this dry mixture aside.
  3. In a large mixer bowl, cream together the room temperature butter, granulated sugar, and brown sugar. Beat on medium speed for about 3-5 minutes until the mixture is light and fluffy. Remember to scrape down the sides of the bowl as needed to everything is well combined.
  4. Add the large egg and vanilla extract to the creamed mixture. Beat for 1-2 minutes until everything is well combined, scraping the sides of the bowl with a spatula.
  5. Toss your finely chopped apples with lemon juice in a small bowl. This simple step prevents them from browning and adds a bright note.
  6. Gradually add the dry ingredients to the wet mixture in the large bowl. Mix on low speed until they are just combined, being careful not to overmix the dough.
  7. Gently fold in the lemon-coated apples. If you’re including chopped white chocolate and walnuts, fold those in now as well. The dough will be noticeably thick and sticky.

2. Bake the Cookies

  1. Using a 2-3 tablespoon ice cream scoop (about 35-40g or 1.4oz per ball), scoop out portions of dough. Roll the dough into smooth balls between your hands and place them on the prepared baking sheets, about 2 inches (5 cm) apart. Gently press down on the tops of the dough balls to slightly flatten them, but don’t squish them completely flat.
  2. Bake for 12-15 minutes, or until the edges are lightly golden and the centers appear set but still look soft. What surprised me in testing was how puffy they look fresh from the oven; they will settle as they cool.
  3. Remove the cookies from the oven and let them cool on the baking sheets for 5-10 minutes. After this initial cooling, transfer them to a wire rack to cool completely.

3. Add the Optional Glaze

  1. If you’re making the maple glaze, combine the powdered sugar, milk, and maple syrup in a small bowl. Whisk until the mixture is smooth and free of lumps. Adjust the consistency by adding a tiny bit more milk if it’s too thick, or more powdered sugar if it’s too thin.
  2. Once the cookies are completely cool, drizzle the maple glaze over each one. Allow the glaze to set fully before stacking or storing your delicious apple cinnamon oatmeal cookies.

Expert Tips and Tricks

Achieving perfect apple cinnamon oatmeal cookies is all about a few key details. Here are some of my top tips to your batch turns out beautifully:

  • Room Temperature Butter is Key: Don’t skip this step! Softened butter creams properly with sugar, incorporating air that makes your cookies light and tender. If your butter is too cold, the dough will be dense.
  • Finely Chop Apples: Dice the apples into 1/4-inch cubes or smaller. This ensures they soften evenly during baking and distribute throughout every bite. Larger chunks can make the cookies watery or prevent even baking.
  • Don’t Overmix the Dough: Once you add the flour, mix only until just combined. Overmixing develops the gluten, leading to tough, less tender cookies.
  • Use Old-Fashioned Rolled Oats: These oats provide the best chewy texture. Quick oats can absorb too much moisture too quickly, potentially making your cookies drier or cakier.
  • Prevent Apple Browning: Tossing the apples with lemon juice isn’t just for flavor; it actively prevents them from oxidizing and turning brown in your dough.
  • Don’t Overbake: Cookies continue to bake slightly on the hot baking sheet after they come out of the oven. Remove them when the edges are lightly golden and the centers still look soft; they’ll firm up as they cool.

Recipe Variations and Substitutions

These apple cinnamon oatmeal cookies are wonderfully adaptable, allowing you to customize them to your family’s preferences or dietary needs. It’s a versatile oatmeal cookie recipe that welcomes creativity.

For dietary alternatives, consider these options: If you need a gluten-free version, swap the all-purpose flour for a 1:1 gluten-free baking blend that contains xanthan gum. your oats are certified gluten-free as well. For a vegan option, you can substitute the butter with a plant-based margarine or coconut oil, and replace the egg with a “flax egg” (1 tablespoon ground flaxseed mixed with 3 tablespoons water, let sit for 5 minutes). The texture might be slightly different, but the flavors will still shine.

When it comes to seasonal swaps or add-ins, feel free to experiment. Instead of walnuts, try chopped pecans or even toasted almonds for a different nutty crunch. Dried cranberries or golden raisins can be folded in alongside the fresh apples for an extra burst of fruity sweetness. For an even richer cinnamon spice profile, you could add a teaspoon of apple pie spice blend in place of some of the individual spices.

If you’re looking for a different presentation, this dough can also be pressed into a parchment-lined 8×8 inch pan and baked as apple recipes bars. Bake at the same temperature for 20-25 minutes, or until golden brown and set. This is a great option for a quick dessert that’s easy to slice and serve.

Serving and Pairing Suggestions

These apple cinnamon oatmeal cookies are incredibly versatile, making them perfect for a variety of occasions. For a cozy afternoon snack, serve them with a warm mug of chai tea or a classic cup of coffee. Their wholesome nature also makes them a fantastic grab-and-go breakfast option for busy mornings, especially when paired with a glass of milk.

To them for a dessert, arrange the glazed cookies on a simple platter, perhaps garnished with a few thin apple slices or a sprinkle of extra cinnamon. For a kid-friendly presentation, consider adding a small scoop of vanilla ice cream on the side, allowing the warm cookie to slightly melt it. These chewy cookies are also wonderful for holiday gatherings or fall-themed parties. Package a few in small bags with a festive ribbon for a thoughtful homemade gift.

Frequently Asked Questions

What kind of apples are best for Apple Cinnamon Oatmeal Cookies?

Crisp, firm apples that hold their shape well during baking are ideal. Granny Smith apples are a popular choice for their tartness, which balances the sweetness of the cookie, but Honeycrisp or Fuji also work wonderfully. Avoid overly soft or mealy apple varieties.

Can I make Apple Cinnamon Oatmeal Cookies gluten-free or vegan?

Yes, you can! For a gluten-free version, use a 1:1 gluten-free all-purpose flour blend and your oats are certified gluten-free. To make them vegan, substitute the butter with a plant-based margarine or coconut oil, and replace the egg with a flax egg (1 tbsp ground flaxseed + 3 tbsp water).

How long do Apple Cinnamon Oatmeal Cookies stay fresh?

These cookies are best enjoyed within 3-4 days when stored in an airtight container at room temperature. Because they contain fresh apples, they tend to get softer over time due to the moisture. Placing a piece of parchment paper between layers can help prevent sticking.

Can I use quick oats instead of old-fashioned rolled oats in this recipe?

It’s highly recommended to stick with old-fashioned rolled oats for this recipe. Quick oats are cut finer and absorb moisture faster, which can result in a drier, more cake-like cookie rather than the desired chewy texture.

What are some variations or add-ins for Apple Cinnamon Oatmeal Cookies?

Beyond the optional white chocolate and walnuts, you can add dried cranberries or golden raisins for extra fruitiness. A sprinkle of toasted pecans or a touch of ginger in the spice blend would also be delicious. For a simpler cookie, skip the glaze and dust with cinnamon sugar before baking.

Conclusion

These apple cinnamon oatmeal cookies are truly a testament to simple, comforting baking. With their soft, chewy texture and the delightful warmth of cinnamon and fresh apples, they’re sure to become a family favorite. I’ve always found that the best recipes are the ones that bring joy without complexity, and this one certainly delivers. Give this easy recipe a try, and share your delicious results! If you love these, you might also enjoy my recipes for classic snickerdoodles or pumpkin spice muffins.

Apple Cinnamon Oatmeal Cookies

These soft and chewy apple cinnamon oatmeal cookies are packed with warm spices, tender apples, and often topped with a sweet maple glaze drizzle. They are perfect for a cozy snack or dessert, combining the wholesome texture of oats with aromatic flavors.
Prep Time 15 minutes
Cook Time 14 minutes
Total Time 29 minutes
Servings: 21 servings
Cuisine: American

Ingredients
  

  • 1/2 cup 113g unsalted butter, room temperature
  • 1/2 cup 100g granulated sugar
  • 3/4 cup 160g packed light brown sugar
  • 1 large egg
  • 1 teaspoon vanilla extract
  • 1 1/4 cups 156g all-purpose flour
  • 1 1/4 cups 120g old-fashioned rolled oats
  • 1 teaspoon ground cinnamon
  • 1/2 teaspoon baking soda
  • 1/4 teaspoon salt
  • 1 cup 120g peeled and finely chopped apple (1/4-inch cubes or smaller)
  • 2 teaspoons lemon juice
  • 1/4 teaspoon ground cloves optional
  • 1/2 teaspoon ground allspice optional
  • 1/4 teaspoon ground nutmeg optional
  • 2 oz 60g chopped white chocolate (optional)
  • 1/2 cup 63g chopped walnuts (optional)
Maple Glaze (optional)
  • 2/3 cup powdered sugar
  • 2 teaspoons milk
  • 2 teaspoons maple syrup

Method
 

Instructions
  1. Preheat oven to 350°F (175°C or 180°C). Line baking sheets with parchment paper or silicone baking mats.
  2. In a medium bowl, whisk together the flour, oats, cinnamon, baking soda, and salt. If using, also whisk in allspice and nutmeg. Set aside.
  3. In a large mixer bowl, cream together the room temperature butter, granulated sugar, and brown sugar on medium speed until light and fluffy, about 3-5 minutes. Scrape down the sides of the bowl as needed.
  4. Add the egg and vanilla extract. Beat for 1-2 minutes or until well combined, scraping the sides of the bowl with a spatula.
  5. Toss the finely chopped apples with lemon juice to prevent browning.
  6. Add the dry ingredients to the wet mixture and mix on low speed until just combined. Do not overmix.
  7. Gently fold in the lemon-coated apples. If using, also fold in chopped white chocolate and walnuts. The dough will be thick and sticky.
  8. Scoop the dough with a 2-3 tablespoon ice cream scoop (about 35-40g or 1.4oz per ball) and roll the dough into balls between your hands. Place them on the prepared baking sheets about 2 inches (5 cm) apart. Press down gently to slightly flatten the tops, but do not squish them flat.
  9. Bake for 12-15 minutes, or until the edges are lightly golden and the centers are set but still look soft. The cookies will be a little puffy when you take them out of the oven and will settle as they cool.
  10. Remove cookies from the oven and allow to cool on the baking sheets for 5-10 minutes before transferring to a wire rack to cool completely.
  11. If making the maple glaze: In a small bowl, combine powdered sugar, milk, and maple syrup. Whisk until smooth. Adjust consistency with additional milk or powdered sugar if necessary.
  12. Drizzle the maple glaze over each cooled cookie. Let the glaze set before stacking or storing.