No-Bake Key Lime Pie Recipe

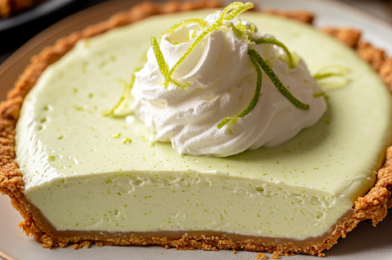
No-Bake Key Lime Pie: Easy & Creamy Recipe

The summer heat is on, and the last thing anyone wants is to turn on the oven. That’s why a slice of cool, tangy no-bake key lime pie is the ultimate answer to your dessert cravings. This recipe is a lifesaver for busy parents and anyone looking for a refreshing treat without the fuss. You’re about to discover how to whip up a truly delicious pie that’s perfect for any occasion, all with minimal effort.

This isn’t just another dessert; it’s a creamy, zesty escape that comes together in a flash. My goal is to show you how simple it is to create a show-stopping pie that will impress everyone, especially your kids. Get ready to mix, chill, and enjoy a sweet, zesty treat that tastes like sunshine!

Why You’ll Love This Recipe

This delightful no-bake key lime pie is a dream come true for hectic schedules. It requires absolutely no oven time, making it ideal for scorching summer days when keeping your kitchen cool is a top priority. The entire process, from mixing the buttery graham cracker crust to blending the luscious cream cheese filling, is incredibly straightforward. I’ve personally found this recipe to be a lifesaver on busy weeknights when I still want to serve something special.

It’s a fantastic make-ahead option, meaning you can prepare it the night before a gathering and simply pull it from the fridge when it’s time to serve! The vibrant, tart key lime juice perfectly balances the sweet, rich sweetened condensed milk, creating a flavor profile that’s both refreshing and deeply satisfying. This pie is a guaranteed crowd-pleaser, a delightful dessert that appeals to all ages with its smooth texture and bright, zesty taste.

Ingredients You’ll Need

Here are the essential ingredients for your delightful no-bake key lime pie:

  • Graham Cracker Crumbs: These form the classic, buttery base for our crust. You can buy them pre-crushed or crush whole crackers yourself for a fresher taste.
  • Unsalted Butter: Melted butter binds the crumbs together, creating a firm, flavorful foundation.
  • Brown Sugar: A touch of brown sugar adds a subtle caramel note and extra sweetness to the crust.
  • Cream Cheese: Softened cream cheese is crucial for achieving that incredibly smooth, rich texture in the cream cheese filling. Make sure it’s at room temperature to avoid lumps.
  • Sweetened Condensed Milk: This provides the bulk of the sweetness and contributes to the pie’s signature creamy consistency. Don’t confuse it with evaporated milk!
  • Key Lime Juice: The star of the show! Freshly squeezed key lime juice delivers the authentic tangy, tart flavor that defines this dessert.
  • Key Lime Zest (optional): A little zest amplifies the lime flavor and adds a beautiful aromatic touch.
  • Cold Heavy Whipping Cream: Whipped into stiff peaks, this lightens the filling, making it airy and luscious.
  • Fresh Key Lime Slices, Whipped Cream, Fresh Mint: These are for garnishing, adding visual appeal and an extra burst of freshness.

How to Make No-Bake Key Lime Pie

Creating this delightful no-bake key lime pie is surprisingly simple. Just follow these steps, and you’ll have a stunning dessert ready to chill.

1. Making the Graham Cracker Crust

  1. To a small bowl, add your graham cracker crumbs, brown sugar, and melted butter. Stir these ingredients together until every crumb is thoroughly coated with butter. This ensures a cohesive crust.
  2. Press the crumb mixture firmly into the bottom and up the sides of a 9-inch pie pan. Use the bottom of a measuring cup or your hands to get an even, compact layer.
  3. Place the prepared crust into the refrigerator to chill for at least 1 hour. This chilling time allows the butter to firm up, making the crust sturdy before you add the filling.

2. Preparing the Creamy Filling

  1. In a large mixing bowl, beat the softened cream cheese on medium speed. Continue mixing until it’s wonderfully smooth and creamy, which typically takes between 30 seconds to 2 minutes. Scrape down the sides of the bowl to everything is incorporated.
  2. Add the sweetened condensed milk, key lime juice, and the optional key lime zest to the cream cheese mixture. Mix these ingredients until they are fully combined, pausing to scrape down the sides of the bowl as needed.
  3. In a separate, clean mixing bowl, pour in the cold heavy whipping cream. Using a handheld mixer or a stand mixer fitted with the whisk attachment, begin mixing on low-medium speed for 30 seconds to 1 minute. Increase the speed to medium-high and continue mixing until stiff peaks form. The cream should hold its shape when you lift the whisk.
  4. Gently fold one-third of the freshly whipped cream into the cream cheese mixture until it’s just combined. Then, carefully fold in the remaining whipped cream until the entire filling is light and fully integrated. This gentle folding keeps the filling airy.

3. Chilling and Serving

  1. Pour the prepared cream cheese filling over your chilled graham cracker crust. Spread it out into an even layer using a spatula.
  2. Cover the pie pan tightly with plastic wrap. Transfer it to the refrigerator to chill for a minimum of 4-6 hours, or ideally, overnight. This extended chilling time is essential for the pie to set completely.
  3. When you’re ready to serve, remove the plastic wrap. Garnish each slice with fresh key lime slices, a dollop of whipped cream, and a sprig of fresh mint if desired. Slice and enjoy your delightful easy summer dessert!

Expert Tips and Tricks

  • Room Temperature Cream Cheese is Key: Always your cream cheese is fully softened before beating. This prevents lumps and guarantees a silky-smooth filling. I’ve found that cutting it into smaller cubes helps it soften faster.
  • Don’t Overmix the Whipped Cream: While you want stiff peaks, stop mixing as soon as they form. Overmixing can cause the cream to become grainy or even separate.
  • Gentle Folding Matters: When incorporating the whipped cream into the lime mixture, use a gentle folding motion. This preserves the airiness of the whipped cream, contributing to the light texture of the no-bake key lime pie.
  • Chill Time is Non-Negotiable: Resist the urge to cut into the pie too early! The 4-6 hours (or overnight) chilling period is crucial for the pie to set properly, ensuring clean slices and a firm texture. In testing, I noticed a significant difference in firmness between a 4-hour chill and an overnight chill.
  • Use Fresh Key Lime Juice if Possible: While bottled juice works, freshly squeezed key lime juice offers a brighter, more intense flavor. It’s worth the extra effort if you can find the limes.
  • Taste Test the Filling: Before pouring it into the crust, taste a small spoonful of the filling. Adjust the sweetness or tartness with a tiny bit more lime juice or a pinch of powdered sugar if desired, though the recipe is balanced as written.

Recipe Variations and Substitutions

This no-bake key lime pie is wonderfully adaptable. Here are a few ways you can customize it to your liking:

  • Crust Alternatives: While a graham cracker crust is classic, you can get creative. Try crushed vanilla wafers or even shortbread cookies for a different flavor profile. For a gluten-free option, simply use gluten-free graham crackers. You can also use a store-bought crust to save even more time.
  • Lime Juice Swap: If key limes are hard to find, regular Persian lime juice can be used. Just be aware that the flavor will be slightly less tart and intense, as key limes are known for their unique zing. Bottled key lime juice, like Nellie & Joe’s, is also a good, consistent option.
  • Dairy-Free Option: For those with dairy sensitivities, consider using dairy-free cream cheese alternatives and coconut sweetened condensed milk. You would also need to use a dairy-free whipping cream alternative. Note that textures might vary slightly.
  • Add a Tropical Twist: For an extra layer of flavor, try adding a tablespoon or two of toasted coconut flakes to your graham cracker crust mixture. It complements the lime beautifully.
  • Mini Pies: Instead of a single pie, you can make individual no-bake key lime pies using muffin tins lined with cupcake wrappers. Simply press a smaller amount of crust into each, fill, and chill. They’re perfect for parties!

Serving and Pairing Suggestions

This no-bake key lime pie is a showstopper on its own, but a few thoughtful touches can make it even more special. The vibrant green of the lime and the creamy white of the whipped topping make for a visually appealing dessert.

Serve each slice chilled, allowing its refreshing tang to cut through the richness. A generous dollop of extra whipped cream is always welcome. For an elegant touch, arrange thin slices of fresh key lime and a few delicate mint leaves on top. The mint’s freshness truly brightens the overall experience. This pie is perfect for backyard barbecues, summer potlucks, or simply as a light, zesty end to a family dinner. It’s truly an easy summer dessert that everyone will love. It pairs wonderfully with a cup of iced tea or a sparkling water with a hint of mint.

Frequently Asked Questions

How long does No-Bake Key Lime Pie need to chill? Your no-bake key lime pie needs to chill for at least 4-6 hours to properly set. For the best results and the firmest slices, I always recommend chilling it overnight. This ensures the filling is perfectly firm and holds its shape beautifully.

Can I use regular limes instead of key limes for this recipe? Yes, you can use regular limes if key limes are unavailable. However, be aware that regular limes (Persian limes) are typically less tart and intensely aromatic than key limes. The flavor of your pie will still be delicious, but it will have a slightly different, milder lime profile.

What is the best way to store leftover No-Bake Key Lime Pie? To store leftover no-bake key lime pie, cover it tightly with plastic wrap or transfer slices to an airtight container. Keep it refrigerated for up to 3-4 days. The texture and flavor remain excellent when stored properly.

Can I make No-Bake Key Lime Pie ahead of time for a party? Absolutely! This is an ideal make-ahead dessert. You can prepare the entire pie one day in advance and let it chill overnight in the refrigerator. This allows ample time for it to set perfectly and for the flavors to meld beautifully.

What are some common substitutions for the crust or topping in a No-Bake Key Lime Pie? For the crust, common substitutions include crushed vanilla wafers, shortbread cookies, or even a pre-made graham cracker crust. For the topping, you can use store-bought whipped topping like Cool Whip, or get creative with toasted coconut flakes or candied lime zest for extra flair.

Conclusion

Creating this no-bake key lime pie is a simple joy, delivering big flavor with minimal fuss. It’s the perfect solution for a quick, impressive dessert that keeps your kitchen cool and your family happy. The combination of the crisp graham cracker crust and the smooth, tangy sweetened condensed milk and cream cheese filling is truly irresistible.

I encourage you to give this recipe a try and experience the ease and deliciousness for yourself. Don’t forget to share your creations and tell me what you think! If you loved this, you might also enjoy other quick no-bake desserts, easy fruit tarts, or simple cheesecake recipes.

No-Bake Key Lime Pie Recipe

No-Bake Key Lime Pie is a tangy, slightly tart creamy filling on top of a buttery graham cracker crust, garnished with slices of key limes and whipped cream. This easy dessert comes together with no oven needed, just mix, chill, and enjoy a sweet, zesty treat!
Prep Time 30 minutes
Total Time 30 minutes
Servings: 8 slices
Cuisine: American

Ingredients
  

  • 1 1/2 cups graham cracker crumbs
  • 1/2 cup 1 stick / 113 g unsalted butter, melted
  • 1/4 cup brown sugar
  • 8 ounces cream cheese softened
  • 1 can 14 ounces sweetened condensed milk
  • 1/2 cup key lime juice
  • 1 teaspoon freshly grated key lime or regular lime zest optional
  • 3/4 cup cold heavy whipping cream
  • Fresh key lime slices for garnish
  • Whipped cream for garnish
  • Fresh mint optional

Method
 

Instructions
  1. To a small bowl, add graham cracker crumbs, brown sugar, and melted butter. Mix, ensuring that every crumb is coated with butter. Press the crumbs into the bottom and up the sides of a 9-inch pie pan. Place the crust into the refrigerator to chill for at least 1 hour while you make the filling.
  2. In a large mixing bowl, beat the cream cheese on medium speed until smooth and creamy, about 30 seconds to 2 minutes. Scrape the bowl.
  3. Add the sweetened condensed milk, key lime juice, and optional key lime zest. Mix until fully combined, stopping to scrape down the sides of the bowl as needed.
  4. In a separate mixing bowl, add the heavy whipping cream. Using a handheld mixer or stand mixer fitted with the whisk attachment, mix on low-medium speed for 30 seconds to 1 minute then increase the speed to medium-high and continue mixing until stiff peaks form.
  5. Gently fold one-third of the whipped cream into the cream cheese mixture until just combined, then fold in the remaining whipped cream until fully combined.
  6. Pour the filling over the graham cracker crust and spread it into an even layer. Cover with plastic wrap and transfer to the refrigerator to chill for at least 4-6 hours or overnight until set.
  7. When ready to serve, garnish with key lime slices, fresh mint, and whipped cream.


Korean Chicken Skewers Recipe

Easy Korean Chicken Skewers Recipe

Imagine the irresistible aroma of sweet, savory, and spicy chicken sizzling on the grill, ready in just 30 minutes. This easy Korean chicken skewers recipe brings that vibrant street food experience right to your kitchen or backyard. You’ll learn how to create perfectly marinated chicken with a sticky, rich glaze, using simple ingredients and straightforward techniques.

This recipe is a game-changer for busy families who crave exciting flavors without spending hours in the kitchen. It’s quick, healthy, and surprisingly simple to master, making weeknight dinners or weekend BBQs a breeze. Get ready to impress everyone with these delicious skewers!

Why You’ll Love This Recipe

You’ll adore these Korean chicken skewers for their incredible flavor balance. The gochujang paste delivers a delightful kick, perfectly harmonized by the sweetness of brown sugar and the savory depth of soy and oyster sauce. Each bite offers a juicy, tender texture that melts in your mouth.

This recipe is incredibly versatile, offering grilling, grill pan, and oven baking instructions. No matter your cooking setup, you can achieve that desirable char and sticky glaze. It’s a fantastic way to introduce new, exciting flavors to your family, even picky eaters, thanks to the appealing bite-sized pieces. Plus, it’s a high-protein meal that comes together in a flash, fitting perfectly into a busy lifestyle.

Ingredients You’ll Need

Here are the essential components for crafting these flavorful skewers. Each ingredient plays a vital role in building the signature Korean taste.

  • Boneless, skinless chicken breasts: Diced into uniform chunks, these absorb the marinade beautifully and cook quickly. You can also use chicken thighs for a juicier result.
  • Gochujang paste: This Korean red pepper paste is the star, providing an unique sweet, savory, and spicy depth. Adjust the amount to your heat preference.
  • Soy sauce: Adds essential umami and saltiness; low-sodium is often preferred.
  • Rice vinegar: Provides a tangy balance to the rich flavors.
  • Light brown sugar: Sweetens the marinade and helps create that desirable sticky glaze.
  • Toasted sesame oil: Contributes a nutty, aromatic finish that’s characteristic of Korean cuisine.
  • Kosher salt and freshly ground black pepper: Basic seasonings to all the other flavors.
  • Fresh ginger and minced garlic: These aromatics are crucial for the authentic Korean flavor profile.
  • Oyster sauce: Adds a layer of savory richness and helps with the glaze’s stickiness.
  • Sweet rice wine (mirim): A subtle sweetness and tenderizing agent for the chicken.
  • Korean oligo syrup (or light corn syrup): Essential for that glossy, sticky finish on the reduced sauce.
  • Chili flakes (optional): For an extra punch of heat if you like things spicier.
  • Red pepper: Adds a sweet crunch and vibrant color when threaded onto the skewers.
  • Green onion and sesame seeds: Perfect optional garnishes for freshness and texture.
  • Wooden skewers: Remember to soak these thoroughly to prevent burning during cooking.

How to Make Korean Chicken Skewers

This recipe is designed for ease and efficiency, ensuring delicious results every time. Follow these steps for perfect Korean chicken skewers.

1. Preparing the Marinade and Sauce

  1. If you’re using wooden skewers, start by soaking them in water for at least 15-30 minutes. This crucial step prevents them from burning on the grill or in the oven.
  2. In a large bowl, combine the Gochujang paste, soy sauce, rice vinegar, brown sugar, sesame oil, salt, and pepper. Whisk these ingredients together until they are fully combined, creating a rich chicken marinade. Taste the mixture and adjust any ingredients to your preference.
  3. Remove 1/3 cup of this marinade and set it aside in a small saucepan. This portion will become your basting sauce later.
  4. Add the diced chicken to the remaining marinade in the large bowl. Toss the chicken well to each piece is evenly coated. Marinate the chicken for 15-30 minutes; if you’re marinating for the longer duration, cover the bowl and place it in the fridge. Do NOT marinate the chicken for longer than 30 minutes; the acidity in the marinade can break down the chicken fibers too much, resulting in a mushy texture.
  5. Place the saucepan with the reserved 1/3 cup marinade on the stove over medium-high heat. Cook for about 2-3 minutes, stirring nearly continuously, until the sauce reduces, thickens, and becomes wonderfully sticky. Remove it from the heat and set it aside, ready to baste your chicken.

2. Assembling and Cooking the Skewers

  1. After the chicken has marinated, thread the pieces onto approximately 5 to 8 skewers. The exact number will depend on your chicken quantity and skewer length. Avoid compressing or overly compacting the chicken onto each skewer; give the pieces a little space for even cooking. If you’re adding red pepper, alternate chicken and pepper chunks for a colorful presentation.
  2. When you’re ready to cook, discard the used marinade from the marinating bowl.

3. Grilling Instructions (Outdoors)

  1. Oil your grill grates and preheat your outdoor gas grill to medium-high heat. Place the prepared skewers on the grill, close the lid, and grill for approximately 3-4 minutes. Open the lid, flip the chicken using tongs, and baste it generously with the reduced sticky sauce. Continue cooking for another 2-4 minutes, or until the chicken reaches an internal temperature of 160°F (it will rest up to 165°F). Baste as much as you like for juicier chicken with richer flavor.

4. Grill Pan Instructions (Indoors on Stove)

  1. Preheat a grill pan over medium-high to high heat on your stove. Arrange the skewers on the hot pan and cook for approximately 5 minutes. Flip the chicken using tongs, baste generously with the reduced sauce, and cook for another 3-5 minutes, or until the chicken is done (160°F internal temperature, resting to 165°F). Baste often to juicy, flavorful chicken.

5. Oven Baking Instructions

  1. Preheat your oven to 400°F. Place a grill rack over a parchment-lined baking sheet and arrange the skewers on the rack. Bake in the preheated oven for about 20 minutes, or until the chicken is cooked through and lightly charred on the edges. Flip the skewers midway through baking with tongs and baste generously with the reduced sauce. You can even flip and baste another time before the chicken is fully done for extra moistness.
  1. Optionally, garnish your cooked korean chicken skewers recipe with sliced green onions, sesame seeds, or fresh herbs like basil or cilantro. Serve the chicken directly on the skewers, or remove it and serve alongside rice, over a fresh salad, or as part of a larger meal.

Expert Tips and Tricks

  • Uniform Chicken Pieces: Cut your chicken into consistently sized 1 1/2-inch chunks. This ensures that all pieces cook evenly and reach doneness at the same time, preventing some from drying out while others are still undercooked.
  • Don’t Over-Marinate: The instruction to marinate for only 15-30 minutes is critical. The acids in the marinade, like rice vinegar and gochujang, can break down chicken proteins too much if left for longer, resulting in a stringy or mushy texture.
  • Reduce the Sauce Properly: Continuously stir the reserved marinade as it reduces. This prevents it from burning and helps it achieve that perfect sticky, glossy consistency for basting. What surprised me in testing was how quickly it can go from perfect to burnt if you look away!
  • Don’t Overcrowd Skewers or Cookware: Give your chicken pieces space on the skewers and don’t overcrowd your grill, grill pan, or baking sheet. Good air circulation and direct heat contact are essential for proper searing and charring.
  • Use a Meat Thermometer: Always check the internal temperature of the chicken with a reliable meat thermometer. Aim for 160°F before resting; it will carry over to a safe 165°F. This is the surest way to guarantee juicy, safely cooked chicken.
  • Soak Wooden Skewers: Thoroughly soaking wooden skewers in water for at least 15-30 minutes prevents them from catching fire or charring excessively during grilling or baking.

Recipe Variations and Substitutions

This korean chicken skewers recipe is wonderfully adaptable, allowing you to tailor it to your family’s tastes or what you have on hand.

For a richer flavor and even juicier results, consider using boneless, skinless chicken thighs instead of breasts. Chicken thighs skewers tend to stay more tender under high heat. If you’re looking to add more vegetables, bell peppers (any color), zucchini, or even pineapple chunks can be threaded onto the skewers, alternating with the chicken. They’ll absorb some of the delicious marinade flavors.

If gochujang paste is hard to find, a simple substitute for the gochujang marinade can be a mix of tomato paste, a touch of sriracha or other Asian chili garlic sauce, and a pinch of sugar. While not identical, it will provide a similar sweet-spicy-savory profile. For the Korean oligo syrup, light corn syrup works perfectly as a direct substitute to achieve that glossy finish. To make this recipe gluten-free, simply swap regular soy sauce for tamari. If you prefer a milder flavor, you can reduce the amount of gochujang or omit the optional chili flakes entirely.

Serving and Pairing Suggestions

These sticky dakkochi (Korean chicken skewers) are fantastic served in a variety of ways, making them perfect for any meal or occasion. For a classic pairing, serve them alongside a bowl of fluffy steamed white or brown rice. The rice soaks up the extra sauce beautifully.

For a lighter meal, remove the chicken from the skewers and serve it over a crisp, fresh salad with a light vinaigrette. A simple side of quick pickled cucumbers or kimchi offers a refreshing contrast to the rich flavors of the chicken. During warmer months, grilled vegetables like asparagus or corn on the cob make excellent accompaniments. For a complete family dinner, you could also offer a side of quick fried rice or a simple Asian-inspired coleslaw. The vibrant colors and irresistible aroma of these skewers make them a showstopper whether served directly on the stick or plated elegantly.

Frequently Asked Questions

Q1: What is the best way to cook Korean Chicken Skewers if I don’t have a grill?

If you don’t have an outdoor grill, you have excellent alternatives! You can use an indoor grill pan on your stovetop for similar charring and flavor, or bake them in the oven on a rack over a parchment-lined baking sheet. Both methods provide delicious results for this korean chicken skewers recipe.

Q2: Can I use chicken breast instead of thighs for this Korean Chicken Skewers recipe?

Yes, the recipe specifically calls for boneless, skinless chicken breasts. You can absolutely use them for a leaner option. However, many home cooks prefer boneless, skinless chicken thighs for their inherent juiciness and richer flavor, as they are more forgiving and less prone to drying out during cooking.

Q3: How long can Korean Chicken Skewers be marinated?

The chicken should be marinated for 15-30 minutes. It’s crucial not to marinate for longer than 30 minutes, as the acidic ingredients in the marinade can begin to break down the chicken’s protein fibers, leading to a mushy texture after cooking.

Q4: What are common substitutions for gochujang in Korean chicken skewers?

If you don’t have gochujang, a good substitute for the gochujang marinade involves combining tomato paste with a dash of sriracha or another Asian chili garlic sauce, and a pinch of sugar. This will mimic the sweet, spicy, and savory profile fairly well.

Q5: How do I store and reheat leftover Korean Chicken Skewers?

Store leftover Korean chicken skewers in an airtight container in the refrigerator for up to 3-4 days. To reheat, you can warm them gently in a microwave, a preheated oven at 350°F until heated through, or quickly on a stovetop pan to retain some crispness.

Conclusion

These easy Korean chicken skewers offer a fantastic blend of sweet, savory, and spicy flavors that your family will adore. With flexible grilling instructions and oven options, this quick 30-minute meal is perfect for busy weeknights or relaxed gatherings. I’ve found that the reduced sauce is key to that irresistible sticky glaze.

Give this korean chicken skewers recipe a try tonight and watch it become a new family favorite. Don’t forget to share your delicious creations! For more quick and flavorful meals, our recipes for Sheet Pan Teriyaki Chicken, Spicy Asian Noodles, or Grilled Lemon Herb Chicken.

Korean Chicken Skewers Recipe

These sticky Korean BBQ Chicken Skewers are marinated with gochujang paste, soy sauce, rice vinegar, brown sugar, and toasted sesame oil for a perfect blend of savory, sweet, and spicy flavors. Both grilling and baking instructions are provided for this easy chicken recipe that’s ready in 30 minutes.
Prep Time 15 minutes
Cook Time 15 minutes
Total Time 30 minutes
Servings: 4 servings
Cuisine: Korean

Ingredients
  

  • 2 lbs boneless skinless chicken breasts diced into 1 1/2-inch chunks
  • 2 tablespoons Gochujang paste
  • 1/4 cup soy sauce
  • 3 tablespoons rice vinegar
  • 2 tablespoons light brown sugar packed
  • 1 tablespoon toasted sesame oil
  • 1/2 teaspoon kosher salt
  • 1/2 teaspoon freshly ground black pepper
  • 1 green onion sliced into thin rounds; optional for garnishing
  • sesame seeds to taste; optional for garnishing
  • 1 red pepper cut into large chunks (optional)
  • 2 teaspoons fresh ginger finely grated
  • 2 teaspoons minced garlic
  • 1 tablespoon oyster sauce
  • 1 tablespoon sweet rice wine mirim
  • 1/2 teaspoon ginger puree
  • 2 tablespoons Korean oligo syrup or light corn syrup
  • 1 teaspoon chili flakes optional
  • 2 tablespoons oil divided
  • wooden skewers soaked in water

Method
 

Instructions
  1. If using wooden skewers, soak them in water for at least 15-30 minutes.
  2. To a large bowl, add the Gochujang paste, soy sauce, rice vinegar, brown sugar, sesame oil, salt, and pepper, and whisk to combine to create the chicken marinade. Taste, and if desired, add more of a certain ingredient.
  3. Remove 1/3 cup of the marinade and place it in a small saucepan; set aside.
  4. Add the diced chicken to the bowl, toss to coat evenly, and marinate for 15-30 minutes. If marinating closer to 30 minutes, cover and place the bowl in the fridge. Do NOT marinate longer than indicated; the acidity of the ingredients will break down the chicken protein fibers too much and the chicken will be mushy.
  5. Place the saucepan with the reserved 1/3 cup marinade on the stove, heat over medium-high for about 2-3 minutes, or until the sauce reduces, thickens, and becomes sticky; stir nearly continuously so it doesn’t burn. Set aside off the heat until it’s time to baste the chicken.
  6. After marinating, thread the chicken on approximately 5 to 8 skewers, depending on how much chicken you’re using and the exact length of your skewers. Don’t compress or overly compact/squish the chicken onto a skewer. If you’re running out of space, start a new skewer. If adding red pepper, alternate chicken and red pepper chunks on skewers.
  7. When ready to cook, discard the marinade that was in the marinating bowl.
  8. For grilling (outdoors): Oil the grill grates, and preheat outdoor gas grill to medium-high heat. Place the skewers on the grill, close the lid, and grill for approximately 3-4 minutes, open the lid, flip the chicken using tongs, baste it generously with the sauce that you reduced, and cook for another 2-4 minutes, or until the chicken is done (160F internal temperature, resting to 165F); baste as much as desired for juicier chicken with richer flavor.
  9. For grill pan (indoors on stove): Preheat a grill pan over medium-high to high heat on your stove, place the skewers on top, and cook for approximately 5 minutes, flip the chicken using tongs, baste generously, and cook for another 3-5 minutes, or until the chicken is done (160F internal temperature, resting to 165F); baste as often as desired for juicier more flavorful chicken.
  10. For oven baking: Preheat oven to 400F and place a grill rack over a parchment-lined baking sheet, and arrange the skewers on the prepared rack. Bake in the preheated oven for about 20 minutes, or until the chicken is cooked through and lightly charred on the edges. Flip midway through baking with tongs, baste generously, and you can even flip and baste another time before chicken is fully done for juicier, moister chicken.
  11. Optionally garnish with green onions, sesame seeds, fresh herbs such as basil or cilantro, or as desired. Serve the chicken right on the skewers, or remove it from the skewers and serve it alongside rice, over a salad, or as desired.


Pink Lemonade Cupcakes

Pink Lemonade Cupcakes: The Perfect Summer Treat

The vibrant, cheerful hue of a glass of pink lemonade instantly evokes sunny days and carefree moments. These delightful pink lemonade cupcakes capture that very essence, bringing a sweet and tangy burst of summer to your table. You’ll learn how to bake tender, moist lemon cupcakes from scratch, topped with a luscious, creamy lemon buttercream frosting that’s as pretty as it is delicious. This cupcake recipe is perfect for brightening any occasion, from casual backyard BBQs to elegant baby showers.

This recipe delivers on both flavor and visual appeal, making it a guaranteed crowd-pleaser. It’s a fantastic way to enjoy a classic summer drink in an unexpected and utterly charming dessert.

Why You’ll Love This Recipe

These pink lemonade cupcakes are a celebration of fresh flavors and simple joy. Each bite offers a perfect balance of sweet and tart, reminiscent of a tall, icy glass of your favorite summertime beverage. The cupcakes themselves are incredibly soft and springy, thanks to the careful balance of ingredients.

The star of the show might just be the luscious lemonade frosting. It’s wonderfully creamy with a bright, zesty kick that perfectly complements the cake. Plus, their beautiful pale pink color and charming lemon jelly candy toppers make them an absolute showstopper. They’re a joy to bake and even more delightful to share with family and friends.

Ingredients You’ll Need

Creating these delightful treats starts with selecting the right components. Here’s a breakdown of the key ingredients and why they’re essential for your perfect batch of pink lemonade cupcakes.

  • All-purpose flour: Provides the structure for your cupcakes.
  • Baking powder & salt: These leavening agents a light, airy texture and balance the sweetness.
  • Granulated sugar: Sweetens the cake and helps tenderize the crumb.
  • Lemon zest & fresh lemon juice: Crucial for that authentic, bright lemon flavor in both the cake and the lemonade frosting. Use fresh lemons for the best results.
  • Unsalted butter: Adds richness and moisture to the cupcakes and creates a smooth, creamy frosting.
  • Large eggs: Bind the ingredients and contribute to the cake’s structure and richness.
  • Vanilla extract: Enhances all the other flavors with its warm, aromatic notes.
  • Whole milk: Adds moisture and richness to the cupcake batter.
  • Red food coloring: Just a few drops transform these into a beautiful pink dessert.
  • Cream cheese: This is what gives the frosting its incredible tang and silky texture, setting it apart from a standard lemon buttercream.
  • Powdered sugar: The base for your sweet, fluffy frosting.
  • Pink Sprinkles & Lemon Jelly Candy Wedges: For a festive, fun finish that screams summer!

How to Make Pink Lemonade Cupcakes

Get ready to create some magic in your kitchen. This cupcake recipe is straightforward and incredibly rewarding, resulting in beautiful, delicious treats.

1. For the Pink Lemonade Cupcakes

  1. Start by preheating your oven to 350 degrees F. Line two large muffin pans with 24 paper liners, preparing them for your delicious batter.
  2. In a medium bowl, whisk together the all-purpose flour, baking powder, and salt. Set this dry mixture aside for later.
  3. In the bowl of an electric mixer, cream together the softened unsalted butter and granulated sugar until the mixture is light and fluffy, which usually takes about 3 to 4 minutes. Scrape down the sides of the bowl, then add the eggs, vanilla extract, and baking powder. Beat these ingredients until they are just combined.
  4. Next, add the lemon zest and fresh lemon juice to the mixer bowl. Turn the mixer to low speed and gradually add the flour mixture and whole milk, alternating between the two, until everything is just combined. Scrape the bowl once more, then, with the mixer still on low, add 3 to 5 drops of red food coloring until you achieve a lovely pale pink color.
  5. Divide the batter evenly among the 24 cupcake liners, filling each about two-thirds full. Bake for 15 to 20 minutes, or until a toothpick inserted into the center of a cupcake comes out clean. Let the cupcakes cool in the muffin pans for 10 minutes before transferring them to a wire rack to cool completely. This prevents them from getting soggy.

2. For the Pink Lemonade Frosting

  1. Once your cupcakes are completely cool, it’s time to make the frosting. Place the softened butter and cream cheese in a clean mixing bowl. Cream these together with the mixer on high speed until the mixture is very smooth and free of any clumps.
  2. Scrape down the bowl, then add the lemon zest and fresh lemon juice. Turn the mixer to low speed and slowly add the powdered sugar, a cup at a time, until you reach your desired frosting consistency. I’ve found that using fresh lemon juice here really brightens the flavor.
  3. Finally, add 2 to 3 drops of red food coloring to the frosting, mixing on low until it transforms into a beautiful pale pink.
  4. Transfer the finished pink lemonade frosting to a large piping bag fitted with a wide piping tip. Pipe generous mounds of frosting onto the top of each cooled cupcake.
  5. To finish, cover the frosted cupcakes with a scattering of pink sprinkles and crown each one with a lemon jelly candy wedge.

Expert Tips and Tricks

Getting your pink lemonade cupcakes just right involves a few simple tricks. Here’s what I’ve learned in testing this recipe to perfect results every time.

  • Room Temperature Ingredients are Key: Make sure your butter, cream cheese, and eggs are truly softened to room temperature. This helps them cream together smoothly, creating a more uniform batter and a lump-free frosting.
  • Don’t Overmix: Overmixing the cupcake batter can lead to tough, dry cupcakes. Mix only until the ingredients are just combined, especially after adding the flour.
  • Fresh Lemon Zest and Juice: The flavor of these cupcakes relies heavily on fresh lemon. Zest your lemons before juicing them for ease. What surprised me was how much brighter the flavor is with fresh zest versus bottled juice.
  • Cool Completely: your cupcakes are entirely cool before frosting them. Warm cupcakes will melt the frosting, creating a sticky mess. Patience here pays off!
  • Adjust Frosting Consistency: If your frosting is too thick, add a tiny bit more lemon juice or milk. If it’s too thin, gradually add more powdered sugar. My preference is for a frosting that holds its shape but is still easy to pipe.
  • Food Coloring Control: Add red food coloring one drop at a time until you achieve your desired pale pink shade. It’s easier to add more than to take it away.

Recipe Variations and Substitutions

These pink lemonade cupcakes are fantastic as is, but there are plenty of ways to customize them to your taste or dietary needs. You can easily adapt this cupcake recipe for different occasions or to suit what you have on hand.

For a dairy-free option, you can substitute plant-based butter and milk, and a dairy-free cream cheese alternative for the frosting. your chosen substitutes are unsweetened for best results. If you want to make these gluten-free, use a 1:1 gluten-free all-purpose flour blend. I’ve found that many blends work well in cupcake recipes.

Consider adding a few fresh raspberries or finely diced strawberries to the cupcake batter for a fruitier twist. This will also naturally the pink color. For an extra pop of flavor, you could fill the cooled cupcakes with a dollop of store-bought or homemade lemon curd before frosting. This adds another layer of tangy goodness. If you’re looking for a less sweet frosting, you can reduce the amount of powdered sugar slightly, or use a meringue-based lemon buttercream for a lighter texture.

Serving and Pairing Suggestions

These pink lemonade cupcakes are perfect for so many occasions, especially during the warmer months. Their bright, cheerful look makes them ideal for summertime parties, baby showers, or bridal brunches.

To serve, arrange them on a pretty cake stand or a decorative platter. The pink sprinkles and lemon jelly candy wedges add a lovely finishing touch, making them look like a little celebration. For a cohesive spread, pair them with other light, refreshing treats like fresh fruit tarts, mini cheesecakes, or even a simple bowl of mixed berries. They also go wonderfully with a tall glass of actual pink lemonade or iced tea. For a slightly more adult gathering, consider serving them alongside a sparkling rosé or a light, fruity cocktail. These cupcakes are truly versatile, bringing a touch of elegance and fun to any table.

Frequently Asked Questions

What makes pink lemonade cupcakes pink?

Pink lemonade cupcakes get their signature color from a few drops of red food coloring added to both the cupcake batter and the frosting. This creates a pale, inviting pink hue without altering the delicious lemon flavor.

Can I use a cake mix for pink lemonade cupcakes?

While this recipe is made from scratch for the best flavor and texture, you can adapt a white cake mix by adding lemon zest, fresh lemon juice, and a few drops of red food coloring to the batter. For the frosting, a store-bought vanilla frosting can be enhanced with lemon zest, lemon juice, and food coloring.

How do you store pink lemonade cupcakes to keep them fresh?

Store frosted pink lemonade cupcakes in an airtight container at room temperature for up to 2 days. If your kitchen is very warm or if you’ve used a cream cheese frosting, it’s best to refrigerate them. Bring them back to room temperature for optimal flavor and texture before serving.

What are some creative variations for Pink Lemonade Cupcakes?

Beyond the classic, you could add a raspberry puree swirl to the batter, top with candied lemon slices, or even fill them with a tangy lemon curd for an extra burst of flavor. A different pink dessert could involve strawberry or cherry elements.

What ingredients make cupcakes moist and tender?

Ingredients like softened butter, eggs, whole milk, and fresh lemon juice all contribute to a moist and tender cupcake. Properly measuring ingredients and avoiding overmixing the batter are also crucial for achieving that perfect, delicate crumb.

Conclusion

These pink lemonade cupcakes are more than just a dessert; they’re a little bite of sunshine, perfect for sharing. The combination of tender lemon cake and tangy lemonade frosting creates a truly memorable treat that’s surprisingly easy to achieve. My experience shows that the fresh lemon zest and juice are non-negotiable for that authentic, bright flavor.

So, gather your ingredients, follow these steps, and get ready to impress everyone with your baking . Don’t forget to snap a picture and share your beautiful creations! If you loved this recipe, you might also enjoy a classic lemon pound cake, a batch of strawberry shortcake, or a vibrant berry tart.

Pink Lemonade Cupcakes

Sweet and tangy, farm-stand fresh Pink Lemonade Cupcakes are perfect for summertime parties, baby showers, or any cupcake-worthy occasion. They are soft and springy with a luscious sweet-tart frosting.
Prep Time 30 minutes
Cook Time 20 minutes
Total Time 50 minutes
Servings: 24 cupcakes
Cuisine: American

Ingredients
  

For the Pink Lemonade Cupcakes
  • 2 1/2 cups all-purpose flour
  • 2 1/2 teaspoons baking powder
  • 1/4 teaspoon salt
  • 1 1/2 cups granulated sugar
  • 1 tablespoon lemon zest
  • 3/4 cup unsalted butter softened
  • 2 large eggs
  • 1 tablespoon vanilla extract
  • 1/2 cup fresh lemon juice
  • 3/4 cup whole milk
  • 3 to 5 drops red food coloring
For the Pink Lemonade Frosting
  • 1 1/2 cups unsalted butter softened
  • 8 ounces cream cheese softened
  • 6-8 cups powdered sugar
  • 1 lemon zest + 3 tablespoons juice
  • 2-3 drops red food coloring
  • Pink Sprinkles
  • 24 lemon jelly candy wedges

Method
 

Instructions
  1. Preheat the oven to 350 degrees F. Line two large muffin pans with 24 paper liners.
  2. In a medium bowl, whisk together flour, baking powder, and salt.
  3. Place 3 softened Land O Lakes®Salted Butter Half Sticks in the bowl of an electric mixer. Add the sugar and beat until light and fluffy, 3 to 4 minutes. Scrape the bowl and add the eggs, vanilla extract, and baking powder. Beat to combine.
  4. Add the lemon zest and juice to the bowl. Turn the mixer on low and slowly add the flour and milk until just combined. Scrape the bowl again and turn on low while adding 3 to 5 drops of red food coloring, creating a pale pink color.
  5. Divide the batter evenly between 24 cupcake liners. Bake for 15 to 20 minutes, until a toothpick inserted into the center of a cupcake comes out clean. Cool in the muffin pans for 10 minutes before moving to a cooling rack.
  6. Once the cupcakes are completely cool, make the frosting. Place the softened butter and cream cheese in a clean bowl. Cream with the mixer on high until very smooth with no clumps. Scrape the bowl, then add the lemon zest and juice. Turn the mixer on low and slowly add the powdered sugar until your desired consistency is reached. Add 2 to 3 drops of red food coloring to create a pale pink color.
  7. Place the frosting in a large piping bag with wide piping tip. Pipe large mounds of frosting on top of each cupcake. Then cover with pink sprinkles and top with a lemon jelly candy.


Apple Cider Doughnuts

Apple Cider Doughnuts: Perfect Fall Treat Recipe

The air turns crisp, leaves begin to change, and suddenly, the craving hits. That warm, spiced aroma of fresh apple cider doughnuts just screams autumn. There’s nothing quite like biting into a tender, cake-like doughnut, perfectly spiced and coated in cinnamon sugar.

This easy recipe brings that irresistible fall magic right into your kitchen. You’ll learn how to make tender, flavorful, and addictive apple cider doughnuts that are guaranteed to become a family favorite, whether you choose to bake or fry them.

Why You’ll Love This Recipe

These aren’t just any doughnuts; they are a celebration of fall flavors in every bite. The secret lies in reducing the apple cider, which concentrates its natural sweetness and tang into an intense apple essence. This deep flavor permeates the moist cake-like texture, creating a truly unforgettable treat.

Busy families will appreciate how straightforward this recipe is, fitting easily into a weekend morning routine. It delivers big on taste without requiring hours in the kitchen. Plus, these delightful doughnuts are a kid-friendly recipe that everyone will eagerly devour, making them perfect for cozy gatherings or a special breakfast.

Ingredients You’ll Need

Creating these delicious treats starts with a few key ingredients. Each one plays a vital role in achieving that perfect balance of flavor and texture.

  • Apple cider: This is the star! Reducing it concentrates the apple flavor for an intense taste.
  • All-purpose flour: Provides the structure for our tender cake doughnuts.
  • Baking powder, baking soda, and salt: These leavening agents a light, fluffy crumb.
  • Ground cinnamon, nutmeg, ginger, and cardamom: A blend of warm spices that perfectly complements the apple cider. This combination really makes the flavors pop.
  • Light brown sugar and granulated sugar: For sweetness and moisture, with brown sugar adding a subtle caramel note.
  • Large egg: Binds the ingredients and adds richness to the batter.
  • Vanilla extract: A touch of vanilla always rounds out sweet flavors beautifully.
  • Melted coconut oil or vegetable oil: Contributes to the moist texture of the doughnuts. You can use either depending on what you have on hand.
  • Almond milk or regular milk: Adds necessary liquid to the batter, making it smooth and workable.
  • Unsweetened apple sauce: Boosts apple flavor and adds extra moisture without making the doughnuts heavy.
  • Unsalted butter: Used for the delicious cinnamon sugar coating.
  • Peanut or vegetable oil: Essential if you plan on making fried apple cider donuts.

How to Make Apple Cider Doughnuts

Making these delightful apple cider doughnuts is a rewarding process that fills your home with incredible aromas. Follow these steps for a perfect batch every time.

1. Preparing the Apple Cider

  1. Pour 1 1/4 cups of apple cider into a saucepan, adding a cinnamon stick if you like for extra flavor. Place it over medium heat and bring it to a gentle simmer.
  2. Continue to simmer the cider until it reduces down to exactly 1/3 cup. I like to pour it into a measuring glass to check, and if it’s just a little short, I top it off with a tiny bit more fresh cider. Set this concentrated cider aside to cool completely.

2. Mixing the Doughnut Batter

  1. Preheat your oven to 350°F (180°C). Lightly grease your donut pans with nonstick spray, ensuring you have enough for 12 doughnuts.
  2. In a medium bowl, whisk together the all-purpose flour, fine salt, baking powder, baking soda, ground cinnamon, ground ginger, ground nutmeg, and ground cardamom. Set this dry mixture aside.
  3. In a large bowl, whisk together the light brown sugar, 1/4 cup granulated sugar, large egg, vanilla extract, melted oil, and the warm (but not hot) reduced apple cider.
  4. Next, whisk in the almond milk and unsweetened apple sauce until well combined.
  5. Pour the dry ingredients into the wet mixture and whisk gently until they are just blended. Be careful not to overmix the batter; a few small lumps are fine.

3. Baking and Coating

  1. Transfer the doughnut batter into a piping bag or a large zip-top bag. Snip off one corner or the tip of the bag.
  2. Pipe the batter into each cavity of your prepared donut pans, filling each one about three-quarters full. Make sure to use up all the batter.
  3. Bake for 10 to 15 minutes, or until a toothpick inserted into a doughnut comes out clean with only a few moist crumbs attached.
  4. Allow the baked apple cider donuts to cool in their pans for about 10 minutes. Then, carefully remove them and place them on a wire rack to cool further.
  5. For the cinnamon sugar coating, melt 6 tablespoons of unsalted butter in the microwave. In a separate shallow dish, combine 1 cup of granulated sugar and 2 teaspoons of ground cinnamon.
  6. To coat, dunk each warm doughnut into the melted butter, letting any excess drip off. Then, toss it in the cinnamon sugar mixture until it’s thoroughly coated on all sides. Repeat this process with all the remaining doughnuts.
  7. Serve these delightful treats warm for the best flavor and texture.

Expert Tips and Tricks

Getting that perfect apple cider donut recipe is all about a few key details. Here are my top tips to your doughnuts turn out amazing every time.

  • Don’t Rush the Reduction: The apple cider reduction is crucial for deep flavor. Simmer it slowly until it’s truly concentrated to 1/3 cup. This step really makes a difference in the final taste.
  • Mind the Mixing: When combining the wet and dry ingredients, mix just until no streaks of flour remain. Overmixing develops gluten, which can lead to tough, chewy doughnuts instead of the tender cake-like texture you want.
  • Even Filling is Key: Using a piping bag makes it incredibly easy to fill your donut pans evenly. This ensures consistent baking and perfectly shaped doughnuts.
  • Cooling Patience: Allow the doughnuts to cool in the pan for the recommended 10 minutes. This gives them time to firm up before you handle them, preventing breakage.
  • Coat While Warm: The cinnamon sugar coating adheres best when the doughnuts are still warm from the oven. This creates that irresistible sugary crust.
  • Oil Temperature for Frying (if you choose this method): If you decide to make fried apple cider donuts, maintaining a consistent oil temperature of 350-375°F (175-190°C) is essential. Too low, and they’ll be greasy; too high, and they’ll burn outside before cooking inside.

Recipe Variations and Substitutions

This versatile fall dessert is wonderful as is, but you can easily adapt it to suit your preferences or dietary needs.

For those who love the classic deep-fried texture, you can absolutely make fried apple cider donuts. Simply heat peanut or vegetable oil in a deep pot to 350-375°F (175-190°C). Drop portions of the dough into the hot oil, frying for 1-2 minutes per side until golden brown. Drain them on paper towels before coating in cinnamon sugar. In testing, I found the fried version to be incredibly crisp on the outside.

If you prefer a different topping, try a simple apple cider glaze. Whisk together powdered sugar with a tablespoon or two of the reduced apple cider until smooth. Drizzle it over the cooled doughnuts for a sweet, tangy finish.

For dietary adjustments, the recipe already offers almond milk as an alternative to regular milk. If you’re looking for a gluten-free option, you could experiment with a 1:1 gluten-free baking flour blend. However, I haven’t specifically tested this myself, so the texture might vary slightly. You might also swap the coconut oil for an equal amount of unsalted butter if you prefer.

Serving and Pairing Suggestions

These apple cider doughnuts are best served warm, straight from the cooling rack, with their generous coating of cinnamon sugar. The warmth enhances all those cozy fall spices and the tender texture.

For a delightful breakfast or brunch spread, pair them with a hot cup of coffee or a steaming mug of spiced apple cider. The complementary apple flavors create a truly immersive fall experience. You could also serve them alongside a fruit salad for a lighter contrast. What surprised me when I first made these was how well they paired with a simple bowl of plain Greek yogurt for a quick, balanced treat.

If you’re serving them for a special occasion or party, arrange them artfully on a platter with a sprinkle of extra cinnamon sticks or a few fresh apple slices. They make a beautiful and inviting display that captures the essence of autumn.

Frequently Asked Questions

Q1: Can I bake these Apple Cider Doughnuts instead of frying them? Absolutely! The primary instructions for this recipe are for baked apple cider doughnuts, which result in a tender, cake-like texture. Baking offers a lighter version of this classic treat without the need for hot oil.

Q2: How do you store leftover apple cider donuts? Store any leftover apple cider doughnuts in an airtight container at room temperature. They are best enjoyed within 1-2 days to maintain their freshness and tender texture.

Q3: What is the best way to reduce apple cider for this recipe? The best way to reduce apple cider is to simmer it gently over medium heat in a small saucepan. Keep an eye on it and measure periodically to it reduces to exactly 1/3 cup, concentrating its flavor without burning.

Q4: Can I use apple juice as a substitute for apple cider? While you can substitute apple juice, apple cider typically offers a more and complex apple flavor due to its unfiltered nature. If using apple juice, you might want to reduce it slightly more to achieve a similar depth of flavor.

Q5: Why does the dough need to chill before making apple cider doughnuts? For fried apple cider doughnuts, chilling the dough helps it firm up, making it easier to handle and preventing it from spreading too much in the hot oil. However, this specific baked apple cider donut recipe does not require the dough to be chilled before baking.

Conclusion

These apple cider doughnuts are more than just a treat; they’re a taste of autumn, bringing warmth and comfort to your home. With their tender, spiced crumb and sweet cinnamon sugar coating, they are incredibly simple to make and utterly irresistible.

I hope you give this apple cider donut recipe a try and experience the joy of these homemade fall delights. Share your creations with friends and family! If you loved this, you might also enjoy my recipes for pumpkin bread, spiced pear muffins, or a classic apple pie.

Apple Cider Doughnuts

These baked or fried apple cider doughnuts are tender, flavorful, and addictive, with a moist cake-like texture and a coating of cinnamon sugar or a sweet glaze.
Prep Time 35 minutes
Cook Time 10 minutes
Total Time 45 minutes
Servings: 12 donuts
Cuisine: American

Ingredients
  

  • 1 1/4 cups apple cider
  • 2 cups all-purpose flour
  • 1 1/4 teaspoons baking powder
  • 1 teaspoon ground cinnamon
  • 3/4 teaspoon fine salt
  • 1/2 teaspoon apple pie spice
  • 1/2 teaspoon baking soda
  • 1/4 teaspoon ground nutmeg
  • 1/4 teaspoon ground ginger
  • 1/4 teaspoon ground cardamom
  • 1/2 cup light brown sugar packed
  • 1/4 cup granulated sugar
  • 1 large egg
  • 1 teaspoon vanilla extract
  • 1/4 cup melted coconut oil or vegetable oil
  • 1/4 cup almond milk or regular milk
  • 3 tablespoons unsweetened apple sauce
  • 6 tablespoons unsalted butter melted
  • 1 cup granulated sugar
  • 2 teaspoons ground cinnamon
  • Peanut or vegetable oil for frying (if frying)

Method
 

Instructions
  1. Pour 1 1/4 cups apple cider into a saucepan with a cinnamon stick (optional). Place over medium heat and bring to a simmer. Simmer until it reduces down to 1/3 cup. Pour into a measuring glass to ensure you have exactly 1/3 cup. If you’re just a hair short, top it off with a bit more fresh apple cider. Set aside to cool.
  2. Preheat the oven to 350°F (180°C) and grease donut pans, enough to make 12 donuts, with nonstick spray.
  3. In a medium bowl, whisk together the flour, salt, baking powder, baking soda, ground cinnamon, ground ginger, ground nutmeg, and ground cardamom. Set aside.
  4. In a large bowl, whisk together the brown sugar, 1/4 cup granulated sugar, egg, vanilla extract, melted oil, and the warm (not hot) reduced cider.
  5. Then whisk in the almond milk and apple sauce.
  6. Pour in the dry ingredients and whisk to combine until just blended. Do not overmix.
  7. Pour the batter into a piping bag, or a large zip lock bag, and snip off the tip or corner.
  8. Pipe the batter into each cavity of the prepared donut pans, filling each about 3/4 full and using up all of the batter.
  9. Bake for 10-15 minutes, or until a toothpick comes out clean with a few moist crumbs.
  10. Allow the donuts to cool in the pan for about 10 minutes, then carefully remove them from the pan and place on to a cooling rack.
  11. For the coating, melt 6 tablespoons butter in the microwave. Combine 1 cup granulated sugar and 2 teaspoons ground cinnamon in a separate shallow dish.
  12. Coat the donuts by dunking in the melted butter, allowing any excess to drip off, and then toss in the cinnamon sugar until thoroughly coated. Repeat with the remaining doughnuts.
  13. Serve warm.


Oven Baked Beet Chips Recipe

Easy Oven Baked Beet Chips Recipe

The aroma of savory spices mingling with the sweet earthiness of beets fills your kitchen. It’s a signal that something truly delicious is baking. If you’re searching for a healthy, satisfying snack that even picky eaters will adore, then these oven baked beet chips are your answer. This guide will teach you the simple secrets to achieving perfectly crispy, flavorful beet chips every single time, turning a humble root vegetable into a family favorite.

Busy parents often struggle to find quick, nutritious snacks that don’t involve a trip to the vending machine. This recipe offers a fantastic solution, transforming fresh beets into a vibrant, crunchy treat. It’s a smart way to get more vegetables into your family’s diet without sacrificing taste or convenience.

Why You’ll Love This Recipe

You’ll adore these beet chips for their delightful crunch and vibrant color. They offer a slightly sweet, earthy flavor that pairs wonderfully with a hint of salt, creating an irresistible combination. This recipe is also incredibly versatile, allowing you to experiment with different seasonings to suit any palate.

Beyond their fantastic taste, these chips are a genuinely healthy snack, packed with nutrients and fiber. They’re naturally gluten-free and vegan, fitting a variety of dietary needs without extra fuss. Plus, making them at home means you control the ingredients, avoiding unwanted additives found in many store-bought options.

Ingredients You’ll Need

Here are the simple components for your crispy creations:

  • Beets: Choose medium to large beets for easier slicing and a good yield. Red, golden, or striped varieties all work beautifully, offering different visual appeals.
  • Olive Oil: A drizzle of extra virgin olive oil helps the seasonings adhere and promotes even crisping in the oven. You can substitute with avocado oil if preferred.
  • Sea Salt: Fine sea salt is perfect for drawing out moisture and seasoning the chips. Flaked sea salt makes a lovely finishing touch.
  • Onion Powder: This adds a subtle, savory depth to the chips.
  • Garlic Powder: A touch of garlic powder enhances the overall savory profile without being overpowering.
  • Black Pepper: Freshly cracked black pepper brings a gentle warmth and aromatic kick.

How to Make Oven Baked Beet Chips

Creating perfectly crisp oven baked beet chips is simpler than you might think, especially with these clear, step-by-step instructions.

1. Prepare the Beets and Oven

Preheat your oven to 300°F. This low and slow temperature is key for drying out the beets without burning them. Line several baking sheets with parchment paper or lightly spray them with non-stick spray. This prevents sticking and makes cleanup a breeze. Scrub your beets thoroughly under cold water, then trim off the greens and roots. There’s no need to peel them; the skin adds nutrients and texture.

2. Slice and Season

The secret to truly crispy beet chips lies in thin, even slices. Use a mandoline slicer to achieve consistent 1/16-inch thin slices. If you’re using different colored beets, keep them in separate bowls to prevent their vibrant colors from bleeding into each other. Place the beet slices in a large bowl. Drizzle them with one tablespoon of olive oil and sprinkle with one teaspoon of sea salt, along with the onion powder, garlic powder, and black pepper. Toss everything gently to each slice is evenly coated.

3. Sweat Out Moisture

Now for the crucial step: let the seasoned beet slices sit in the bowl for 10-20 minutes. This “sweating” process allows the salt to draw out excess moisture from the beets. What surprised me in testing was how much liquid actually collected at the bottom of the bowl. Drain off any released liquid, then pat the slices thoroughly dry with paper towels. This step is vital for achieving that desirable crisp texture.

4. Bake Until Crisp

Arrange the dried beet slices in a single layer on your prepared baking sheets. Make sure no slices overlap, as this will prevent them from crisping evenly. Use as many baking sheets as needed to give them space. Bake in the preheated oven for 45-60 minutes. Halfway through, rotate the baking sheets from top to bottom if you’re using multiple sheets to even cooking. Bake until the edges begin to dry and curl, and the chips feel crisp but haven’t browned. Cooking times will vary based on your oven and the thickness of your slices.

5. Cool and Serve

Remove the oven baked beet chips from the oven and let them cool completely on the pan or a wire cooling rack. This cooling period is essential; they will continue to crisp up as they cool. Once fully cooled, transfer them to a platter or bowl. For an extra burst of flavor, sprinkle with a little more sea salt to taste, if desired.

Expert Tips and Tricks

  • Mandoline is Your Best Friend: A mandoline slicer is truly indispensable for making crispy beet chips. It ensures uniform, paper-thin slices, which is the most critical factor for even baking and maximum crunch.
  • Don’t Skip the Sweat: Allowing the beets to “sweat” out moisture with salt before baking is a game-changer. This simple step significantly reduces baking time and prevents soggy chips.
  • Single Layer is Key: Overlapping beet slices will steam instead of crisp. Give each chip its space on the baking sheet for optimal results. You might need to bake in batches.
  • Watch Like a Hawk: Beets can go from perfectly crisp to burnt very quickly, especially towards the end of baking. Keep a close eye on them and remove any smaller, crisper pieces as they finish.
  • Cool Completely: Resist the urge to snack on them warm! Beet chips crisp up significantly as they cool. Let them rest fully on the baking sheet or a cooling rack before enjoying.
  • Gloves for the Win: Beets are notorious for staining. Wearing gloves while scrubbing and slicing can save your hands from a temporary pink hue.

Recipe Variations and Substitutions

These oven baked beet chips are fantastic as is, but don’t be afraid to experiment with different flavors and preparations.

For a warm, aromatic twist, try a sweet spice blend. Instead of onion powder, garlic powder, and black pepper, toss your beet slices with 1/4 teaspoon ground cinnamon, 1/4 teaspoon ground ginger, and 1/8 teaspoon ground allspice. This creates a cozy, dessert-like chip that’s surprisingly delicious.

If you’re looking to reduce oil, you can use an olive oil spray instead of drizzling. Just the beets are lightly and evenly coated. For a different flavor profile, consider adding a pinch of dried rosemary or thyme along with the salt and pepper. These herbs complement the earthy sweetness of beets beautifully. If you don’t have fresh beets, you won’t be able to make chips from canned or pre-cooked beets, as they contain too much moisture and lack the firm texture needed for slicing.

Serving and Pairing Suggestions

Serve your crispy oven baked beet chips as a vibrant, standalone healthy snack. Their striking colors make them a beautiful addition to any appetizer platter. Arrange them artfully in a bowl or scattered around a cheese board for a pop of color and crunch.

These chips also make an excellent side dish for sandwiches or wraps, offering a healthier alternative to traditional potato chips. Pair them with a creamy dip, like a homemade Greek yogurt dip with herbs, or a zesty lemon-tahini sauce for an extra layer of flavor. They’re also a surprisingly good accompaniment to a light salad, adding texture and visual interest.

Frequently Asked Questions

Q1: How do you get oven baked beet chips crispy? The key to crispy oven baked beet chips is thin, even slicing (ideally 1/16-inch with a mandoline), sweating out excess moisture with salt before baking, and baking them in a single layer at a low temperature until they are dried out and curled at the edges. Allowing them to cool completely on the pan helps them crisp up further.

Q2: Can you make Oven Baked Beet Chips in an air fryer? Yes, you can make oven baked beet chips in an air fryer! Prepare and season the beets as directed, then place them in a single layer in the air fryer basket. Cook at 320°F (160°C) for 20-25 minutes, flipping them a couple of times, until they are golden and crispy.

Q3: What are the best seasonings for beet chips? Simple seasonings like sea salt, black pepper, onion powder, and garlic powder are excellent for enhancing the natural flavor of beet chips. For a sweeter profile, try a mix of cinnamon, ginger, and allspice. Rosemary or thyme also complement beets beautifully.

Q4: How do you store homemade beet chips? Store homemade oven baked beet chips in an airtight container at room temperature for up to two weeks. While they are best enjoyed fresh for maximum crispness, they will retain a good texture for several days. Avoid refrigeration, as it can make them soft.

Q5: Do you need to peel beets for beet chips? No, you do not need to peel beets for beet chips. The skin is edible, adds nutrients, and contributes to the texture of the chips. Simply scrub the beets very well under cold water to remove any dirt before slicing.

Conclusion

Creating your own batch of crispy oven baked beet chips is a rewarding experience, transforming a simple vegetable into a surprisingly addictive and healthy snack. Remember the power of thin slices, the magic of sweating out moisture, and the patience of a low, slow bake for that perfect crunch. Give this recipe a try; I’ve found it to be a fantastic way to enjoy beets! Share your creations and tell me what seasonings you loved most.

If you enjoyed these, you might also like trying your hand at homemade kale chips, baked sweet potato fries, or even savory zucchini crisps.

Oven Baked Beet Chips Recipe

These oven baked beet chips are sliced thin, tossed with olive oil, simply seasoned, and baked in the oven until crisp. The flavor is slightly sweet and earthy, salty, with a satisfying crunchy texture.
Prep Time 15 minutes
Cook Time 45 minutes
Total Time 1 hour
Servings: 3 servings
Cuisine: American

Ingredients
  

  • 6-8 medium to large beets
  • 1 pound large beets
  • 12 beets
  • 1 teaspoon sea salt
  • 1 tablespoon flaked sea salt
  • 1/2 teaspoon sea salt
  • 2 teaspoon celery salt or sea salt
  • 1 tablespoon extra virgin olive oil
  • 1/2 cup olive oil
  • 1/4 teaspoon onion powder
  • 1/4 teaspoon garlic powder
  • 1/4 teaspoon black pepper or to taste
  • 3/4 teaspoon kosher salt
  • 3/4 tablespoons extra-virgin olive oil
  • 1/4 teaspoon freshly-cracked black pepper
  • 1/4 teaspoon ground cinnamon optional
  • 1/4 teaspoon ground ginger optional
  • 1/8 teaspoon ground allspice optional

Method
 

Instructions
  1. Preheat the oven to 300°F. Line several baking sheets with parchment paper or spray with non-stick spray.
  2. Scrub the beets well under cold water, trim off the greens and roots, but leave the skins on. Use a mandoline slicer to slice the beets 1/16-inch thin. If using different color beets, place them in separate bowls to prevent bleeding.
  3. Place the beet slices in a large bowl. Drizzle with olive oil and sprinkle with salt (and optional spices like onion powder, garlic powder, and pepper, or the warm spice mixture if desired). Toss to coat evenly.
  4. Let the beets sit in the oil and salt for 10-20 minutes to sweat out excess moisture. Drain off any released liquid and pat the slices dry with paper towels.
  5. Lay the slices out in a single layer on the prepared baking sheets, being careful not to overlap. Use enough baking sheets so beets don’t overlap.
  6. Bake in the preheated oven for 15-60 minutes, rotating sheets from top to bottom halfway through baking if using multiple sheets. Bake until the edges begin to dry and curl, and the chips are crisp but not brown. Cooking time will vary depending on thickness and oven.
  7. Remove the beet chips from the oven and allow them to cool completely on the pan or a cooling rack. They will crisp up further as they cool.
  8. Once cool, transfer to a platter or bowl. Sprinkle with more salt to taste, if desired.


Lemon Blueberry Quick Bread

Easy Lemon Blueberry Quick Bread Recipe

The aroma of freshly baked goods has a magical way of filling a home, instantly signaling comfort and warmth. Imagine a slice of golden-brown bread, studded with vibrant blueberries and infused with bright lemon zest. This isn’t just any treat; it’s a delightful lemon blueberry quick bread, a simple yet elegant bake that’s perfect for any time of day.

Busy families often seek delicious recipes that don’t demand hours in the kitchen. This quick bread fits the bill perfectly, offering a homemade touch without the fuss. You’ll learn how to create a moist, tender loaf that’s bursting with fresh flavors, making it an instant family favorite.

Why You’ll Love This Recipe

This quick bread recipe is a true kitchen hero for its straightforward approach and incredible results. It comes together quickly, allowing you to whip up a batch even on a busy weekday morning. The minimal prep time means less stress and more time enjoying delicious food with your loved ones.

Every bite delivers a perfect balance of sweet and tart. Plump, juicy blueberries burst with flavor, beautifully complemented by the bright, zesty notes of fresh lemon. The texture is wonderfully moist and tender, thanks to the combination of Greek yogurt and olive oil, ensuring a truly satisfying experience. This versatile lemon blueberry loaf transitions effortlessly from a wholesome breakfast to a delightful afternoon snack or a light dessert.

Ingredients You’ll Need

Creating this incredible blueberry lemon bread starts with a few simple, wholesome ingredients. Here’s what you’ll gather for your baking adventure:

  • All-purpose flour: Provides the essential structure for your loaf.
  • Granulated sugar: Adds sweetness and helps create that tender crumb.
  • Milk: Contributes to the overall moisture and richness of the batter.
  • Full-fat Greek yogurt: A secret weapon for incredible moisture and a subtle tang that balances the sweetness. It makes the bread wonderfully tender.
  • Extra-virgin olive oil: Lends a delicate fruitiness and keeps the loaf exceptionally moist without needing butter.
  • Large eggs: Bind the ingredients together and add richness.
  • Baking powder: The leavening agent that gives our quick bread its beautiful rise.
  • Vanilla extract: Enhances all the flavors with its warm, sweet notes.
  • Kosher salt: Balances the sweetness and brings out the other flavors.
  • Fresh grated lemon zest: Provides intense, aromatic lemon flavor. Always zest before juicing!
  • Fresh lemon juice: Adds a bright, tangy counterpoint to the sweet blueberries.
  • Blueberries: The star of the show, offering juicy bursts in every slice. We divide them for the batter and topping.
  • Turbinado sugar: For a delightful, crunchy topping.

How to Make Lemon Blueberry Quick Bread

Making this lemon blueberry quick bread is a straightforward process that yields impressive results. Follow these steps for a perfectly baked loaf.

1. Prepare Your Workspace

  1. Preheat your oven to 350°F (177ºC). Line an 8.5 x 4.5-inch loaf pan with parchment paper, leaving an overhang on the longer sides to easily lift the loaf later. This simple step makes cleanup a breeze!

2. Mix the Wet Ingredients

  1. In a large bowl, whisk together the eggs, fresh lemon juice, and Greek yogurt until the mixture is smooth and well combined. Next, add the granulated sugar, lemon zest, olive oil, and vanilla extract. Continue whisking until all these wet ingredients are thoroughly integrated, creating a luscious base for your bread.

3. Combine Dry and Wet

  1. Add the all-purpose flour, baking powder, and kosher salt to the wet ingredients. Mix just until everything is combined; resist the urge to overmix. The batter will be thick, and you might still see small bits of flour, which is exactly what you want for a tender crumb. Overmixing develops gluten, which can lead to a tough bread.

4. Add the Blueberries

  1. Rinse your blueberries gently with water. In a small separate bowl, toss 1 cup of the rinsed blueberries with 1 tablespoon of all-purpose flour until they are lightly coated. This flour coating helps prevent the berries from sinking to the bottom of the loaf during baking.
  1. Using a spatula or wooden spoon, gently fold the flour-coated blueberries into the batter. Turn the mixture just until the berries are evenly distributed throughout the thick batter.

5. Bake and Cool

  1. Pour the batter into your prepared loaf pan and smooth it out, ensuring it fills the corners. Arrange the remaining 1/2 cup of blueberries across the top of the batter, gently pressing them in. Finish with a generous sprinkle of turbinado sugar for a lovely crunchy crust.
  1. Bake for 65-75 minutes, or until the loaf appears golden around the edges and puffed up in the center. A wooden skewer or toothpick inserted into the center should come out dry, indicating it’s fully cooked. In testing, I found that ovens vary, so keep an eye on it after 60 minutes.
  1. Remove the pan from the oven and let the loaf cool in the pan for 20 minutes. Then, using the parchment paper overhang, carefully lift the loaf out and transfer it to a wire cooling rack. For the smoothest, cleanest slices, allow the bread to cool completely before cutting.

Expert Tips and Tricks

Achieving a perfectly moist and flavorful lemon blueberry quick bread is easy with a few key techniques. These tips will help you get bakery-quality results right in your own kitchen.

  • Room Temperature Ingredients: your eggs, milk, and Greek yogurt are at room temperature. This helps them emulsify better with the oil and sugar, creating a smoother, more uniform batter and a finer crumb.
  • Don’t Overmix: This is crucial for any quick bread. Overmixing develops gluten, which can lead to a tough, dense texture. Mix only until the dry ingredients are just incorporated.
  • Flour Your Blueberries: Tossing blueberries in a little flour before adding them to the batter is a game-changer. It prevents them from sinking to the bottom of the pan, ensuring juicy bursts of fruit in every slice.
  • Maximize Lemon Flavor: For an extra burst of citrus, rub the lemon zest into the granulated sugar with your fingertips before adding it to the wet ingredients. This releases the oils in the zest, infusing the sugar with incredible lemon aroma and taste.
  • Choose the Right Pan: A light-colored metal loaf pan or a glass pan works best for quick breads. Darker pans can sometimes over-brown the crust before the center is fully cooked. If using a dark pan, you might need to tent the top with foil towards the end of baking.
  • Cool Completely for Slicing: While it’s tempting to cut into a warm loaf, letting it cool completely allows the crumb to set. This results in cleaner, smoother slices and a better overall texture.

Recipe Variations and Substitutions

This lemon blueberry quick bread is fantastic as written, but it’s also wonderfully adaptable. Feel free to experiment with these variations to suit your taste or dietary needs.

For dietary alternatives, if you need a substitute for Greek yogurt, sour cream or even buttermilk can work beautifully, though they’ll alter the tang slightly. For a dairy-free option, a good quality plant-based yogurt (like almond or oat) can be used, and swap the milk for a dairy-free alternative. If you’re looking for a gluten-free quick bread recipe, a 1:1 gluten-free all-purpose flour blend can often be substituted successfully.

Consider seasonal swaps to keep things fresh. Raspberries or blackberries make excellent alternatives or additions to the blueberries, offering different flavor profiles. You could also introduce a hint of spice with a pinch of cardamom or nutmeg for a warm, cozy twist. For an added touch of sweetness and brightness, a simple lemon glaze made from powdered sugar and fresh lemon juice can be drizzled over the cooled loaf. This adds an extra layer of zesty flavor that many adore.

Serving and Pairing Suggestions

This versatile lemon blueberry quick bread is truly a treat for any occasion. Its bright flavors and tender texture make it a delightful addition to various meals and gatherings.

Serve slices warm for breakfast alongside a steaming cup of coffee or tea. It’s also wonderful toasted and spread with a little butter or cream cheese for an extra indulgent start to your day. For a simple yet satisfying snack, a plain slice of this moist quick bread is perfect on its own. It’s an excellent choice for kids after school, providing a wholesome homemade treat. When serving as dessert, consider a dollop of whipped cream or a scoop of vanilla ice cream. This adds a touch of elegance and richness that elevates the experience. It’s also a fantastic contribution to a brunch spread, potluck, or picnic, always garnering compliments.

Frequently Asked Questions

Q1: Can I use frozen blueberries in Lemon Blueberry Quick Bread?

Yes, you can absolutely use frozen blueberries. Do not thaw them before adding to the batter; toss them directly from the freezer with the tablespoon of flour. This helps prevent them from bleeding into the batter and sinking to the bottom.

Q2: How long does Lemon Blueberry Quick Bread last?

This lemon blueberry loaf will stay fresh in an airtight container at room temperature for 3-5 days. You can extend its life by storing it in the refrigerator for up to a week, or freeze it for up to 3 months.

Q3: What can I substitute for Greek yogurt in this quick bread?

You can substitute full-fat sour cream or buttermilk for the Greek yogurt. Both will provide similar moisture and tenderness, though buttermilk will add a slightly tangier note. Applesauce can also work for a non-dairy option, but it will change the flavor and texture slightly.

Q4: Why did my Lemon Blueberry Quick Bread sink in the middle?

Several factors can cause a quick bread to sink: overmixing the batter, using too much leavening agent, or opening the oven door too early during baking. your oven temperature is accurate and that the bread is fully cooked before removing it.

Q5: Can I make this Lemon Blueberry Quick Bread dairy-free or gluten-free?

To make it dairy-free, substitute the milk with a plant-based milk (like almond or oat) and the Greek yogurt with a plain, full-fat plant-based yogurt. For a gluten-free version, use a high-quality 1:1 gluten-free all-purpose flour blend in place of regular flour.

Conclusion

Baking this easy lemon blueberry quick bread brings so much joy with minimal effort. It’s a recipe that promises a moist, tender crumb and vibrant flavors, making it a reliable choice for any home baker. The combination of bright lemon and sweet blueberries truly makes every slice a moment to savor.

I hope you’ll try this recipe and discover the simple pleasure of a homemade loaf. Share your creations and let me know how it turns out! If you loved this quick bread, you might also enjoy other quick bread recipes, fruit muffins, or even a classic blueberry crumble.

Lemon Blueberry Quick Bread

This lemon blueberry quick bread is moist, tender, and bursting with plump, juicy blueberries and bright, citrusy lemon. It’s perfect for breakfast, snack, or dessert.
Prep Time 20 minutes
Cook Time 1 hour 10 minutes
Total Time 1 hour 30 minutes
Servings: 10 servings
Cuisine: American

Ingredients
  

  • 1 1/2 cups all-purpose flour
  • 1 cup granulated sugar
  • 1/2 cup milk
  • 1/2 cup full-fat Greek yogurt
  • 1/2 cup extra-virgin olive oil
  • 2 large eggs
  • 2 teaspoons baking powder
  • 1 teaspoon vanilla extract
  • 1 teaspoon kosher salt
  • 2 teaspoons fresh grated lemon zest
  • 2 tablespoons fresh lemon juice
  • 1 1/2 cups blueberries divided
  • 1 tablespoon all-purpose flour for tossing blueberries
  • Turbinado sugar for topping

Method
 

Instructions
  1. Preheat oven to 350°F (177ºC) and prepare a parchment-lined 8.5 x 4.5-inch loaf pan.
  2. In a large bowl, whisk together eggs, lemon juice, and yogurt until smooth. Add sugar, lemon zest, oil, and vanilla and continue whisking until well-integrated.
  3. Add flour, baking powder, and salt and continue to mix just until combined. Do not overmix. The batter will be thick, and you should still be able to see bits of flour throughout.
  4. Rinse the blueberries with water. In a small bowl, toss 1 cup of the blueberries with 1 tablespoon of flour until coated.
  5. Using a spatula or wooden spoon, fold the flour-coated blueberries into the batter, turning just until evenly distributed.
  6. Pour batter into the loaf pan and smooth it out into the corners. Arrange the remaining 1/2 cup of berries across the top and gently press them into the batter. Finish with a sprinkle of turbinado sugar.
  7. Bake for 65-75 minutes or until golden and a tester comes out dry. The loaf should also appear golden around the edges and puffed up in the center.
  8. Remove pan from oven and let cool for 20 minutes in the pan. Using parchment edges, remove loaf from pan and transfer to a wire cooling rack. For a smoother cut, let cool completely before slicing and enjoy!


Better Than Cinnabon Cinnamon Rolls Recipe

Best Better Than Cinnabon Cinnamon Rolls Recipe

Imagine waking up to the irresistible aroma of freshly baked cinnamon rolls, so soft and gooey they practically melt in your mouth. Forget the mall food court; this recipe for better than Cinnabon cinnamon rolls delivers that exact experience right in your own kitchen. You’re about to learn how to create ultra-soft, pillowy spirals bursting with cinnamon goodness, all topped with a rich, dreamy cream cheese frosting.

This isn’t just another cinnamon roll recipe. What surprised me in testing was how simple it is to achieve that signature Cinnabon-level gooeyness with a few smart steps. These rolls are perfect for making any morning feel special, whether it’s a holiday, a lazy weekend, or just a treat for your family.

Why You’ll Love This Recipe

These cinnamon rolls are a game-changer for anyone craving that bakery-quality indulgence at home. Each bite offers an incredibly soft, pillowy texture that truly rivals the famous Cinnabon. The secret lies in a perfectly balanced dough and a generous, buttery cinnamon filling that creates pockets of gooey delight.

Then there’s the rich, tangy cream cheese frosting, which melts into every warm swirl, adding another layer of irresistible sweetness. This recipe isn’t just about taste; it’s about the joy of baking something truly spectacular. It’s a wonderful way to bring warmth and deliciousness to your family’s table.

Ingredients You’ll Need

Creating these amazing homemade cinnamon rolls starts with a few simple ingredients. Here’s what you’ll gather for each part of this delightful recipe:

  • For the Dough:

Warm Milk: Essential for activating the yeast and ensuring a tender dough. Instant Dry Yeast: This quick-acting yeast helps the dough rise efficiently. Large Eggs: At room temperature, they add richness and moisture to the dough. Salted Butter: Melted or softened, it contributes to the dough’s tender crumb and flavor. Granulated Sugar: Sweetens the dough and aids yeast activity. Salt: Balances the sweetness and enhances overall flavor. * Bread Flour: Its higher protein content gives these rolls their signature chewy yet soft texture.

  • For the Filling:

Salted Butter: Almost melted, it forms the base for a rich, gooey filling. Packed Brown Sugar: Provides deep, caramel-like sweetness. Cinnamon: The star spice, delivering classic warmth and aroma. Heavy Cream: This is the secret ingredient, poured over the rolls before baking for ultimate gooeyness.

  • For the Frosting:

Cream Cheese: Softened, it creates a rich and tangy base for the frosting. Salted Butter: Softened, it adds to the frosting’s creamy texture and flavor. Powdered Sugar: Sweetens the frosting and gives it a smooth consistency. Maple Extract: Offers a warm, unique flavor, but vanilla extract works beautifully too.

How to Make Better Than Cinnabon Cinnamon Rolls

Making these incredible cinnamon rolls is a rewarding process, broken down into manageable steps. You’ll use a stand mixer for the dough, making the kneading process a breeze.

1. Preparing the Dough

  1. Pour the warm milk into the bowl of your stand mixer, then sprinkle the instant dry yeast over the top. Let it sit for 3-4 minutes until a light froth appears, indicating the yeast is active.
  2. Add the room temperature eggs, melted butter, and granulated sugar to the yeast mixture. Mix these ingredients together until they are well combined.
  3. Next, add the salt and 4 cups of bread flour to the bowl. Mix with the beater blade just until the ingredients are barely combined; the dough will look shaggy. Allow this mixture to rest for 5 minutes. This rest period helps the flour hydrate.
  4. Scrape the dough off the beater blade and remove it from the mixer. Attach the dough hook to your stand mixer.
  5. Beat the dough on medium speed for 5-7 minutes to knead it. Add up to 1/2 cup more flour only if the dough is excessively sticky. The finished dough should be elastic and smooth, tacky to the touch, and pull away from the sides of the bowl, though it might stick slightly to the bottom.

2. First Rise

  1. Lightly spray a large bowl with cooking spray. Use a rubber spatula to transfer the dough from the mixer bowl into the greased bowl.
  2. Cover the bowl with a clean kitchen towel or a sheet of wax paper. Place the bowl in a warm, draft-free spot and let the dough rise until it has nearly doubled in size, which usually takes about 30 minutes. Be careful not to let it over-rise, as this can make your cinnamon rolls airy rather than dense and soft.

3. Making the Filling and Shaping the Rolls

  1. While the dough is rising, prepare the cinnamon filling. In a medium bowl, combine the almost melted salted butter, packed brown sugar, and cinnamon. Mix these ingredients until they are thoroughly combined and set the filling aside.
  2. Once the dough has risen, sprinkle a pastry mat or your work surface generously with flour. Turn the dough out onto the floured surface and sprinkle the top of the dough with a little more flour.
  3. Flour your rolling pin and roll the dough into a large rectangle, approximately 24×15 inches.
  4. Use a rubber spatula to evenly spread the cinnamon filling over the entire dough rectangle, reaching almost to the edges.
  5. Starting from one of the long sides, tightly roll the dough up jelly-roll style, creating a snug log.
  6. Cut the dough log into 12 even slices. Arrange these slices, cut-side up, in a greased 9×13 inch baking pan. Cover the pan loosely and allow the rolls to rise for another 20 minutes while your oven preheats.

4. Baking and Frosting

  1. Preheat your oven to 375ºF (190ºC).
  2. Warm the heavy cream slightly until it’s just warm to the touch, removing its chill but not making it hot. Once the rolls have completed their second rise, carefully pour this warm heavy cream over the tops of the rolls, allowing it to soak down into and around them. This is key for that gooey, almost caramel-like bottom.
  3. Bake the rolls in the preheated oven for 25 minutes. They should be lightly golden brown, and the center rolls should be cooked through. If they start to brown too quickly, loosely cover the pan with aluminum foil for the remaining baking time. An internal thermometer inserted into the center roll should read 190ºF (88ºC).
  4. While the rolls are baking, prepare the frosting. In a medium mixing bowl, whip together the softened cream cheese and softened salted butter until the mixture is smooth and fluffy.
  5. Add the maple extract (or vanilla extract) and powdered sugar to the cream cheese mixture. Whip until the frosting is light, fluffy, and completely smooth.
  6. As soon as the rolls come out of the oven, spread the prepared cream cheese frosting generously over the warm rolls. The warmth will allow the frosting to melt slightly, seeping into all the delicious crevices.

Expert Tips and Tricks

Achieving the best better than Cinnabon cinnamon rolls comes down to a few key details. Here are my top tips for success:

  • Mind the Dough Temperature: your milk is 115ºF for optimal yeast activation. Also, use room temperature eggs and softened butter for a smooth, consistent dough.
  • Don’t Over-Flour: The dough should be slightly tacky after kneading. Adding too much flour will result in dense, dry rolls instead of the desired pillowy texture. Trust the tackiness!
  • The Heavy Cream Trick is Crucial: Don’t skip pouring the warm heavy cream over the rolls before baking. This is the secret to creating that incredibly moist, gooey, almost caramel-like bottom layer that makes these truly special.
  • Roll Tightly: When shaping the dough, roll it as tightly as possible from the long side. This creates those beautiful, defined spirals and ensures the filling stays put.
  • Don’t Overbake: Keep an eye on the rolls; they should be lightly golden brown. Overbaking is the enemy of gooey cinnamon rolls. Use a thermometer to check for 190ºF internal temperature.
  • Frost While Warm: Apply the cream cheese frosting while the rolls are still warm from the oven. This allows the frosting to melt and seep into every nook and cranny, enhancing the gooey factor.

Recipe Variations and Substitutions

This recipe for homemade cinnamon rolls is fantastic as is, but you can easily adapt it to your preferences.

For a different flavor profile, consider swapping the maple extract in the frosting for almond extract or a touch of orange zest. If you’re looking for a seasonal twist, add a teaspoon of pumpkin pie spice to the cinnamon filling during autumn. You can also sprinkle in some chopped pecans or walnuts with the filling for added crunch and nutty flavor.

If you don’t have bread flour, all-purpose flour can be used, though the texture might be slightly less chewy. For a dairy-free option, you can experiment with plant-based milks and butters, but be aware that the richness and texture may vary. I’ve found that full-fat dairy provides the best results for that classic gooey cinnamon roll experience.

Serving and Pairing Suggestions

These better than Cinnabon cinnamon rolls are a showstopper on their own, but they also pair beautifully with other breakfast favorites. Serve them warm, straight from the oven, for the ultimate experience. The melting cream cheese frosting is simply divine.

For a complete breakfast or brunch spread, consider serving them alongside fresh fruit, a simple scrambled egg dish, or crispy bacon. A hot cup of coffee or a glass of cold milk makes the perfect accompaniment. They’re especially wonderful for holiday breakfasts like Christmas morning or Easter brunch, filling your home with an inviting, comforting aroma.

Frequently Asked Questions

Q1: What makes these Better Than Cinnabon Cinnamon Rolls so gooey?

The secret to their incredible gooeyness lies in two key elements: a rich, tender dough that stays moist, and the generous pour of warm heavy cream over the rolls just before baking. This cream soaks into the dough, creating a luscious, almost caramel-like bottom layer as they bake.

Q2: Can I prepare these cinnamon rolls the night before?

Absolutely! You can prepare the cinnamon roll dough, shape the rolls, and place them in the greased baking pan. Cover the pan tightly with plastic wrap and refrigerate overnight. In the morning, remove them from the fridge, let them come to room temperature and finish rising for about an hour, then proceed with pouring the cream and baking as directed.

Q3: What are common substitutions for ingredients in cinnamon rolls?

While this recipe is perfected, you can substitute maple extract for vanilla extract in the frosting. If you don’t have bread flour, all-purpose flour can be used, though it might result in a slightly less chewy texture. For the filling, you can add nuts or dried fruit if desired.

Q4: How long do homemade cinnamon rolls last and how should they be stored?

Homemade cinnamon rolls are best enjoyed the day they are baked. Store any leftovers in an airtight container at room temperature for up to 2 days, or in the refrigerator for up to 5 days. Reheat briefly in the microwave for a fresh, gooey texture.

Q5: Why didn’t my cinnamon rolls rise properly?

Common reasons for poor rising include using milk that was too hot (which kills the yeast) or too cold (which inhibits yeast activity). your yeast is fresh and active, and allow the dough to rise in a warm, draft-free environment. Over-flouring the dough can also make it too stiff to rise well.

Conclusion

There you have it – the ultimate guide to creating truly amazing, better than Cinnabon cinnamon rolls right in your own kitchen. With their ultra-soft dough, rich cinnamon filling, and decadent cream cheese frosting, these rolls are sure to become a cherished recipe. The key is in the careful attention to dough temperature and that magical heavy cream pour.

I hope you try this recipe and share your delicious results! If you enjoyed making these, you might also love exploring other homemade breakfast pastries, sweet breads, or comforting brunch recipes.

Better Than Cinnabon Cinnamon Rolls Recipe

These cinnamon rolls are ultra-soft, pillowy, and filled with gooey cinnamon goodness. Topped with a rich cream cheese frosting, they are perfect for holidays, weekends, or any special occasion.
Prep Time 30 minutes
Cook Time 22 minutes
Total Time 52 minutes
Servings: 12 servings

Ingredients
  

For the Dough
  • 1 cup warm milk 115 degrees F
  • 2 1/2 teaspoons instant dry yeast
  • 2 large eggs at room temperature
  • 1/3 cup salted butter melted or very softened
  • 1/2 cup granulated sugar
  • 1 teaspoon salt
  • 4 1/2 cups bread flour divided
For the Filling
  • 1/2 cup salted butter almost melted
  • 1 cup packed brown sugar
  • 2 tablespoons cinnamon
  • 1/2 cup heavy cream for pouring over the risen rolls
For the Frosting
  • 6 ounces cream cheese softened
  • 1/3 cup salted butter softened
  • 2 cups powdered sugar
  • 1/2 tablespoon maple extract or vanilla

Method
 

Instructions
  1. Pour the warm milk (115ºF) in the bowl of a stand mixer and sprinkle the yeast overtop. Allow this to sit for 3-4 minutes until frothy.
  2. Add the room temperature eggs, butter, and sugar. Mix until combined.
  3. Add in salt and 4 cups of flour and mix using the beater blade just until the ingredients are barely combined. Allow the mixture to rest for 5 minutes.
  4. Scrape the dough off the beater blade and remove it. Attach the dough hook.
  5. To knead, beat the dough on medium speed for 5-7 minutes, adding in up to 1/2 cup more flour only if needed to form a dough. The dough should be elastic and smooth, tacky, and pull away from the sides of the bowl but may stick slightly to the bottom.
  6. Spray a large bowl with cooking spray. Use a rubber spatula to remove the dough from the mixer bowl and place it in the greased large bowl. Cover the bowl with a clean kitchen towel or wax paper.
  7. Set the bowl in a warm place and allow the dough to rise until nearly double, about 30 minutes. Do not allow the dough to rise too much or your cinnamon rolls will be airy.
  8. While the dough is rising, prepare the cinnamon filling. In a medium bowl, combine the soft butter, brown sugar, and cinnamon, mixing until well combined. Set aside.
  9. Sprinkle a pastry mat or work surface generously with flour. Turn out the dough onto the surface and sprinkle the top of the dough with additional flour.
  10. Flour a rolling pin and roll the dough to about a 24×15 inch rectangle.
  11. Use a rubber spatula to smooth the cinnamon filling over the whole dough rectangle.
  12. Starting on the long side, roll the dough up tightly jelly roll style.
  13. Cut into 12 slices and place in a greased 9×13 inch baking pan. Cover the pan and allow the rolls to rise for 20 minutes while the oven is preheating.
  14. Preheat the oven to 375ºF.
  15. Warm the heavy cream until the chill is off (not hot, just warm to the touch). Once the rolls have risen, pour the heavy cream over the top of the rolls, allowing it to soak down in and around the rolls.
  16. Bake in a preheated oven for 25 minutes, until the rolls are lightly golden brown and the center rolls are cooked through. If they are getting too browned, cover loosely with foil for the remaining baking time. The internal temperature should read 190ºF in the center roll.
  17. While rolls are baking, prepare the frosting. In a medium mixing bowl, whip together softened cream cheese and softened butter until smooth and fluffy.
  18. Add in maple extract (or vanilla) and powdered sugar and whip until light and fluffy.
  19. Spread the icing over the warm rolls.


Pecan Pie Bars Recipe (Caramel Bar)

Pecan Pie Bars Recipe (Easy Caramel Bar)

Imagine the sweet, nutty aroma of a classic pecan pie filling, but with the convenience and shareability of a bar. This incredible pecan pie bars recipe delivers exactly that, transforming a beloved holiday dessert into an effortless treat. You’ll learn how to create a rich, buttery shortbread crust and a perfectly gooey caramel-pecan topping that comes together with surprising ease. This recipe is designed to simplify your baking, making it ideal for busy home cooks who still want to impress.

These pecan pie bars recipe are a fantastic solution for anyone craving that classic flavor without the fuss of a traditional pie. They’re perfect for family gatherings, holiday potlucks, or simply a sweet moment at home. Get ready to bake a dessert that’s as delicious as it is simple.

Why You’ll Love This Recipe

This pecan pie bars recipe takes everything you adore about pecan pie and streamlines it into a portable, easy-to-serve format. The foundation is a tender, golden shortbread crust that bakes up perfectly crisp, providing a delightful contrast to the luscious topping. It’s a sturdy base that holds up beautifully, making these caramel pecan bars ideal for sharing.

The pecan bar filling is where the magic truly happens. It’s a rich, gooey blend of corn syrup, brown sugar, and eggs, studded generously with crunchy pecan pieces. This combination creates that irresistible, sticky-sweet texture that defines a great pecan pie. Plus, these bars are much less intimidating to make than a full pie, cutting down on prep time and stress. They are truly a perfect holiday dessert or a sweet anytime indulgence.

Ingredients You’ll Need

To create these delightful pecan pie bars recipe, you’ll need a few essential ingredients. Each plays a vital role in achieving that perfect balance of texture and flavor.

1. Ingredients for the Crust:

  • Unsalted butter: This provides the foundational richness and tender crumb for our shortbread crust. Using it at room temperature ensures a smooth, creamy base.
  • Granulated sugar: Adds just the right amount of sweetness to the crust, balancing the richness of the butter.
  • Kosher salt: A touch of salt enhances all the flavors, preventing the crust from tasting flat.
  • All-purpose flour: Forms the structure of the shortbread, giving it that classic delicate yet firm texture.

2. Ingredients for the Filling:

  • Dark or light corn syrup: This is crucial for the signature gooey, chewy texture of the pecan bar filling. It also helps prevent sugar crystallization.
  • Packed light or dark brown sugar: Contributes a deep, molasses-rich sweetness and moistness to the caramel filling.
  • Large eggs: Act as a binder, helping the filling set and creating a smooth, custard-like consistency.
  • All-purpose flour: A small amount helps to slightly thicken the filling, ensuring it sets without being too runny.
  • Vanilla extract: Essential for adding a warm, aromatic depth that complements the pecans and caramel.
  • Kosher salt: Balances the sweetness of the filling, bringing out the nutty flavors of the pecans.
  • Pecan pieces: The star of our caramel pecan bars, providing a wonderful crunch and earthy flavor.

How to Make Pecan Pie Bars

Making these pecan pie bars recipe is a straightforward process, broken down into simple stages. You’ll be amazed at how easily these come together.

3. Making the Shortbread Crust

  1. First, preheat your oven to 350°F (175°C). Lightly coat an 8×8-inch baking pan with cooking spray. Line the bottom and sides with two sheets of parchment paper, crossing them perpendicularly, allowing about 2 inches to hang over all four sides to form a convenient sling.
  2. In a stand mixer fitted with the paddle attachment, beat the room temperature unsalted butter, granulated sugar, and kosher salt on medium speed. Continue until the mixture is light and creamy, which usually takes about 2 minutes. Remember to scrape down the sides of the bowl with a flexible spatula to everything is well combined.
  3. Reduce the mixer speed to the lowest setting and gradually beat in the all-purpose flour. Mix just until a crumbly dough forms, which should take around 30 seconds. Transfer this dough to your prepared baking pan and use your hands or the bottom of a floured flat measuring cup to press it into an even, compact layer across the bottom.
  4. Bake this crust for 20 to 22 minutes, or until the edges are beautifully golden-brown. While the crust is baking, you can start preparing the filling to save time.

4. Preparing the Gooey Pecan Filling

  1. In a large bowl, whisk together the corn syrup, packed brown sugar, large eggs, all-purpose flour, vanilla extract, and kosher salt until smooth. This forms the base of your rich, gooey pecan bar filling. Once the liquid mixture is uniform, stir in the pecan pieces, ensuring they are evenly coated.
  2. As soon as the crust comes out of the oven, pour the pecan filling directly onto the hot crust. Carefully spread it into an even layer using your spatula.

5. Baking and Cooling Your Bars

  1. Return the pan to the oven and bake for another 25 to 30 minutes, or until the filling is set and has turned a lovely dark golden-brown color. The center should have a slight jiggle, but not be liquid. What surprised me in testing is how quickly the filling transforms from liquid to perfectly set.
  2. Once baked, place the pan on a wire rack and allow the bars to cool completely at room temperature, which will take approximately 1 1/2 hours. This step is crucial for the bars to set properly. After cooling, refrigerate the pan for at least 1 hour, or even overnight, for the best results and cleanest cuts. To serve, grasp the parchment paper overhang and lift the entire slab out of the pan onto a cutting board. Cut into 12 even bars.

Expert Tips and Tricks

Achieving perfect caramel pecan bars is all about a few key details. Here are some expert tips to your pecan pie bars recipe turns out beautifully every time:

  • Use the Parchment Sling: Don’t skip lining your pan with parchment paper. Creating a “sling” with overlapping sheets makes lifting the cooled bars out of the pan incredibly easy, preventing sticking and breakage.
  • Room Temperature Butter is Key: For the crust, your butter is truly at room temperature. This allows it to cream properly with the sugar, resulting in a tender, melt-in-your-mouth shortbread crust.
  • Don’t Overmix the Crust: Once you add the flour, mix the crust dough only until just combined and crumbly. Overmixing can develop too much gluten, leading to a tough crust instead of a tender one.
  • Bake Crust Until Golden: A golden-brown crust around the edges indicates it’s perfectly baked and will provide a sturdy base for the rich pecan bar filling.
  • Cool Completely and Chill: This is perhaps the most important step for preventing your pecan pie bars recipe from falling apart. Allowing them to cool completely at room temperature, then chilling them in the refrigerator, ensures the gooey caramel filling sets firm enough for clean, neat slices. Here’s what I found: patience truly pays off here.
  • Pan Size Matters: An 8×8-inch pan is specified for a reason. Using a larger pan will result in thinner bars that might bake quicker and be more prone to falling apart.

Recipe Variations and Substitutions

This pecan pie bars recipe is wonderfully versatile, allowing for creative twists and adjustments to suit different preferences or dietary needs.

  • Add Chocolate: For a decadent touch, sprinkle 1/2 cup of semi-sweet chocolate chips over the hot crust before pouring on the filling. The chocolate will melt slightly into the warm crust, creating an extra layer of flavor in your caramel pecan bars.
  • Salted Caramel Kick: A pinch of flaky sea salt sprinkled over the top of the baked bars just after they come out of the oven can “ the caramel notes beautifully. This creates a lovely sweet-and-salty contrast.
  • Nut-Free Option: If you have nut allergies or simply prefer a different flavor, you can substitute the pecans with an equal amount of rolled oats or even toasted pumpkin seeds for an unique twist. The texture will change slightly, but the gooey caramel base remains delicious.
  • Gluten-Free Crust: In testing, I’ve found that a 1:1 gluten-free all-purpose flour blend can often be substituted for the regular flour in the crust. Be aware that the texture might be slightly different, but it should still hold together well.
  • Make-Ahead Bars: These make-ahead bars are fantastic for planning. You can prepare the entire recipe a day or two in advance and store them in the refrigerator. This makes them an ideal holiday dessert when you have many other dishes to prepare.

Serving and Pairing Suggestions

These pecan pie bars recipe are a showstopper on their own, but a few simple additions can make them even more special.

Serve the caramel pecan bars at room temperature or slightly chilled. For an extra indulgent treat, top each bar with a dollop of freshly whipped cream or a scoop of vanilla bean ice cream. A light drizzle of extra caramel sauce or a sprinkle of toasted coconut flakes can also add visual appeal and flavor.

These bars are perfect for any occasion, from casual family desserts to elegant holiday dessert platters. They pair beautifully with a strong cup of coffee, a warm mug of spiced cider, or a glass of dessert wine. Their rich, sweet flavor makes them a comforting end to any meal, especially during the cooler months. They’re also a fantastic addition to a potluck or cookie exchange, as their bar format makes them easy to transport and share.

Frequently Asked Questions

Q1: What is the difference between pecan pie and pecan pie bars? Pecan pie bars feature a sturdy, often shortbread-style crust that forms the base, making them easier to eat out of hand. Traditional pecan pie has a flakier pastry crust that encases the filling, typically requiring a fork for serving. The filling itself is very similar, but the bar format offers convenience.

Q2: Can you freeze pecan pie bars recipe? Yes, this pecan pie bars recipe freezes exceptionally well. Once completely cooled, wrap the bars tightly in plastic wrap, then again in aluminum foil, or place them in an airtight freezer-safe container. They can be frozen for up to 3 months; thaw overnight in the refrigerator or at room temperature before serving.

Q3: How do you keep pecan pie bars from falling apart? The key to keeping pecan pie bars recipe from falling apart is adequate cooling and chilling. the bars cool completely on a wire rack at room temperature for at least 1 1/2 hours, then refrigerate for a minimum of 1 hour (or overnight). This allows the gooey pecan bar filling to fully set, making them firm enough to cut cleanly.

Q4: What can I substitute for corn syrup in pecan pie bars? While corn syrup is highly recommended for its unique texture and anti-crystallization properties in this pecan pie bars recipe, you could try light maple syrup or golden syrup as a substitute. Be aware that these alternatives might slightly alter the flavor and texture of the pecan bar filling, potentially making it a bit less chewy or more prone to crystallization.

Q5: How long do homemade pecan pie bars last? Homemade pecan pie bars recipe will last for 3-4 days when stored in an airtight container at room temperature. For extended freshness, you can store them in the refrigerator for up to a week. Always they are covered to prevent them from drying out.

Conclusion

This pecan pie bars recipe offers a delightful blend of convenience and classic flavor, making it a truly exceptional dessert. The combination of a buttery shortbread crust and a rich, gooey caramel pecan bars filling is simply irresistible. You’ll find that these bars are not only easier to prepare than traditional pie but also perfect for any gathering or a sweet treat for your family.

I encourage you to try this recipe and discover the joy of these perfectly balanced bars. Share your creations with friends and family, and perhaps even make them a new tradition for your next holiday dessert. If you enjoyed these, you might also love other bar recipes, shortbread cookies, or make-ahead holiday treats.

Pecan Pie Bars Recipe (Caramel Bar)

These bars feature a buttery shortbread crust topped with a rich, gooey caramel and pecan filling. They are easier to make than traditional pecan pie and perfect for holiday gatherings or sharing.
Prep Time 10 minutes
Cook Time 45 minutes
Total Time 55 minutes
Servings: 12 servings

Ingredients
  

For the crust
  • 8 tablespoons 1 stick unsalted butter, at room temperature
  • 1/4 cup granulated sugar
  • 1/2 teaspoon kosher salt
  • 1 cup all-purpose flour
For the filling
  • 3/4 cup dark or light corn syrup
  • 1/4 cup packed light or dark brown sugar
  • 2 large eggs
  • 2 tablespoons all-purpose flour
  • 1 teaspoon vanilla extract
  • 1/2 teaspoon kosher salt
  • 1 1/2 cups pecan pieces 6 ounces

Method
 

Instructions
  1. Heat the oven to 350°F. Lightly coat an 8×8-inch baking pan (about 2 inches high) with cooking spray. Line the bottom and sides with 2 sheets of parchment paper positioned perpendicular to each other so that the parchment hangs about 2 inches over all 4 sides of the pan to form a sling.
  2. Beat 1 stick room temperature unsalted butter, 1/4 cup granulated sugar, and 1/2 teaspoon kosher salt with the paddle attachment in a stand mixer on medium speed until creamy, about 2 minutes. Scrape down the sides of the bowl with a flexible spatula.
  3. Beat in 1 cup all-purpose flour on the lowest speed just until a crumbly dough forms, about 30 seconds. Transfer to the baking pan and use your hands or the bottom of a flat measuring cup dusted with flour to press it into an even layer.
  4. Bake until the crust is golden-brown around the edges, 20 to 22 minutes. A few minutes before the crust is ready, make the pecan filling.
  5. Whisk 3/4 cup corn syrup, 1/4 cup packed brown sugar, 2 large eggs, 2 tablespoons all-purpose flour, 1 teaspoon vanilla extract, and 1/2 teaspoon kosher salt together in a large bowl. Stir in 1 1/2 cups pecan pieces.
  6. Pour the filling onto the hot crust and spread into an even layer.
  7. Bake until the filling is set and dark golden-brown, 25 to 30 minutes. Place the pan on a wire rack and let cool completely, about 1 1/2 hours. Refrigerate for at least 1 hour or up to overnight. To serve, grasp the excess parchment and lift the slab out of the pan and onto a cutting board. Cut into 12 bars.


S’mores Bars

S’mores Bars Recipe – Easy Campfire Treat

That irresistible scent of toasted marshmallow and melting chocolate, the satisfying crunch of graham crackers – it’s the taste of summer, a classic campfire memory. But what if you could capture that magic without the smoke, the sticks, or the unpredictable flames? This delightful s’mores bars recipe brings all those nostalgic flavors right into your kitchen. You’re about to discover how simple it is to create soft, chewy blondies topped with gooey chocolate and perfectly toasted mini marshmallows, transforming a backyard staple into a convenient, crowd-pleasing dessert.

I’ve always loved the idea of s’mores, but the reality of wrangling kids around a fire isn’t always the relaxing experience I imagine. This recipe solves that beautifully, offering a quick, kid-friendly dessert that delivers on every sticky, sweet promise. It’s the perfect treat for busy families who crave those classic flavors without the fuss.

Why You’ll Love This Recipe

You’ll adore these s’mores bars for their sheer simplicity and incredible flavor. They’re a fantastic summer dessert, bringing all the joy of a campfire treat right to your kitchen counter. Imagine golden brown edges, a rich chocolate layer, and perfectly puffed, golden marshmallows.

This recipe is also incredibly quick to prepare, making it ideal for those busy weeknights or last-minute gatherings. Plus, they’re wonderfully portable and a huge hit with kids and adults alike. These bars are easier to serve than traditional s’mores, cutting down on sticky fingers and maximizing enjoyment.

Ingredients You’ll Need

Creating these irresistible bars starts with a few pantry staples. Each ingredient plays a crucial role in building that iconic s’mores flavor profile.

  • All-purpose flour: The base of our chewy blondie, providing structure.
  • Graham crackers: Pulsed into fine crumbs, these create the signature graham cracker crust flavor in the blondie base. You can also use digestive biscuits for a similar effect if graham crackers are hard to find.
  • Baking powder: This helps our blondie base rise slightly and achieve a tender texture.
  • Salt: A touch of salt balances the sweetness and enhances all the flavors.
  • Unsalted butter: Melted butter adds richness and moisture to the blondie.
  • Light brown sugar: Packed brown sugar provides deep caramel notes and contributes to the bars’ wonderfully chewy texture.
  • Large eggs: Room temperature eggs bind the ingredients and add richness, ensuring a tender crumb.
  • Natural vanilla extract: Vanilla elevates the overall flavor, adding warmth and depth to the blondie.
  • Mini Hershey bars or milk chocolate chips: These melt into a luscious, gooey chocolate layer. Milk chocolate chips are a convenient substitute for the classic Hershey bar taste.
  • Mini marshmallows: These are essential for the iconic toasted, gooey topping. Mini marshmallows toast quickly and evenly under the broiler.

How to Make S’mores Bars

Making this s’mores bars recipe is straightforward, breaking down into a few simple steps. You’ll be enjoying warm, gooey s’mores in no time!

1. Prepare for Baking

  1. Position a rack in the center of your oven. Preheat the oven to 350°F (180℃).
  2. Lightly coat a 9 by 13 baking pan with cooking spray or line it with parchment paper, leaving an overhang on the sides for easy removal later.

2. Mix the Blondie Base

  1. In a medium bowl, whisk together the all-purpose flour, graham cracker crumbs, baking powder, and salt. Set this dry mixture aside.
  2. In a second, larger mixing bowl, whisk together the melted unsalted butter, packed light brown sugar, room temperature eggs, and natural vanilla extract until well combined and smooth.
  3. Add the dry ingredients to the wet ingredients. Mix until just combined, about 5 to 10 seconds. Be careful not to overmix the batter; a few streaks of flour are fine.
  4. Spread the batter evenly into the prepared 9 by 13 baking pan.

3. Bake and Finish

  1. Bake for about 22-25 minutes, or until the top is set and golden brown. The bars may appear slightly underdone in the center, but trust me, they will set up as they cool. Overbaking will result in dry bars.
  2. Remove the pan from the oven. Immediately layer the top with the mini Hershey bars or milk chocolate chips.
  3. Evenly top the chocolate layer with the mini marshmallows.
  4. Turn the oven to broil. Return the bars to the oven for 1 to 2 minutes, or until the marshmallows are lightly toasted and golden brown. Keep a very close eye on them during this step, as marshmallows can burn quickly under the broiler!
  5. Set the pan on a wire rack and allow the s’mores bars to cool completely before cutting into squares. This cooling time is crucial for them to set properly.

Expert Tips and Tricks

Achieving the perfect s’mores bars recipe comes down to a few key details. Here are my top tips for success:

  • Don’t Overbake the Base: The blondie base should be golden brown and set around the edges, but the center might still look a little soft. This is intentional! It ensures a wonderfully chewy texture once cooled. In testing, I found that taking them out at the 25-minute mark usually yields the best results.
  • Watch the Broiler Closely: Marshmallows go from perfectly golden to burnt in a matter of seconds. Stay right by the oven and pull the pan out as soon as they reach your desired toastiness.
  • Cool Completely: This is perhaps the most important tip. Warm s’mores bars will be a gooey, sticky mess when cut. Allow them to cool fully on a wire rack, ideally for several hours, before slicing. For extra clean cuts, you can even chill them in the refrigerator for 30 minutes after they’ve cooled to room temperature.
  • Room Temperature Eggs: Using room temperature eggs helps them incorporate more evenly into the batter, leading to a smoother mixture and a more consistent texture in your blondies.
  • Line Your Pan: Using parchment paper with an overhang makes lifting the entire cooled slab out of the pan incredibly easy. This prevents sticking and allows for cleaner cuts.
  • Pulse Graham Crackers Finely: For the best texture in the blondie base, your graham cracker crumbs are finely ground. A food processor works wonders for this.

Recipe Variations and Substitutions

This s’mores bars recipe is wonderfully adaptable, allowing you to customize it to your taste or dietary needs. Don’t be afraid to get creative!

For a different flavor profile, consider swapping the milk chocolate chips for semi-sweet or dark chocolate chips. White chocolate chips could also add an unique twist. If you’re a fan of peanut butter, a swirl of creamy peanut butter over the baked blondie base before adding the chocolate and mini marshmallows would be absolutely divine. This adds another layer of flavor that complements the s’mores perfectly.

If you need a gluten-free option, simply use gluten-free graham crackers and an all-purpose gluten-free flour blend. your blend contains xanthan gum, or add a quarter teaspoon per cup of flour. For the graham cracker crust, if you don’t have graham crackers, crushed vanilla wafers or even shortbread cookies can make a delicious alternative. Just remember to adjust the amount of butter if the alternative crumbs are already buttery.

Serving and Pairing Suggestions

These s’mores bars are a celebration in themselves, perfect for any occasion that calls for a fun, easy dessert. They’re a fantastic summer dessert for potlucks, barbecues, or casual family gatherings.

For serving, once completely cooled and cut, arrange them on a rustic wooden board or a colorful platter. A light dusting of cocoa powder or a drizzle of extra melted chocolate can add an elegant touch. For a truly decadent experience, serve them slightly warmed (a quick 10-15 second microwave zap works wonders) with a scoop of vanilla bean ice cream. The contrast of warm, gooey s’mores and cold, creamy ice cream is simply divine.

Pair these bars with a tall glass of cold milk, a refreshing iced coffee, or even a dark roast for the adults. Fresh berries like raspberries or strawberries also offer a lovely tart counterpoint to the sweetness. They’re easy to transport, making them a go-to for school events or neighborhood get-togethers.

Frequently Asked Questions

Can I use regular marshmallows instead of mini marshmallows in S’mores Bars?

Yes, you absolutely can use regular marshmallows! Simply cut them into halves or quarters before layering them on top of the chocolate. This ensures they melt and toast evenly, just like the mini marshmallows.

How do you store S’mores Bars and how long do they last?

Store your s’mores bars in an airtight container at room temperature for up to 3 days. While they are still delicious, the marshmallows may lose some of their initial toastiness over time.

What are some common substitutions for graham crackers in S’mores Bars?

If you don’t have graham crackers, you can substitute them with other crushed cookies like vanilla wafers, digestive biscuits, or even shortbread cookies. they are finely crushed for the best texture in the graham cracker crust.

Why are my S’mores Bars too gooey or not setting properly?

This usually happens if the bars haven’t been baked long enough or haven’t cooled completely. Make sure the blondie base is golden brown and set, and allow the bars to cool fully before cutting. The chocolate chips and marshmallows need time to firm up.

Can I add peanut butter or other mix-ins to S’mores Bars?

Absolutely! Swirl about 1/2 to 1 cup of peanut butter over the baked blondie base before adding the chocolate chips and mini marshmallows for a delicious twist. You could also sprinkle in chopped nuts or a different type of candy.

Conclusion

This s’mores bars recipe offers all the joy and nostalgic flavor of a classic campfire treat without any of the hassle. They are quick to prepare, incredibly delicious, and perfect for sharing with family and friends. The chewy graham cracker blondie base, rich chocolate, and perfectly toasted mini marshmallows create a dessert that everyone will adore.

I encourage you to try this recipe for your next gathering or simply when a craving strikes. I’m sure you’ll find them to be a new favorite! If you love easy bar desserts, you might also enjoy my recipes for classic blondies or chewy chocolate chip cookies.

S’mores Bars

Soft, chewy S’mores bars loaded with milk chocolate chips and toasted marshmallows. These easy graham cracker blondies get topped with gooey marshmallow and milk chocolate, bringing campfire flavors to your kitchen without a campfire.
Prep Time 10 minutes
Cook Time 25 minutes
Total Time 35 minutes
Servings: 16 bars
Cuisine: American

Ingredients
  

  • 1 1/2 cups all-purpose flour
  • 1 package 9 full rectangles, 135 g graham crackers, pulsed into crumbs
  • 1 teaspoon baking powder
  • 1/2 teaspoon salt
  • 12 tablespoons 170 g, 1 1/2 sticks unsalted butter, melted
  • 1 1/2 cups packed light brown sugar
  • 2 large eggs room temperature
  • 2 teaspoons natural vanilla extract
  • 30 mini Hershey bars or 2-3 cups milk chocolate chips
  • 3-4 cups mini marshmallows

Method
 

Instructions
  1. Position a rack in the center of your oven. Preheat the oven to 350°F (180℃). Lightly coat a 9 by 13 baking pan with cooking spray or line with parchment paper.
  2. Whisk together the flour, graham cracker crumbs, baking powder and salt into a bowl. Set aside.
  3. In a second mixing bowl, whisk together melted butter, brown sugar, eggs, and vanilla.
  4. Add dry ingredients and mix until just combined, 5 to 10 seconds. Spread batter into prepared pan.
  5. Bake for about 22-25 minutes, or until the top is set and golden brown. Bars may appear to be not done, but they will set up as they cool.
  6. Remove the pan from the oven. Layer the top with the chocolate bars. Top with marshmallows.
  7. Turn the oven to broil and return the bars to the oven for 1 to 2 minutes or until the marshmallows are lightly toasted. Keep a close eye on them so they don’t burn! Set the pan on a wire rack and cool completely before cutting into bars.


Chocolate Espresso Muffins

Ultimate Chocolate Espresso Muffins Recipe

The rich, intoxicating aroma of freshly brewed coffee mingling with warm chocolate is a promise of pure comfort. There’s nothing quite like biting into a perfectly baked muffin, especially when it delivers a double dose of your favorite flavors. Today, we’re making the ultimate chocolate espresso muffins, a treat that’s moist, intensely chocolatey, and boasts an irresistible crunchy top. You’ll learn how to create bakery-style muffins that are perfect for any time of day.

This recipe delivers a satisfying half-bread, half-cake texture, making it substantial enough for breakfast but decadent enough for dessert. It’s an easy-to-follow guide that will quickly become a family favorite, especially for busy mornings or afternoon pick-me-ups.

Why You’ll Love This Recipe

These aren’t just any muffins; they’re a revelation. The deep, dark chocolate flavor is perfectly balanced by a subtle coffee kick, creating a sophisticated taste profile that still appeals to everyone. You’ll notice the incredible moistness from the whole milk and melted butter, ensuring every bite is tender and rich.

What truly sets these chocolate espresso muffins apart is their super crunchy topping. A generous sprinkle of coarse sugar, pecans, and chocolate chips bakes into a delightful crust, offering a wonderful textural contrast to the soft interior. This combination creates a truly bakery-style muffin experience right in your own kitchen. I’ve found that this crunchy top is what everyone raves about!

The texture is another standout feature. It’s that ideal blend of a tender crumb and a slightly denser, satisfying chew. This makes them versatile enough for a quick breakfast or a comforting afternoon snack with your favorite beverage.

Ingredients You’ll Need

Here’s a breakdown of the key ingredients that make these muffins so special:

  • All-purpose flour: The structural base for our muffins, providing the right balance for that half-bread, half-cake texture.
  • Unsweetened cocoa powder: This delivers the rich, deep chocolate flavor. For an even darker hue, you could opt for Dutch-processed cocoa.
  • Baking powder & baking soda: These leavening agents work together to give our muffins a beautiful rise and light texture.
  • Ground cinnamon (optional): A warm spice that subtly enhances the chocolate flavor without overpowering the coffee.
  • Salt: Essential for balancing the sweetness and intensifying all the other flavors.
  • Granulated sugar & light brown sugar: The combination provides sweetness and moisture. Brown sugar adds a deeper, molasses-like note and keeps the muffins extra tender.
  • Large egg: Binds the ingredients and adds richness and moisture. it’s slightly beaten for easier incorporation.
  • Whole milk: Contributes to the moistness and tender crumb.
  • Strong espresso or brewed coffee, cooled: This is where the “espresso” in our chocolate espresso muffins comes in. It deepens the chocolate flavor and adds a lovely coffee undertone.
  • Butter, melted: Adds richness and contributes to the moist, tender texture.
  • Vanilla extract: A flavor enhancer that complements both chocolate and coffee beautifully.
  • Pecans or walnuts, coarsely chopped: Provides a delightful crunch and nutty flavor throughout the muffin.
  • Dark chocolate chips or chunks: For bursts of melty chocolate in every bite, making these truly dark chocolate muffins.
  • Coarse/turbinado/demerara/brown sugar (for topping): Creates that signature crunchy, sparkling top.
  • Chopped pecans (for topping): Adds extra texture and nutty flavor to the crust.
  • Chocolate chips (for topping): Melts slightly on top, adding more chocolatey goodness and a bakery-style finish.

How to Make Chocolate Espresso Muffins

Making these delicious muffins is straightforward. Follow these steps for perfect results every time.

  1. Prepare your muffin pan: First, preheat your oven to 375℉ (190℃). Then, butter 12 standard muffin cups thoroughly or line them with paper liners. This ensures your muffins won’t stick and come out easily.
  2. Combine dry ingredients: In a large bowl, sift together the all-purpose flour and unsweetened cocoa powder. Next, add the baking powder, baking soda, optional ground cinnamon, salt, granulated sugar, and light brown sugar. Mix these dry ingredients together until they are well combined.
  3. Mix wet ingredients: In a separate, medium-sized bowl, whisk together the slightly beaten large egg, whole milk, cooled strong espresso or brewed coffee, melted butter, and vanilla extract. This creates your liquid base.
  4. Combine wet and dry: Pour the wet ingredients from the medium bowl into the large bowl containing the flour mixture. Using a wooden spoon or a rubber spatula, fold the ingredients together gently. Mix just until everything is combined; do not overmix. The batter should look quite thick and lumpy, which is exactly what we want for tender muffins.
  5. Fold in additions: Gently fold in the coarsely chopped pecans or walnuts and the dark chocolate chips or chunks. Distribute them evenly throughout the thick batter.
  6. Fill and top: Divide the muffin mixture evenly among the 12 prepared muffin cups. To make the irresistible topping, toss together the 2 tablespoons of coarse sugar, 2 tablespoons of chopped pecans, and 2 tablespoons of chocolate chips in a small bowl. Sprinkle this mixture evenly over the top of the batter in each muffin cup.
  7. Bake: Place the muffin pan into your preheated oven. Bake for 15-20 minutes, or until a toothpick inserted into the center of a muffin comes out clean. This indicates they are fully cooked through.
  8. Cool: Transfer the muffin pan to a wire rack and let the muffins cool in the pan for 10 minutes. After this initial cooling, carefully remove the muffins from the pan and let them cool completely on the wire rack.

Expert Tips and Tricks

Getting that perfect bakery-style muffin isn’t hard when you know a few secrets. Here are my top tips for these amazing chocolate espresso muffins:

  • Don’t Overmix: This is crucial for tender muffins. Overmixing develops the gluten in the flour, leading to tough, chewy muffins. Mix only until the dry ingredients are just incorporated, even if a few streaks of flour remain.
  • Thick Batter is Key: Our recipe yields a thick, lumpy batter, which is ideal. This consistency helps the muffins rise tall and creates that desirable half-bread, half-cake texture.
  • High Heat Start: For tall, domed tops, consider starting your oven at 425°F (220°C) for the first 5 minutes of baking, then reduce it to 375°F (190°C) for the remaining 10-15 minutes. The initial blast of high heat helps the muffins rise quickly before setting.
  • Cool Coffee/Espresso: Make sure your brewed coffee or espresso is cooled before adding it to the wet ingredients. Hot liquid could start to cook the egg or melt the butter prematurely.
  • Room Temperature Ingredients: Eggs and milk at room temperature mix more evenly into the batter, creating a smoother emulsion and a more consistent texture in your finished muffins.
  • The Power of the Topping: Don’t skip the coarse sugar topping! It’s responsible for that delightful crunch and sparkle, truly elevating these to bakery-style muffins.

Recipe Variations and Substitutions

This recipe for chocolate espresso muffins is fantastic as is, but it’s also wonderfully adaptable. Here are some ideas to make them your own:

  • Nut-Free Version: If you have nut allergies or simply prefer no nuts, feel free to omit the pecans or walnuts entirely. You can increase the chocolate chips slightly or add a different crunchy element like toasted coconut flakes to the topping.
  • Mocha Muffins: To lean more into a mocha flavor, you could reduce the cocoa powder by ¼ cup and increase the chocolate chips slightly. Alternatively, add a touch more espresso powder if you like a stronger coffee kick.
  • Espresso Powder Muffins: If you don’t have brewed espresso or coffee, you can use instant espresso powder. Dissolve 1-2 tablespoons of espresso powder in the milk before adding it to the wet ingredients. This gives a concentrated coffee flavor.
  • Dairy Alternatives: For a dairy-free option, use unsweetened almond or soy milk and a plant-based butter alternative. your chocolate chips are also dairy-free.
  • Different Chocolate: Experiment with white chocolate chips for a different flavor contrast, or use milk chocolate chips if you prefer a sweeter muffin. Chocolate chunks provide a more intense burst of melted chocolate.

Serving and Pairing Suggestions

These chocolate espresso muffins are incredibly versatile and can be enjoyed in many ways. For a simple breakfast, serve them warm with a cup of strong coffee or a frothy latte. The coffee notes in the muffin will perfectly complement your morning brew.

They also make an excellent afternoon snack alongside a glass of cold milk or a soothing cup of tea. For a more indulgent treat, consider warming them slightly and serving with a dollop of whipped cream or a scoop of vanilla bean ice cream. The crunchy topping holds up beautifully, adding textural interest.

These muffins are also perfect for school lunchboxes (if nuts are allowed) or as a grab-and-go snack for busy professionals. They travel well and maintain their delicious flavor and texture for days. Consider them for your next brunch spread, perhaps alongside fresh fruit and a yogurt parfait.

Frequently Asked Questions

Q1: How do I get tall, domed chocolate espresso muffins?

To achieve tall, domed tops, start baking your muffins at a higher temperature (425℉/220℃) for the first 5 minutes. Then, reduce the oven temperature to 375℉/190℃ for the remaining bake time. Also, you don’t overmix the batter; a thick, lumpy batter helps with a good rise.

Q2: Can I make these chocolate espresso muffins ahead of time?

Yes, you can! The baked muffins can be stored in an airtight container at room temperature for up to 2 days. For longer storage, freeze them in a freezer-safe bag or container for up to 2 months. Thaw them overnight in the fridge or at room temperature.

Q3: What are some substitutions for ingredients in chocolate espresso muffins?

You can substitute the pecans/walnuts with other chopped nuts or omit them entirely. If you don’t have brewed espresso, strong brewed coffee works perfectly. For the topping, any coarse sugar will do, and you can swap the type of chocolate chips inside or on top.

Q4: How long do chocolate espresso muffins stay fresh?

These muffins stay fresh for about 2 days when stored in an airtight container at room temperature. If you need them to last longer, freezing is a great option, where they’ll keep for up to 2 months. Always they are completely cooled before storing to prevent sogginess.

Q5: Can I use instant coffee instead of espresso in chocolate espresso muffins?

Absolutely! If you don’t have brewed espresso or coffee, you can use instant coffee or espresso powder. Simply dissolve 1-2 tablespoons of instant coffee granules or espresso powder in the ¾ cup of whole milk before adding it to your wet ingredients. This will give you a delicious coffee-flavored muffin.

Conclusion

These chocolate espresso muffins truly deliver on flavor, texture, and that coveted bakery-style appeal. The combination of rich chocolate, subtle coffee, and a delightful crunchy topping makes them an instant classic in any home. I’ve found that this recipe is a consistent crowd-pleaser, perfect for both quick breakfasts and indulgent afternoon breaks.

Give this recipe a try and share your results! You’ll love having these moist, flavorful muffins on hand. For more delicious baked goods, check out my recipes for classic chocolate chip cookies, banana bread, or a simple coffee cake.

Chocolate Espresso Muffins

Moist, flavorful, and very chocolatey muffins with a super crunchy top and a half-bread/half-cake texture, perfect for a morning or afternoon snack.
Prep Time 15 minutes
Cook Time 15 minutes
Total Time 30 minutes
Servings: 12 standard
Cuisine: American

Ingredients
  

  • 1 ½ cups all-purpose flour
  • ½ cup unsweetened cocoa powder
  • ½ teaspoon baking powder
  • 1 teaspoon baking soda
  • ½ teaspoon ground cinnamon optional
  • ¼ teaspoon salt
  • ½ cup granulated sugar
  • ½ cup light brown sugar
  • 1 large egg slightly beaten
  • ¾ cup whole milk
  • ¼ cup strong espresso or brewed coffee cooled
  • ½ cup 1 stick butter, melted
  • 1 teaspoon vanilla extract
  • ½ cup pecans or walnuts coarsely chopped
  • ½ cup dark chocolate chips or chunks
  • 2 tablespoons coarse/turbinado/demerara/brown sugar for topping
  • 2 tablespoons chopped pecans for topping
  • 2 tablespoons chocolate chips for topping

Method
 

Instructions
  1. Preheat oven to 375℉/190℃. Butter 12 muffin cups or line them with liner papers.
  2. In a large bowl, sift together flour and cocoa powder. Add baking powder, baking soda, cinnamon, salt, and sugars and mix to combine.
  3. In a medium bowl, mix together egg, milk, coffee, melted butter, and vanilla extract. Pour the wet ingredients into the flour mixture and fold with a wooden spoon or rubber spatula just until combined. Do not overmix. The batter should be quite thick and lumpy.
  4. Fold in nuts and chocolate chips.
  5. Divide the mixture evenly between the muffin cups. Make the topping by tossing together sugar, pecans, and chocolate chips in a small bowl, then sprinkle evenly on top of the batter.
  6. Bake for 15-20 minutes, or until a toothpick inserted into the center of the muffins comes out clean.
  7. Transfer pan to a wire rack and let cool for 10 minutes, then remove muffins from pan and let cool completely.