
Classic French Vanilla Ice Cream Recipe
Vanilla ice cream is often underestimated, but a truly great one is a revelation. It’s the ultimate blank canvas, a creamy, sweet comfort that stands perfectly on its own. This classic french vanilla ice cream recipe takes simple ingredients and transforms them into a rich, decadent dessert. You’ll learn to craft a luscious, smooth ice cream with a distinct golden hue and deep vanilla flavor, perfect for any occasion.
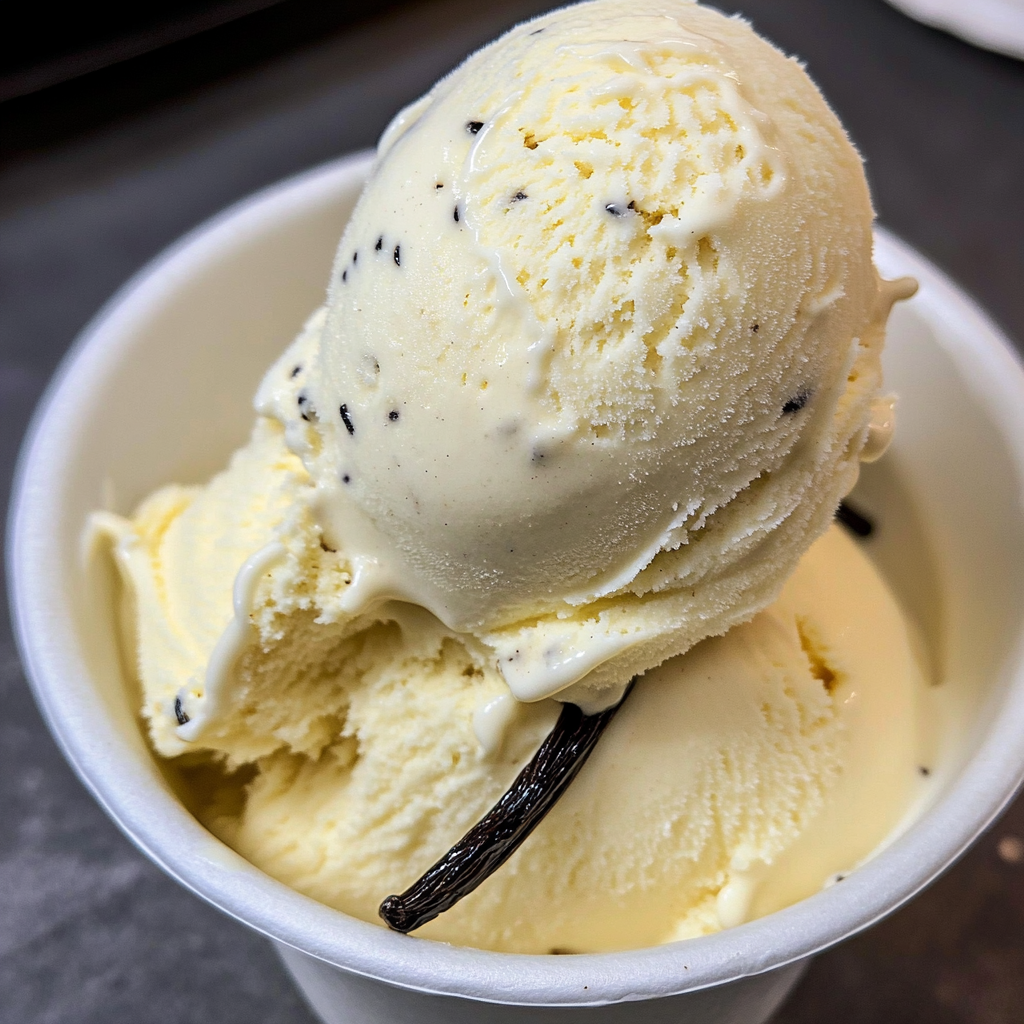
This isn’t just any vanilla ice cream; it’s a celebration of texture and taste. The traditional egg yolk custard base makes all the difference, creating an unparalleled richness that store-bought versions simply can’t match. You’ll be amazed at how easy it is to achieve such a luxurious treat right in your own kitchen.
Why You’ll Love This Recipe
Making homemade ice cream offers a level of freshness and flavor you won’t find anywhere else. This recipe delivers an incredibly creamy texture that melts slowly on your tongue, releasing waves of pure vanilla. The distinct golden color signals the richness of the egg yolks, promising a truly indulgent experience.
There’s a special satisfaction in creating something so delicious from scratch. You control the quality of every ingredient, ensuring a wholesome dessert for your family. This french vanilla ice cream is versatile enough to be served plain or as the perfect accompaniment to almost any other sweet treat. It’s a simple pleasure that truly shines.
Ingredients You’ll Need
Here’s a look at the essential ingredients that make this ice cream so special:
- Whole Milk & Heavy Cream: These dairy powerhouses provide the essential fat content for a rich, smooth, and utterly creamy ice cream texture. Don’t skimp on the fat here!
- Vanilla Bean or Vanilla Extract: A vanilla bean offers those beautiful flecks and an intense, complex vanilla flavor. If using extract, opt for a good quality one to a pure taste. You can also use
vanilla bean pastefor a similar visual and flavor impact. - Salt: Just a pinch balances the sweetness and brings out the full depth of the vanilla.
- Large Egg Yolks: These are the heart of
french vanilla ice cream, creating the classic custard base that gives it its signature richness, pale yellow color, and silky mouthfeel. - Granulated Sugar: Provides sweetness and contributes to the smooth texture of the finished ice cream, preventing it from becoming too icy.
How to Make French Vanilla Ice Cream
Creating this french vanilla ice cream is a rewarding process. Follow these steps carefully for the best results.
1. Prepare Your Equipment
- Freeze the
ice cream makerbowl for at least 24 hours, or until it is completely solid. This crucial step ensures your ice cream churns properly.
2. Infuse the Vanilla
- Pour the whole milk and heavy cream into a medium saucepan. Carefully cut a vanilla bean lengthwise down the middle and use the back of your knife to scrape out the tiny, fragrant seeds. Add both the seeds and the scraped bean pod to the milk mixture, along with a small pinch of salt.
- Bring this mixture to a gentle simmer over medium heat, watching for small bubbles around the edges (this usually takes about 10 minutes). Remove the pan from the heat, cover it tightly, and let it stand for 20 to 30 minutes. This allows the vanilla to infuse deeply into the cream.
3. Create the Custard Base
- In a separate mixing bowl, whisk together the egg yolks and granulated sugar. Continue whisking until the mixture becomes smooth, light pale yellow in color, and noticeably airy. This aeration is key for a light custard.
4. Temper the Eggs
- Reheat the vanilla-infused milk and cream mixture until it’s just steamy again. Using a ladle, slowly and gradually pour about 1/2 cup of the hot milk mixture into the whisked egg and sugar mixture. Whisk constantly as you pour; this process, called
tempering eggs, gently raises the temperature of the yolks without scrambling them. After adding a couple of ladles and feeling the egg mixture warm up, add the remaining hot milk mixture to the bowl and mix everything very well.
5. Cook the Custard
- Pour the tempered mixture back into the saucepan. Cook over low heat, stirring constantly with a rubber spatula, until the mixture begins to thicken. It should coat the back of a spoon, and an instant-read thermometer should read 170-175°F. Do not let it boil, or the eggs will curdle.
6. Strain and Chill
- Pour the thickened custard through a fine-mesh strainer into a clean mixing bowl. This step removes any tiny cooked egg pieces and the vanilla bean pod, ensuring a perfectly smooth base.
- Let the mixture cool on the counter for 30-40 minutes. Then, cover the bowl with plastic wrap, pressing it directly onto the surface of the custard to prevent a skin from forming. Refrigerate the mixture for at least 2 hours, or until it is completely cold. I’ve found chilling it overnight yields the best results.
7. Churn and Freeze
- Once the base is thoroughly chilled, churn the ice cream according to your
ice cream maker’s manufacturer’s instructions. Churn until it’s thick and has the consistency of soft-serve ice cream. - Transfer the freshly churned ice cream to an airtight container. Freeze it overnight before serving to allow it to firm up to a scoopable consistency.
Expert Tips and Tricks
Making homemade ice cream is a joy, and these tips will help you achieve perfection every time.
- Chill Thoroughly: The colder your ice cream base is before churning, the smoother and creamier your final product will be. Don’t rush the refrigeration step; overnight is ideal.
- Use a Thermometer: A good instant-read thermometer is your best friend when cooking the custard. Hitting that 170-175°F sweet spot ensures safety and proper thickening without overcooking the eggs.
- Strain for Smoothness: Don’t skip straining the custard. It removes any potential cooked bits of egg or vanilla bean debris, guaranteeing a silky-smooth texture.
- Plastic Wrap Contact: Pressing plastic wrap directly onto the surface of the custard while it chills prevents a “skin” from forming, keeping your base perfectly smooth.
- Quality Vanilla Matters: Since vanilla is the star here, invest in a good quality vanilla bean or extract. It truly makes a difference in the depth of flavor. If you’re using
vanilla bean paste, it’s a reputable brand. - Airtight Storage: Store your finished
french vanilla ice creamin an airtight container with a piece of parchment or wax paper pressed against the surface. This minimizes ice crystal formation and freezer burn.
Recipe Variations and Substitutions
This french vanilla ice cream recipe is wonderful as is, but it’s also a fantastic base for creativity. You can easily adapt it to suit different tastes or dietary needs (within reason for a custard base).
If you don’t have a vanilla bean, you can substitute 1 teaspoon of good quality vanilla extract or 2 teaspoons of vanilla bean paste in step 2. Add the extract or paste after cooking the custard in step 6, before chilling, to preserve its delicate flavor. For a dairy-free alternative, unfortunately, this recipe relies heavily on dairy and egg yolks for its classic texture, so substitutions here are not recommended. However, you can find many excellent no-churn dairy-free ice cream recipes online if that’s what you need.
For a fun twist, consider adding mix-ins during the last few minutes of churning. Think mini chocolate chips, chopped cookies, or a swirl of caramel sauce. These additions can make the ice cream even more appealing to kids. You could also infuse other flavors into the milk mixture, like a cinnamon stick or a few cardamom pods, for an aromatic variation.
Serving and Pairing Suggestions
This french vanilla ice cream is incredibly versatile and pairs beautifully with a wide array of desserts. Its rich, creamy texture and sweet vanilla flavor complement almost anything.
Serve a scoop alongside a warm apple pie, a fudgy brownie, or a fresh berry crumble. It’s also fantastic in a classic root beer float or as the base for a thick milkshake. For a simple yet elegant presentation, I often top a scoop with fresh berries and a drizzle of homemade chocolate sauce. In testing, I found that the pure vanilla flavor truly shines when paired with something tart, like raspberries, or something rich, like a dark chocolate ganache.
Frequently Asked Questions
Frequently Asked Questions
Q1: What makes French Vanilla Ice Cream different from regular vanilla?
French vanilla ice cream is distinguished by its use of an egg yolk custard base. This gives it a richer, creamier texture and a pale yellow color, compared to regular vanilla ice cream, which typically uses a simpler milk and cream base without egg yolks. The custard base provides a more decadent mouthfeel.
Q2: Can I make French Vanilla Ice Cream without an ice cream maker?
Unfortunately, this specific french vanilla ice cream recipe, with its custard base, is designed for an ice cream maker. The churning process is essential for incorporating air and preventing large ice crystals, resulting in a smooth, creamy texture. Without an ice cream maker, the result would likely be icy.
Q3: How long does homemade French Vanilla Ice Cream last in the freezer?
When stored properly in an airtight container with plastic wrap pressed directly onto the surface, homemade ice cream will last for about 1-2 weeks in the freezer for optimal quality. Beyond that, it might start to develop ice crystals and lose some of its creamy texture.
Q4: What are common substitutions for vanilla bean in French Vanilla Ice Cream?
If you don’t have a vanilla bean, the most common substitutions are vanilla extract or vanilla bean paste. For this recipe, you can use 1 teaspoon of high-quality vanilla extract or 2 teaspoons of vanilla bean paste instead of one vanilla bean. Add these after cooking the custard to preserve their flavor.
Q5: Why is tempering eggs important when making French Vanilla Ice Cream?
Tempering eggs is crucial to prevent the egg yolks from scrambling when hot liquid is added. By slowly whisking a small amount of hot milk mixture into the egg yolks first, you gradually raise their temperature. This allows the eggs to be safely incorporated into the hot custard base without cooking into lumps.
Conclusion
Crafting your own french vanilla ice cream is a culinary experience that truly pays off. The rich egg yolk custard base and deep vanilla flavor create a dessert that’s far superior to anything you can buy. Follow these steps, and you’ll be rewarded with a creamy, dreamy treat your whole family will adore.
I encourage you to give this recipe a try and share your results! There’s nothing quite like the taste of homemade ice cream. If you enjoyed this, you might also like exploring other custard-based desserts, creamy fruit ice creams, or even a simple chocolate ice cream recipe.
French Vanilla Ice Cream
Ingredients
Method
- Freeze the ice cream bowl for at least 24 hours or until solid.
- Pour the milk and heavy cream into a saucepan. Cut a vanilla bean lengthwise and scrape the seeds. Put the seeds and the bean to the milk mixture, together with a pinch of salt.
- Bring the mixture to a simmer over medium heat (about 10 minutes). Remove from heat, cover, and let stand for 20 to 30 minutes to infuse the vanilla.
- In a mixing bowl, whisk together the egg yolks and sugar until smooth, pale yellow in color, and airy.
- Reheat the milk/cream mixture until just steamy. Using a ladle, slowly and gradually pour about 1/2 cup of the hot milk mixture into the egg/sugar mixture, while constantly whisking the egg yolks. After adding a couple of ladles and the eggs are warmed up, add the rest of the milk mixture to the bowl and mix very well.
- Pour the tempered mixture back into the saucepan and cook over low heat, stirring constantly, until the mixture starts to thicken and the internal temperature reaches 170-175°F, or until it coats the back of a spoon.
- Pour the mixture through a fine-mesh strainer into a clean mixing bowl to remove any cooked egg pieces and the vanilla bean.
- Let the mixture cool on the counter for 30-40 minutes. Then cover with plastic wrap, pressing it directly onto the surface, and refrigerate for at least 2 hours or until completely cold.
- Churn the ice cream according to the manufacturer’s instructions until it is thick and the consistency of soft-serve ice cream.
- Transfer the ice cream to an airtight container and freeze overnight before serving.